
Abstract
Partial nephrectomy (PN) is the preferred surgical treatment for T1 renal tumors whenever technically feasible. When properly performed, it allows preservation of nephron mass without compromising oncologic outcomes. This reduces the postoperative risk of renal insufficiency, which translates into better overall survival for the patients. PN can be technically challenging, because it requires the surgeon to complete the tasks of tumor excision, hemostasis and renorrhaphy, all within an ischemic time of preferably below 30 minutes. The surgeon needs to avoid violating the tumor margins while leaving behind the maximal parenchymal volume at the same time. Variations such as zero ischemia, early unclamping, and selective clamping have been developed in an attempt to reduce the negative impact of renal ischemia, but inevitably add to the steep learning curves for any surgeon. Being able to appreciate the fine details of each surgical step in PN is the fundamental basis to the success of this surgery. The use of the robotic assistance allows a good combination of the minimally invasive nature of laparoscopic surgery and the surgical exposure and dexterity of open surgery. It also allows the use of adjuncts such as concurrent ultrasound assessment of the renal mass and intraoperative fluorescence to aid the identification of tumor margins, all with a simple hand switch at the console. Robot-assisted laparoscopic PN is now the most commonly performed type of PN in the United States and is gaining acceptance on the global scale. In this video, we illustrate the steps of robot-assisted laparoscopic PN and highlight the technical key points for success.
Indications
Robotic partial nephrectomy (PN) is an acceptable option for the vast majority of T1a renal tumors. For T1b renal tumors, PN is possible in patients with exophytic and polar masses. 1,2 The patient's renal function, solitary kidney status, comorbidities such as hypertension, type 2 diabetes, cardiac and pulmonary conditions, body habitus, and other factors should be considered when deciding between partial and radical nephrectomy and between open and minimally invasive approach. 3,4 Compared to pure laparoscopy, robotic assistance does increase the number of patients that can be treated via the minimally invasive approach, although it is also dependent upon the surgeon's expertise and experience.
Early in a surgeon's experience, small exophytic and polar masses should be considered for the robotic approach. However, as the surgeon's experience grows, virtually all renal masses amenable to a PN can be treated via the robotic approach. Contraindications for the robotic or laparoscopic approach include multiple previous abdominal surgeries with extensive adhesions, active intra-abdominal infections, uncontrolled bleeding diathesis, and severe pulmonary disease that precludes pneumoperitoneum with carbon dioxide. 5
A high-quality contrast-enhanced CT scan, preferably triphasic, is ideal before a PN. The following details must be observed for surgical planning: 1. Nephrometry score, especially the location of the mass and its proximity to the hilar vessels. 2. Vascular anatomy such as the presence of multiple renal arteries and veins, early renal arterial bifurcations, and variants of the renal hilar vasculature. 3. Amount of perinephric fat and the presence (or absence) of perinephric stranding. 4. Presence (or absence) of other renal masses in both the ipsilateral and contralateral kidneys. 5. Proximity of the ureter to the renal tumors, especially for lower pole masses. 6. Renal anomalies such as pelvic kidneys and horseshoe kidneys.
Preoperative Preparation
A thorough review of patient's comorbidities and optimization of these conditions is essential for general anesthesia. Management of anticoagulants is important and is dependent on the indication for anticoagulant therapy. Cardiology clearance is required for patients with heart disease; those who need to remain on anticoagulants such as warfarin should be switched to heparin or enoxaparin preoperatively. Low-dose aspirin therapy may be continued during the perioperative period. A formal bowel preparation is not required.
Patient Positioning
The urethral catheter is placed before the patient positioning. The patient is positioned in the lateral decubitus position with the ipsilateral side up. We secure the patient in a 45-degree lateral decubitus position with adequate paddings at all bony prominences. The contralateral leg is partially flexed and the ipsilateral leg is kept extended, with pillows between them. The ipsilateral arm is strapped to the side of the patient with adequate paddings in order not to be an interference with the cephalad robotic arm. Minimal flexion off the bed may be used, but is not essential in all patients. We use a beanbag under the patient and straps and tape to help secure the patient in position. An axillary roll may be required and adequate support for the neck and head is essential. The 45-degree lateral decubitus position allows the patient to be in a supine or at a fully lateral position by rotating the table.
Surgical Steps
Skin preparation
The hair is trimmed just before the skin is prepped. Chlorhexidine is used for preparation of the skin before surgery, after which drapes are used to isolate the operative field.
Preoperative ureteral catheter placement
In about 10% of the patients with large masses close to the hilum or in patients with renal anomalies, a ureteral catheter should be placed in a retrograde manner just before putting the patient in the lateral decubitus position. This can be done with the patient in the supine position using a flexible cystoscope without fluoroscopy. A 5F open-ended ureteral catheter is inserted over a hydrophilic guidewire. After removal of the cystoscope, a Foley catheter is inserted per urethra, and the ureteral catheter is attached to the Foley catheter with 2-0 silk. This can be used during surgery to irrigate the collecting system with diluted methylene blue or indigo carmine to facilitate identification and closure of violation of the collecting system. The open-ended ureteral catheter will be removed at the end of surgery.
Postoperative double pigtail indwelling ureteral catheters are not recommended since they can cause obstruction of the ureter, especially if there is bleeding into the collecting system.
Establishment of pneumoperitoneum
We typically use the Veress needle for abdominal insufflation. In the vast majority of patients, insufflation can be obtained at the level of the umbilicus after the table is rotated so the patient is in an almost supine position. Once pneumoperitoneum is established, the first trocar can be inserted at the umbilicus under vision using a 0-degree 10 mm laparoscope. In experienced hands and in patients without risks of intra-abdominal adhesions, the first trocar can be inserted without laparoscopic guidance. In morbidly obese patients, the point of insufflation has to be lateral to the umbilicus, where the first trocar will be inserted. Midline trocars in morbidly obese individuals should be avoided since there will be significant interference with bowels at this location.
The sites of the other trocars are based on patient's body habitus, location of the renal hilum and location of the renal mass. Individualization of the trocar sites for each patient allows optimal robotic arm positions and prevents interference between robotic arms. It also allows optimal access to the renal hilum and the renal mass by both the robotic surgeon as well as the assistant surgeon. We typically use two trocars for the assistant, one being a 12 mm trocar for insertion of 10 mm Hem-o-lok clip applicator and the other being a 5 mm trocar for the suction irrigator. Having two trocars for the assistant also helps in situations when one of them becomes inoperable due to inadequate access or inappropriate angles of approach to the operative site. We typically use the fourth arm of the robot in all patients as it helps greatly in retraction and allows for less reliance on the assistant.
Once the trocars are inserted, the patient is rotated to the full lateral position and the da Vinci surgical system is docked to the trocars. The angle of approach of the da Vinci surgical system will depend upon the renal mass location and the configuration of the trocars. Typically, it comes over the patient's shoulder in a cephalad direction for upper pole tumors and less obliquely for inter and lower pole tumors. The trocar configuration also changes slightly, depending on the location of the renal masses.
Retroperitoneal approach
This module will focus on the transperitoneal approach, which can be used for almost all renal masses. For posterior and posteromedial tumors, however, this would require complete medial flipping of the kidney to access the renal mass. This extensive renal mobilization can be avoided by using the retroperitoneal approach. The retroperitoneal approach will be discussed in a separate module, but knowledge and experience of both approaches allow for the choice of the optimal one, depending on the location of the renal mass and the patient. The retroperitoneal approach is also useful for patients with extensive abdominal surgeries.
Mobilization of the bowel on the left side
After lysis of any adhesions that may be seen, the peritoneum along the line of Toldt should be incised in preparation for mobilization of the left colon. This mobilization should extend from the splenic flexure to the sigmoid colon. A plane should be developed between the Gerota's fascia and the mesocolon. Development of this plane is crucial to access the renal hilar vessels. This is performed with blunt and sharp dissection ensuring that the Gerota's fascia remains intact. The spleen can also be mobilized at this stage of the operation, especially for upper pole renal masses. The splenorenal and splenocolic attachments are released and the spleen is entirely mobilized for upper pole renal masses. As the dissection proceeds medially, the plane between the pancreas and the Gerota's fascia should be developed without injury to the tail of the pancreas. The splenic vein can be visualized at this stage and must be safeguarded. Inferiorly, the gonadal vein can be visualized just deep to this Gerota's fascial layer. Once this is identified, dissection should be carried out just lateral to the gonadal vein and followed up to the renal vein. A plane should be developed just lateral to the gonadal vein to access the psoas muscle posteriorly. The fourth arm can be used at this stage to retract the lower pole of the kidney anteriorly and laterally to visualize the renal hilar vessels and provide lateral traction.
Mobilization of the bowel on the right side
For right-sided renal masses, the mobilization of bowel to access the renal hilum is similar to that of the left side, as described above (Figs. 1 and 2). Colonic mobilization is not extensive since the right colon is typically not anterior to the kidney. Finding the correct plane of dissection and access to the right renal hilum can be facilitated by first incising the hepatorenal peritoneal reflection to visualize the inferior vena cava medially. The duodenum must be recognized safeguarded and mobilized if required to visualize the inferior vena cava. With a top–down approach, the right renal vein can be identified by dissecting along the inferior vena cava inferiorly starting just below the liver.
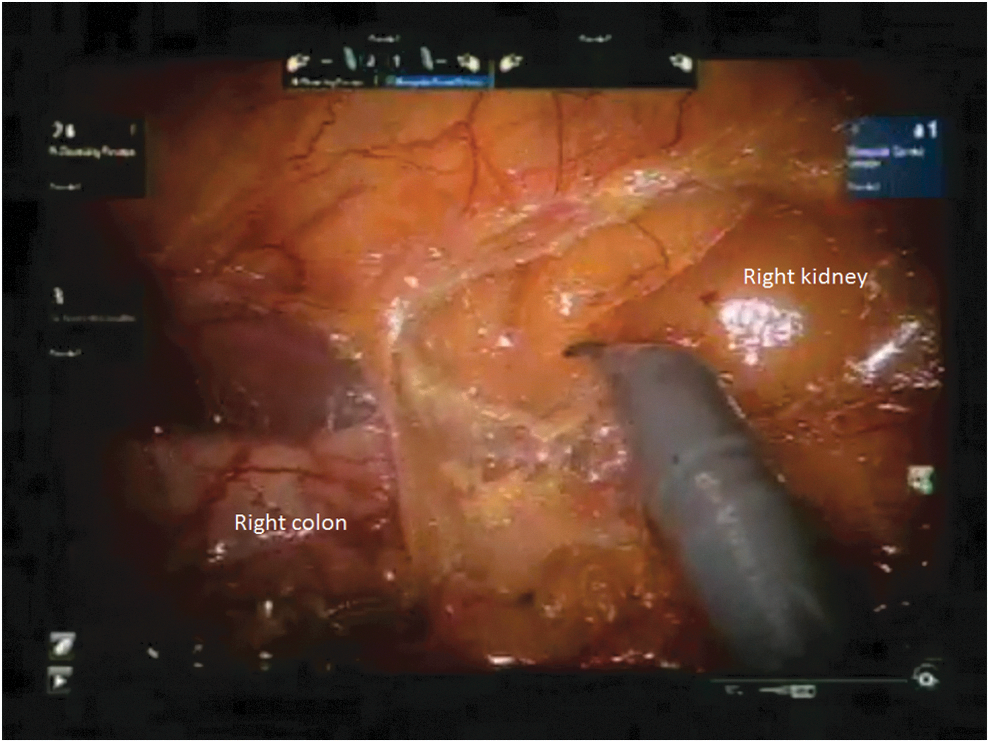
The right is mobilized to expose the retroperitoneum before hilar dissection of the right kidney.

A plane is developed lateral to the right gonadal vein and the psoas muscle comes into view.
Dissection of the renal hilar vessels
We use the robotic PK dissecting forceps (Intuitive Surgical Inc., Sunnyvale, CA) in the left hand and the curved monopolar shears in the right hand during hilar dissection. After the renal vein is visualized and mobilized adequately, a vessel loop can be used to isolate the renal vein and to help with its retraction later on. The use of vessel loops also helps with access to the renal vessels during PN before and after clamping for vascular control.
The renal artery is identified posterior to the renal vein (Fig. 3). In most patients, this can be done by dissection inferior to the renal vein; however, at times the renal artery is more superiorly placed, and will have to be accessed above the renal vein. Adequate mobilization of the renal vein often assists with identification and isolation of the renal artery. It is essential to dissect the renal artery proximally close to its origin from the aorta so that early branches are not missed. Careful review of the vascular anatomy and a CT scan would also assist in identifying early bifurcations as well as accessory renal arteries. CT scans may occasionally miss an accessory renal artery; adequate dissection around the hilum is therefore important. The renal artery is also isolated with vessel loop for the reasons discussed above (Fig. 4). During isolation and dissection of the renal artery, it is essential not to traumatize the renal artery to prevent arterial spasm. Excessive manipulation and traction of renal artery can also cause intimal injuries and obstruction to vascular flow.
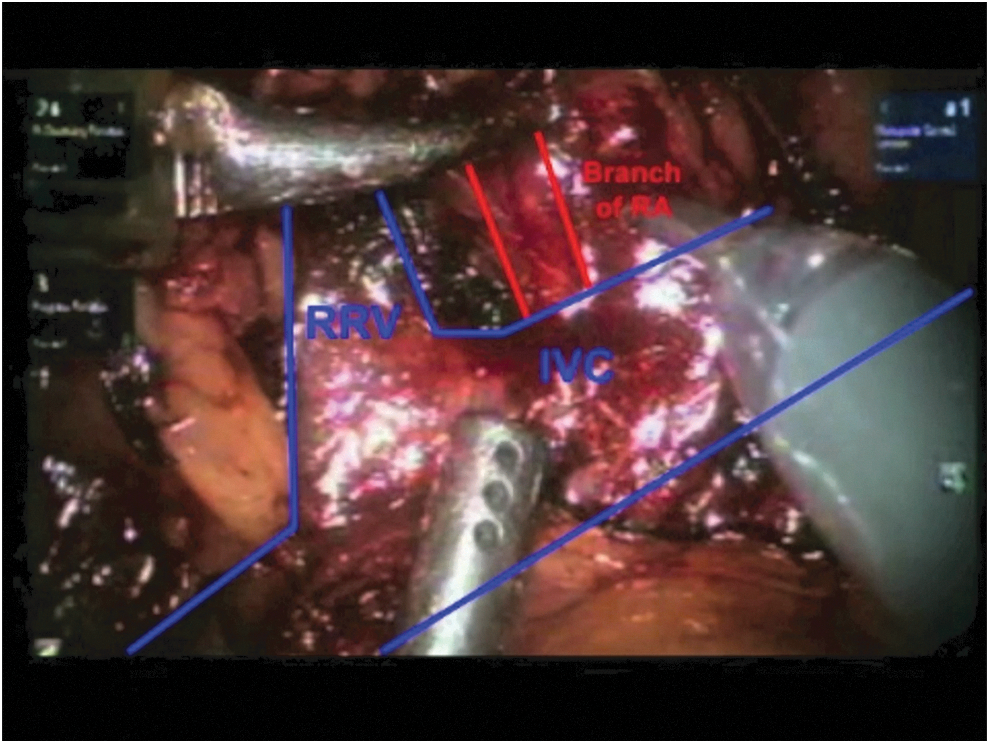
Hilar vasculature of right kidney at the end of hilar dissection. IVC = inferior vena cava; RA = renal artery; RRV = right renal vein.
Isolation of the right renal artery and vein with vessel loops.
Renal mobilization and exposure of the renal mass
Depending on its location, mobilization of the kidney may be required. Posterior renal masses will require complete mobilization and medial rotation of the kidney to expose the entire renal mass. It is essential to expose all the intended margins of the renal mass in PN. Time spent during extensive exposure of the renal mass and renal mobilization will count toward a trouble-free PN. The Gerota's fascia should be incised at a location away from the renal mass. If the entire kidney needs to be mobilized for a lateral or posterior renal mass, we incise the Gerota's fascia vertically in an anterolateral location. The perinephric fat is then incised and separated to reach the renal parenchymal cortical surface. The plane between the renal cortex and the perinephric fat is then developed around the renal mass. For small renal masses, the perinephric fat is easily dislodged. However, for larger renal masses, we leave the perinephric fat overlying the mass intact. This helps with reducing the incidence of capsular injury around the renal mass and also assists with the handling of the mass during excision without unnecessary violation of the mass. The renal cortex around the entire renal mass should be cleared of all perinephric fat (Fig. 5). If the renal mass location is not readily visible, ultrasonography of the renal mass should be performed before incising the Gerota's fascia.
Tumor and its surrounding parenchyma have been cleared of perinephric fats before clamping.
Ultrasonography of the renal mass
Laparoscopic ultrasound probes designed for robotic surgery are preferable for scanning of the mass. The BK Medical ultrasound probe (BK Ultrasound, Peabody, MA) and the Aloka ultrasound probe (Hitachi Aloka Medical America, Wallingford, CT) are both acceptable instruments for proper ultrasonography. It is essential that a thorough ultrasonography of the mass be performed to delineate the margins (Fig. 6). We perform ultrasonography in two dimensions to determine the margins. The margin is then marked with monopolar cautery on the renal capsule about 5 mm from the margin of the mass. This is done circumferentially to develop an accurate margin (Fig. 7). The TilePro feature of the da Vinci surgical system should be used so that both the laparoscopic and the ultrasound views can be seen by the surgeon at the console. Color flow Doppler can also be used to determine any large blood vessels in the vicinity of the renal mass. The ProGrasp instrument is used to handle the ultrasound probe. The ProGrasp may be held by either the right or left robotic arm to obtain an optimal angle for thorough ultrasound examination.
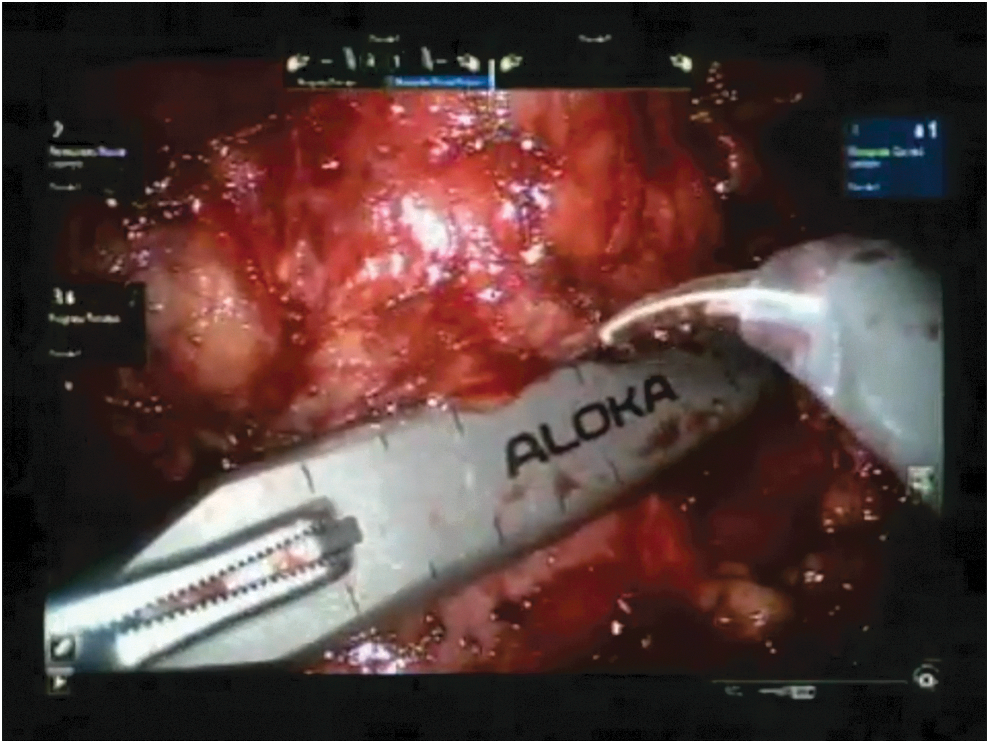
Laparoscopic ultrasound for real-time confirmation of tumor extent.
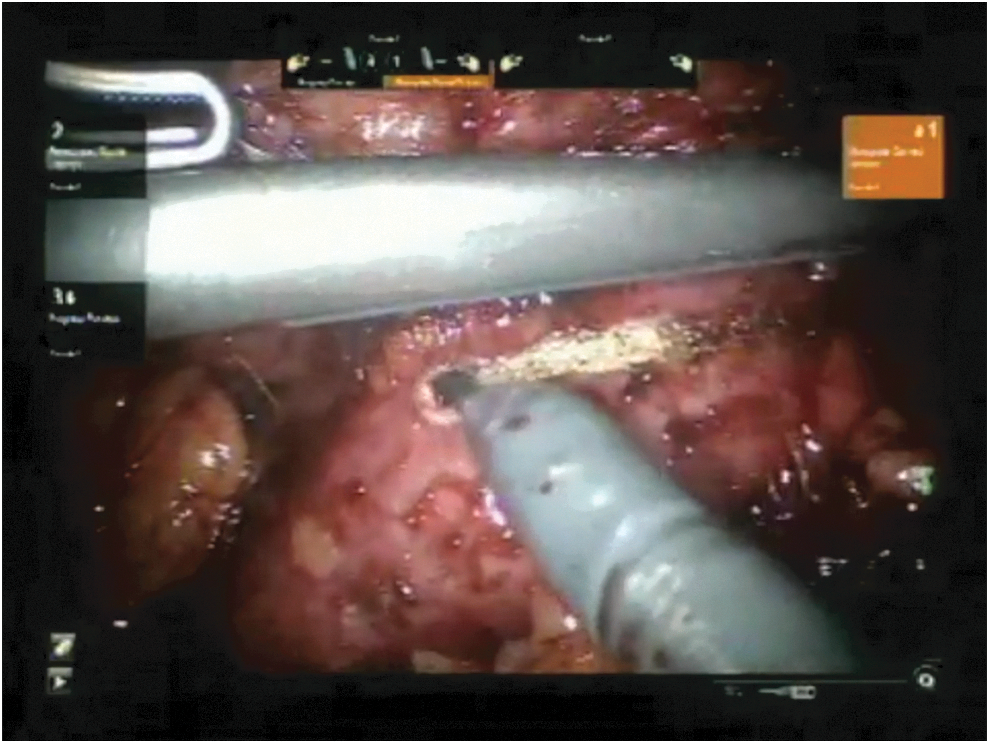
Using diathermy to mark out intended plane of excision around tumor.
Vascular control
Before the vascular bulldog clamps are applied, we ensure that the sutures that are used for renorrhaphy are placed within the abdomen. We use 2-0 barbed absorbable sutures on a 26 or 36 mm half circle needle for this purpose. Smaller needles and sutures can also be used depending on surgeon's preference.
If the kidney needs to be mobilized extensively, a lap sponge can be inserted into the abdomen to help keep the kidney in a rotated position to assist with access to the renal mass. Before the vascular bulldog clamps are applied, it is essential that the surgical assistant is able to access the renal mass adequately through the assistant trocar sites.
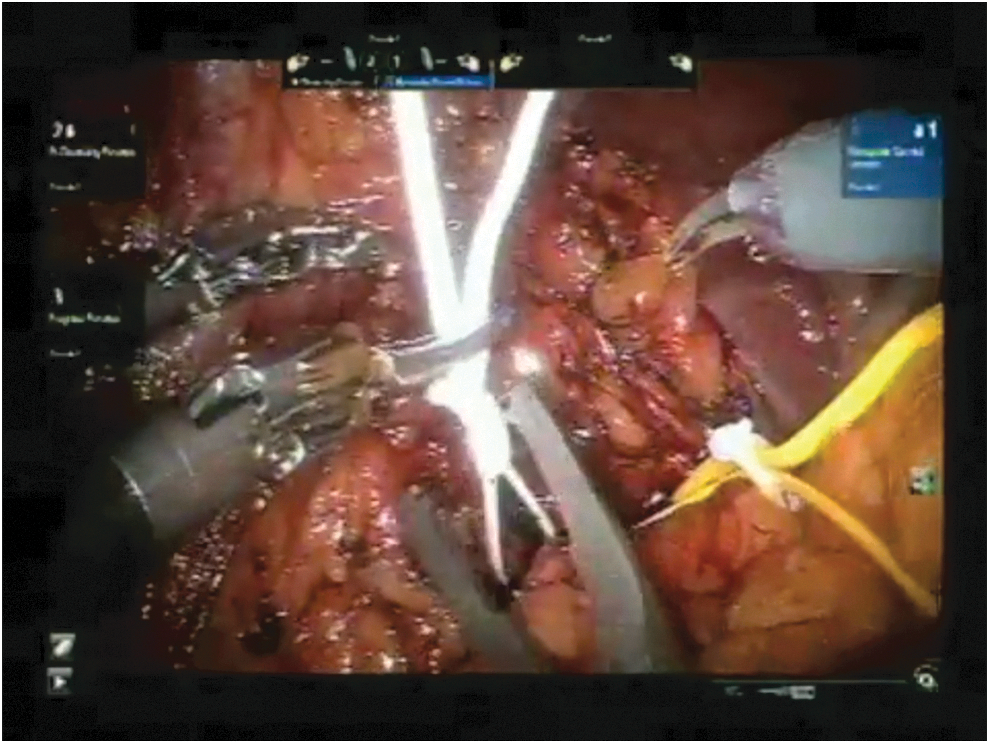
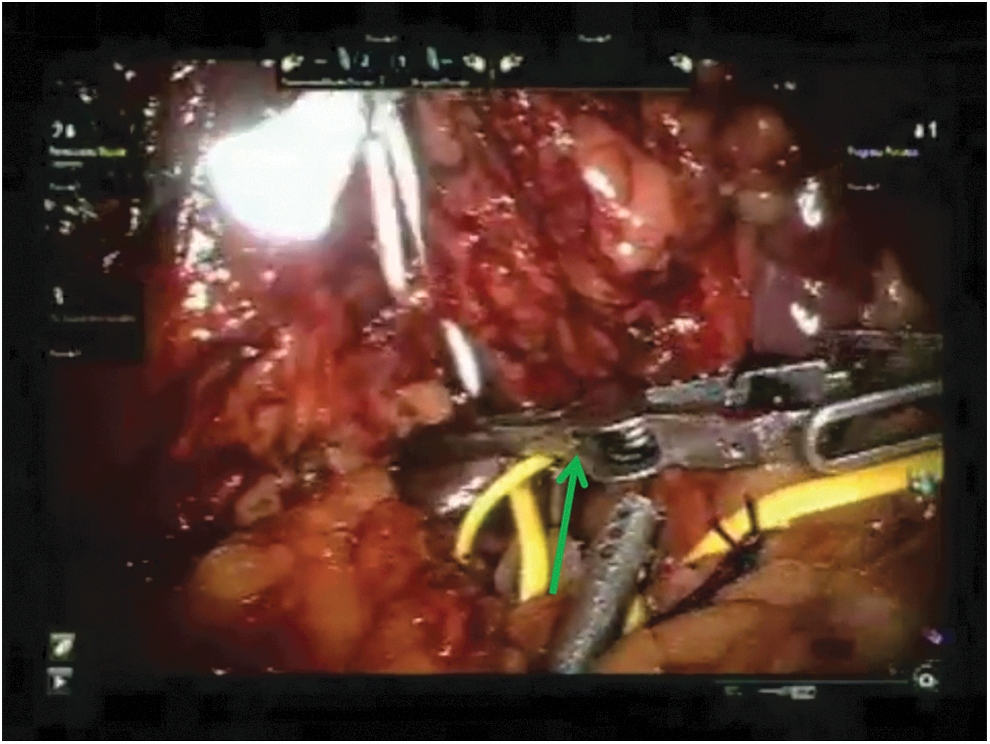
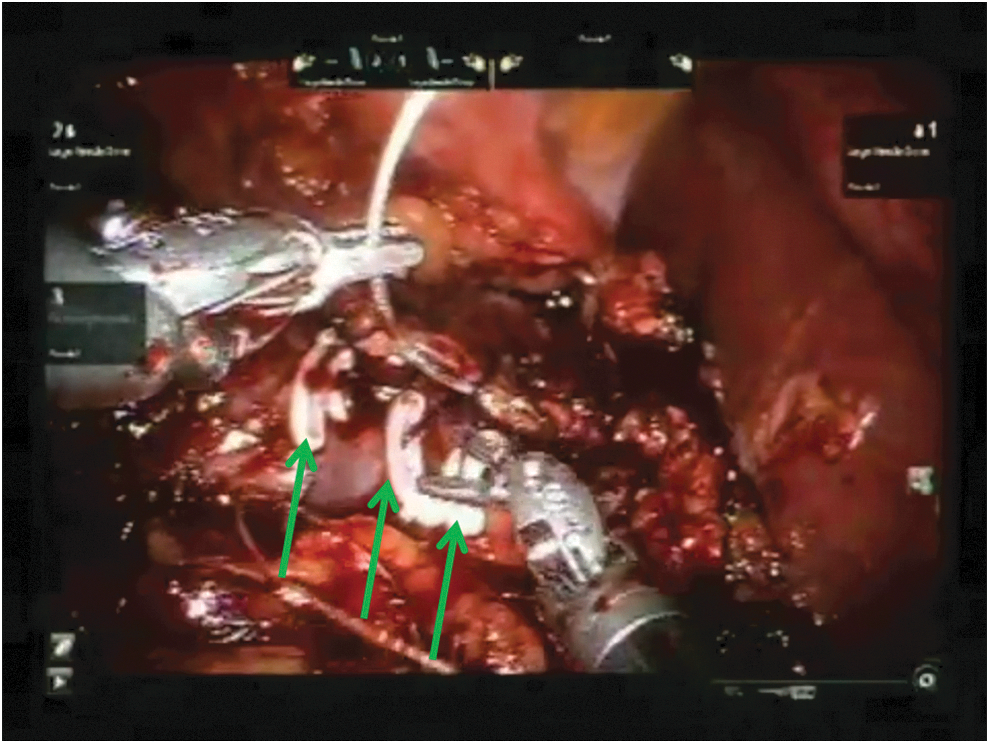
Vascular control is obtained using vascular bulldog clamps on the hilar vessels. We typically clamp both the renal artery and vein to ensure a bloodless field during excision of the mass (Figs. 8 and 9). However, clamping the renal artery alone is adequate for most peripheral renal masses. Several companies produce vascular bulldog clamps suitable for vascular control in PN. We use the Scanlan bulldog clamps (Scanlan International, St. Paul, MN). Other vascular bulldog clamps made by Klein Surgical (San Antonio, TX) and Aesculap AG (Tuttlingen, Germany), are good alternatives. We tie a loop of 2-0 dyed polyglactin suture to the back of each bulldog clamp, which helps to identify the clamps in case they are lost between bowel loops within the abdomen. Before the vessels are clamped, it is essential to go through a check list to ensure that all equipment is readily available functional. Adequate pneumoperitoneum must be available, the needle drivers and all instruments required for renal reconstruction should be available and tested. If bleeding is anticipated, blood should be available in the room, and all members of the team should be well versed with procedures such as conversion to open surgery, emergency dedocking of the robot and other such procedures. We use the ProGrasp instrument to apply the vascular bulldog clamps to the artery and the vein, with two bulldog clamps to the artery and one to the vein.

The right renal artery is clamped before the vein. Two bulldog clamps are used for the artery. Arrows indicates two vascular bulldog clamps.
The right renal vein is clamped with one bulldog clamp. Arrow indicates single vascular bulldog clamp.
Vascular bulldog clamps should be applied with the target blood vessel at the midpoint along the length of the jaws. The closing pressure at the tips of the jaws is inadequate and there may be a notch at the crotch of the clamp that precludes complete vascular occlusion. The vascular bulldog clamp should be tested for adequate closure pressure before inserting into the abdomen since the closing pressure decays and the clamps become ineffective after long periods of usage and multiple surgeries.
Excision of the renal mass
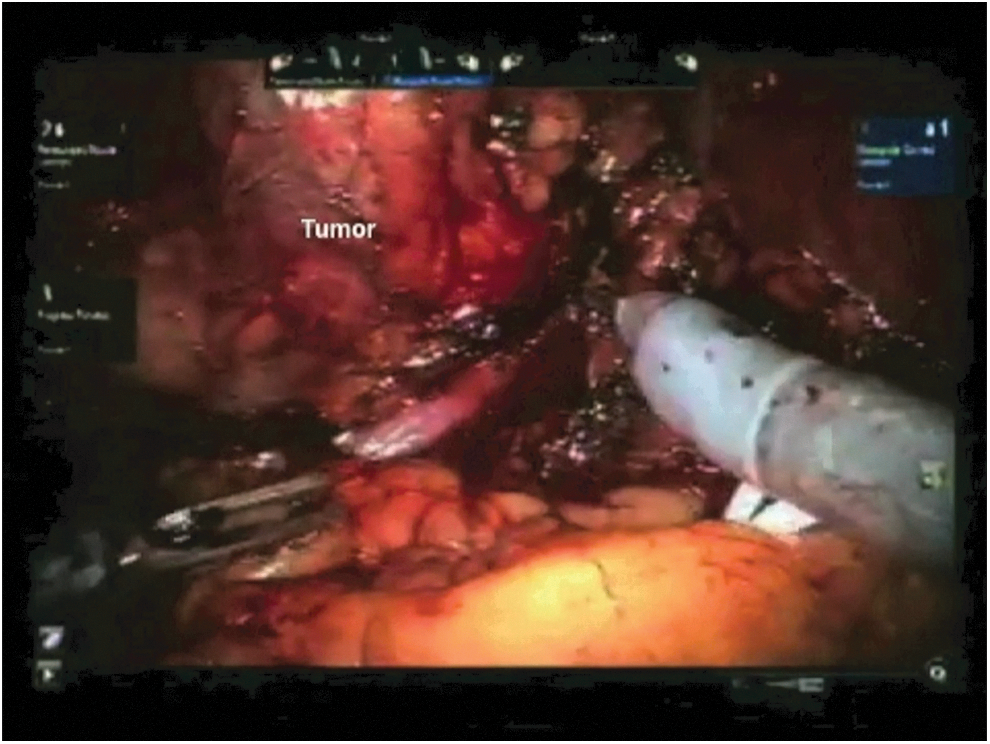
Once the renal hilum is controlled, the ProGrasp on the right robotic arm is changed to curved monopolar scissors. The tumor is excised with cold scissors starting along the predetermined line around the mass that has been marked previously after ultrasonography (Fig. 10). The parenchyma is divided in a plane that is perpendicular to the surface of the kidney. Once the depth of this incision reaches the depth of the tumor based on ultrasound and CT scan, the direction of the excision becomes more horizontal toward the tumor bed. It is essential to complete the initial division of the renal parenchyma circumferentially before going deep toward the base of the tumor. Both blunt and sharp dissection is used to separate the renal parenchyma around the tumor. As the deep margin is reached, the tumor capsule becomes visible in some occasions, especially if it abuts the renal collecting system. Care should be taken not to violate the tumor capsule. In larger renal masses, entry into the collecting system is often necessary. Obvious renal vessels that are seen during this division can be selectively coagulated with a bipolar forceps before it is divided. Once the renal mass is completely freed, it is removed from the operative field and placed within the abdomen for later retrieval.

The tumor is excised circumferentially with cold scissors.
Renal reconstruction (renorrhaphy)
After the tumor is excised, the tumor bed margin can be sent for frozen section analysis. However, in most cases, this is not required since visual determination of a negative margin under the magnification of the robotic system is adequate for most experienced surgeons. Should there be any questions about presence of residual tumor in the tumor bed, another margin of healthy renal parenchyma should be excised. In most instances, any entry into the collecting system is easily recognized. The renal reconstruction is typically done in two layers. We use 2-0 barbed absorbable sutures with a 26 mm half circle needle for this purpose. Suture of the deep layer is 8 inches long. We used to perform the deep layer of renorrhaphy with an undyed suture, but have recently changed to using a dyed one instead. We found that dyed sutures for the deep layer helps to identify it more easily. Before this suture is inserted into the abdomen, a double knot is tied at the end, and a 10 mm polymer Hem-o-lok clip (Teleflex, Inc., Morrisville, NC) is placed just next to the knot.
The first suture begins with the needle passing from outside the renal capsule next to one end of the renal defect. Once the needle is drawn through the renal parenchyma into the tumor bed, the suture is run in a continuous manner to close the collecting system and the deep renal parenchyma. This tissue incorporates the larger vessels seen in this area. The running suture is completed throughout the extent of the defect, the needle then passes from the tumor bed to outside the renal capsule at the other end of the renal defect (Fig. 11). A 10 mm Hem-o-lok clip is placed on the other end and is slid down to complete a watertight and hemostatic closure of the collecting system and the deep renal parenchyma. Individual throws of the suture can be tightened sequentially before the sliding clip renorrhaphy technique is used for the last stitch of the suture line. After the deep layer of renorrhaphy is completed, the vascular bulldog clamps can be released if the surgeon has decided on early unclamping. If early unclamping is used, some bleeding from the renal parenchyma can usually be managed with the second layer of renorrhaphy. Should there be an individual arterial bleeder that is visible after early unclamping, the bleeding vessel can be ligated with a 2-0 or 3-0 polyglactin suture 5 to 6 inches long.
It is important to tighten the sutures upon completion of a layer of renorrhaphy for hemostasis and to avoid urinoma.
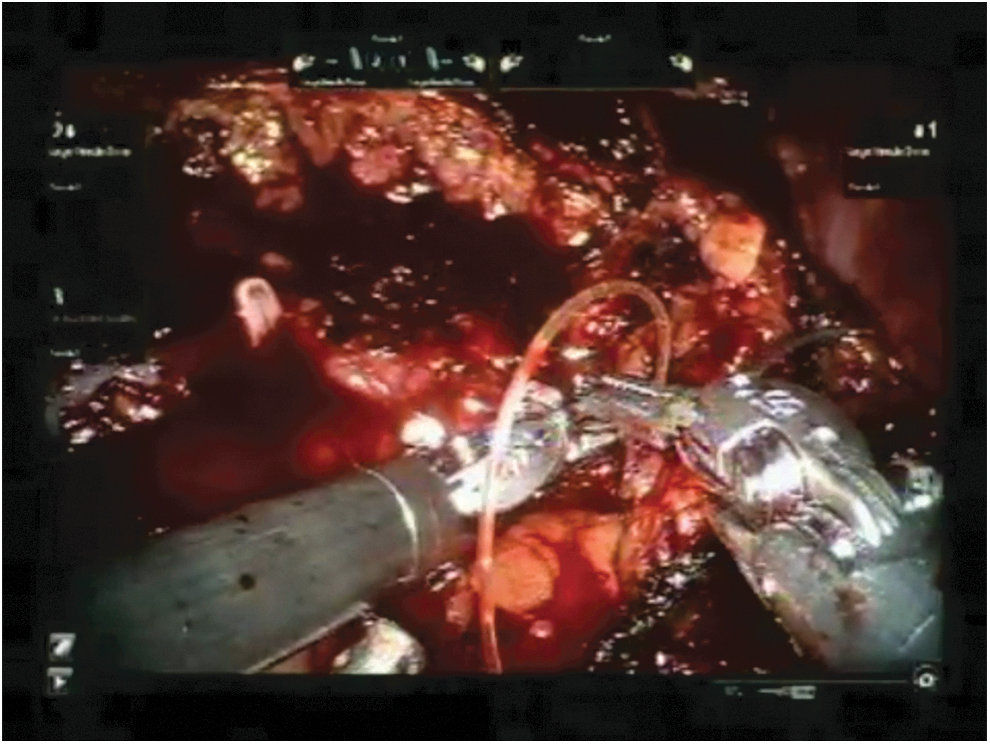
In most instances, a superficial layer of renorrhaphy is completed with another 8 to 10 inches long barbed absorbable suture. If a dyed suture was used for the deep layer, an undyed suture should be used instead for the superficial layer to differentiate between the deep and superficial suture lines. The superficial renorrhaphy incorporates the renal parenchyma not incorporated in the deep renorrhaphy stitch. Hem-o-lok clips are applied after each throw of the suture, and as the suture line progresses, a sliding clip renorrhaphy can be used to ensure complete closure of the renal defect (Fig. 12). For this superficial renorrhaphy stitch, interrupted sutures can also be used. Instead of the barbed absorbable sutures that we use, 2-0 polyglactin suture for the deep layer and 0 polyglactin for the superficial layer are possible alternatives. Monocryl can also be used for both layers of the renorrhaphy. After the superficial layer of renorrhaphy is completed, there should be no bleeding from the renal defect. Release of the vascular bulldog clamps from the hilum should be performed systematically, removing the venous clamp before the arterial clamps. The reperfusion of the kidney and pulsation of the renal artery should be confirmed after unclamping.
Using Hem-o-lok clips in the second layer of renorrhaphy to maintain tissue apposition. Arrows indicates 10 mm polymer locking clips.
Near infrared imaging with indocyanine green can be used to confirm perfusion of the kidney after it is unclamped. Indocyanine green has also been used to confirm an avascular renal parenchyma before PN, especially when selective arterial clamping is performed. Selective arterial clamping is useful when there are polar renal tumors, especially when there is accessory renal artery supplying that segment of the kidney or in patients with early bifurcation of the renal artery.
If the kidney has been significantly mobilized for a PN, it should be replaced into its anatomic position. The Gerota's fascia can be reconstituted with a running suture. We use a 2-0 barbed absorbable suture similar to what is used for the renorrhaphy.
Once the two-layer renorrhaphy is performed satisfactorily, it is not necessary to leave a drain. However, for larger tumors or when only single layer renorrhaphy is performed, a 15F round Blake drain can be left in the region of the kidney after it is inserted through the fourth arm trocar site.
The specimen is entrapped in a laparoscopic specimen retrieval bag inserted through the trocar at the umbilicus. Hemostasis is ensured. It is important to ensure that all sutures, needles, vascular bulldog clamps, and vessel loops are retrieved and accounted for before the da Vinci system is undocked from the trocars. Once the system is undocked, the trocars are removed under vision. The 12 mm trocar sites are closed with a single 0 polydioxanone (PDS) suture using a port closure device. The specimen is extracted from the umbilical trocar site by vertical extension of the fascia. The fascia is closed with one PDS in a figure-of-eight manner and the skin is closed with 4-0 Monocryl subcuticular suture as well as skin adhesive.
Troubleshooting and other modifications
1. Trocar positions. In obese patients, all the trocars should be shifted laterally to allow the bowels to remain dependent on the contralateral side. Bariatric trocar is often required. We typically use the AirSeal insufflation system (Conmed, Utica, NY) that helps to maintain pneumoperitoneum despite suction. This is important during PN since the loss of pneumoperitoneum when the hilum is clamped can be a significant problem. We also use a bariatric trocar for the fourth arm to minimize clashing between the third and fourth arms.
2. Adhesiolysis. When the patient has had previous surgeries, there can be significant intra-abdominal adhesions. It is often required to perform adhesiolysis using laparoscopic scissors before the robotic instruments are inserted and the robot is docked. Thus, it is useful to have traditional 5 and 10 mm laparoscopes available for this purpose.
3. Exposure of the renal tumor. In obese patients, it is important to determine if the fat is within the abdominal wall or around the kidney during dissection. When there is excessive amount of perinephric fat, especially with stranding of this fat, difficulty in visualization of the tumor, due to difficult mobilization of the perinephric fat from the kidney, should be anticipated. A painstaking clearing of this perinephric fat around the tumor is an essential part of the operation. In these instances, performing meticulous ultrasound examination before the perinephric fat is incised would help in determine the site of the tumor and where the fat should be incised. Particular care should be taken in cases of cystic tumors that can easily rupture.
4. Excision of the renal tumor. A thorough ultrasonography as well as review of cross-sectional, coronal, and sagittal views of the CT scan is important to plan for tumor excision and to ensure negative margins. The deep margins of the tumor on the CT scan should be carefully scrutinized since occasional satellite nodules as well as irregular deep margins can occur. In such cases, the margins have to be wider to avoid tumor violation. Despite best efforts, violation of the tumor capsule can occasionally occur. If this happens, it is important to immediately stop and readjust the plane of excision to include a wider margin. Care should be taken to adjust for the new margin since there is significant magnification of the images in the robotic surgery. If violation of the tumor is recognized after the tumor has been excised, it is important to remove an entirely new slice of the tumor bed. In these instances, a frozen section of the new tumor bed may assist in confirming adequacy of the excision.
5. Bleeding during tumor excision. Some amount of bleeding during initial incision of the renal cortex is expected, since the kidney does have blood within it despite vascular control. However, significant or arterial bleeding implies inadequate vascular control. Under these circumstances, it is important not to proceed any further, but reassess the situation and achieve adequate vascular control. Should both the artery and the vein have been clamped, releasing the venous clamp may reduce back-bleeding in cases of incomplete arterial control. In cases that only the artery has been clamped, placing an additional clamp on the artery or looking for a missed accessory renal artery is prudent. Such situations can be avoided by looking for accessory vessels or early branching before vascular control. In the rare instance of severe bleeding, a Satinsky clamp can be used for en masse vascular clamping of the entire hilum by the assistant. This should be a rare event if meticulous vascular dissection and control are performed as described earlier.
6. Subcapsular dissection should be avoided since renal parenchyma without the capsule is fragile and does not take suturing well without fracturing. Should there be any subcapsular dissections, it is important to include the capsule during renorrhaphy.
7. Enucleation. In patients with multiple renal masses, such as those with hereditary renal cell carcinoma, enucleation is advisable. Even in solitary renal masses, enucleation is carried out with good results in some centers. To perform enucleation, it is important to check the CT scan before surgery to ensure that the capsule is intact and clearly defined without satellite nodules or irregular borders. In these cases, an incision is made just next to the tumor capsule, and with careful blunt dissection, the plane between the capsule and the renal parenchyma is circumferentially developed. Further gentle blunt dissection separates the capsule from the surrounding parenchyma. For small tumors, enucleation can be performed without vascular control. Bleeding can be controlled with bipolar or monopolar diathermy, and with direct tamponade using a Surgicel bolster after tumor excision. If direct tamponade does not work, suture ligation with 2-0 or 3-0 Vicryl can be performed.
Recommended Videos from Videourology
1. Videourology 2016; Vol. 30, No. 6
Feasibility of Omitting Cortical Renorrhaphy During Robot-Assisted Partial Nephrectomy
Andrew Vissing, Steven Kheyfets, Clinton Bahler, Chandru Sundaram
2. Videourology 2018; Vol. 32, No. 2
Robot-Assisted Laparoscopic Partial Nephrectomy of Hilar Renal Tumor
Ronit Patnaik, Cheuk Fan Shum, Chandru P. Sundaram, Ronit Patnaik
3. Videourology 2011; Vol. 25, No. 1
Robot-Assisted Partial Nephrectomy
Shyam Sukumar, Quoc-Dien Trinh, Firas Petros, Craig Rogers
4. Videourology 2010; Vol. 24, No. 5
Barbed Suture for Renorrhaphy During Robot-Assisted Partial Nephrectomy
Jesse D. Sammon, Sanjeev Kaul, Akshay Bhandari, Firas Petros, Naveen Pokala, Craig Rogers
Footnotes
Supplementary Videos
Click here for Supplementary Videos: 00 PN Video Introduction FINAL_2_1; 02 PN Hilar Disection & Vessel Loops FINAL_2; 03 PN Gerota's Mobilization FINAL_2; 04 PN US Probe & Bovie Scoring FINAL_2; 05 PN Bulldog FINAL_2; 06 PN Clamping FINAL_2; 07 PN Tumor Excision FINAL_2; 08 PN Renorrhaphy FINAL_2; 09 PN Removing Clamps FINAL_2; 10 PN Specimen Removal FINAL_2; 11 PN Gerota's Fascia Repair FINAL_2; 12 PN Pathology FINAL_2; PN Video FINAL 2 merged
Author Disclosure Statement
Author(s) have received and archived patient consent for video recording/publication in advance of video recording of procedure.