
Abstract
Introduction:
Ureteral reimplantation is indicated for patients with congenital distal ureteral strictures, for iatrogenic intraoperative distal ureteral injuries, and for those who require distal ureterectomy for transitional cell carcinoma.
Methods:
Using the da Vinci system from Intuitive, we demonstrate distal ureterectomy with reimplantation. Both a refluxing extravesical reimplant and nonrefluxing extravesical reimplant are shown. We also demonstrate modifications, including psoas hitch and Boari flap.
Results:
Robotic ureteral reimplantation with psoas hitch and Boari flap are demonstrated in a reproducible manner. Additional topics covered include the delineation of diseased ureter vs healthy ureter, the applications of indocyanine green, and the use of interoperative ureteral stents.
Conclusions:
Robotic ureteral reimplantation is safe and feasible when performed with proper technique. Ureteroscopy and near-infrared fluorescence technology facilitate improved detection of diseased ureteral segments. Key points include the maintenance of principles of open surgery such as a tension-free, watertight, and stented anastomosis.
Indications
Ureteral reimplantation is indicated for patients with congenital distal ureteral strictures, for iatrogenic intraoperative distal ureteral injuries, and for those who require distal ureterectomy for transitional cell carcinoma (TCC).
Preoperative Preparation
Before performing ureteral reimplantation, the surgeon must determine the extent of ureteral pathology for proper surgical planning. We recommend imaging with three-phase computed tomography scan or magnetic resonance imaging of the abdomen and pelvis with dedicated arterial and urographic phases. The length of ureteral pathology should be measured. Any surrounding pathology should be noted. Diuretic renal scan can be performed to assess baseline function of the ipsilateral kidney. If possible, retrograde ureteropyelogram and/or ureteroscopy with direct vision should be performed preoperatively or at the time of surgery to further evaluate the anatomy.
Patients should receive extensive information about all surgical options and be consented for all possible procedures, including (when indicated) ureteral reimplantation, psoas hitch, Boari flap, ileal ureter, buccal graft ureteroplasty, transureteroureterostomy, autotransplant, and possible nephrectomy. All possible approaches to surgery, including endoscopic, laparoscopic, robotic, and open, should be described. Additional risks, including bleeding and need for transfusion, infection, recurrence of ureteral obstruction, the need for long-term follow-up, and reoperation must be discussed. The patient should also be aware of the risks associated with a prolonged retained stent.
Patient Positioning
For lower ureteral reconstruction, the patient is placed in a low-lithotomy position with steep Trendelenburg similar to the positioning for a robotic prostatectomy. The robot is docked in between the patient's legs (Fig. 1) or at the patient's side. Alternatively, for pathology extending up to the mid-ureter, a lateral decubitus position can be used with the patient in modified low-lithotomy position to allow access from the mid-ureter down to the bladder (Fig. 2). This also permits for simultaneous cystoscopy or ureteroscopy.
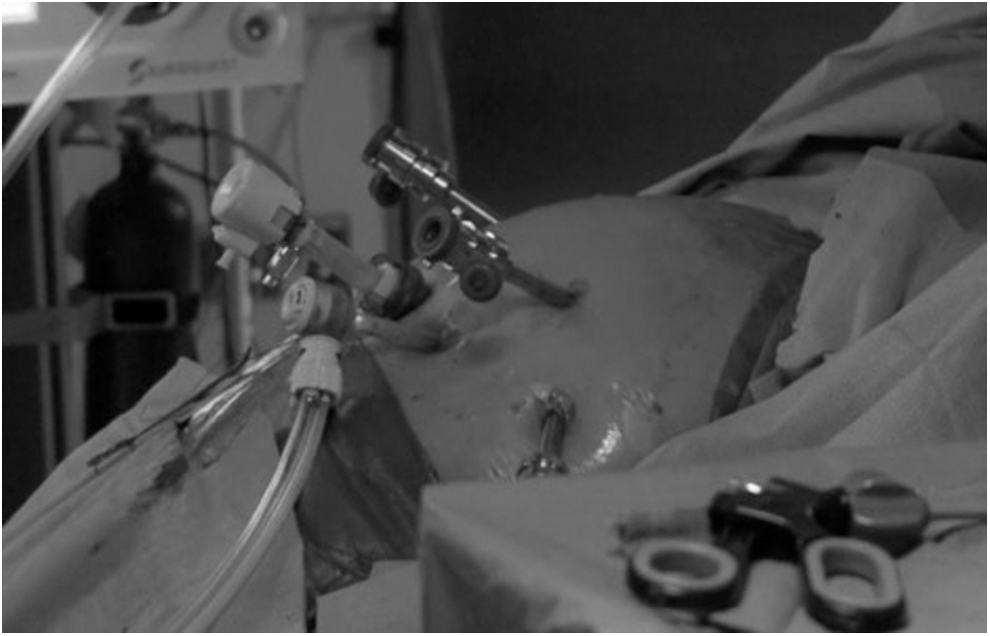
Low-lithotomy position.

Semilateral decubitus position with modified low-lithotomy position.
Five trocars are used. A camera port is placed several centimeters above the umbilicus. Two trocars are placed in the left abdomen: one trocar is placed superiorly and on the midclavicular line, and the other trocar is placed on the anterior axillary line. In the right abdomen, a trocar is again placed superiorly to the umbilicus on the midclavicular line, and another trocar is placed on the anterior axillary line. The fourth arm (usually for the Prograsp) is placed on the side ipsilateral to the ureter of interest. On the side contralateral to the ureter of interest, the assistant port is the trocar placed at the midclavicular line (Fig. 3).
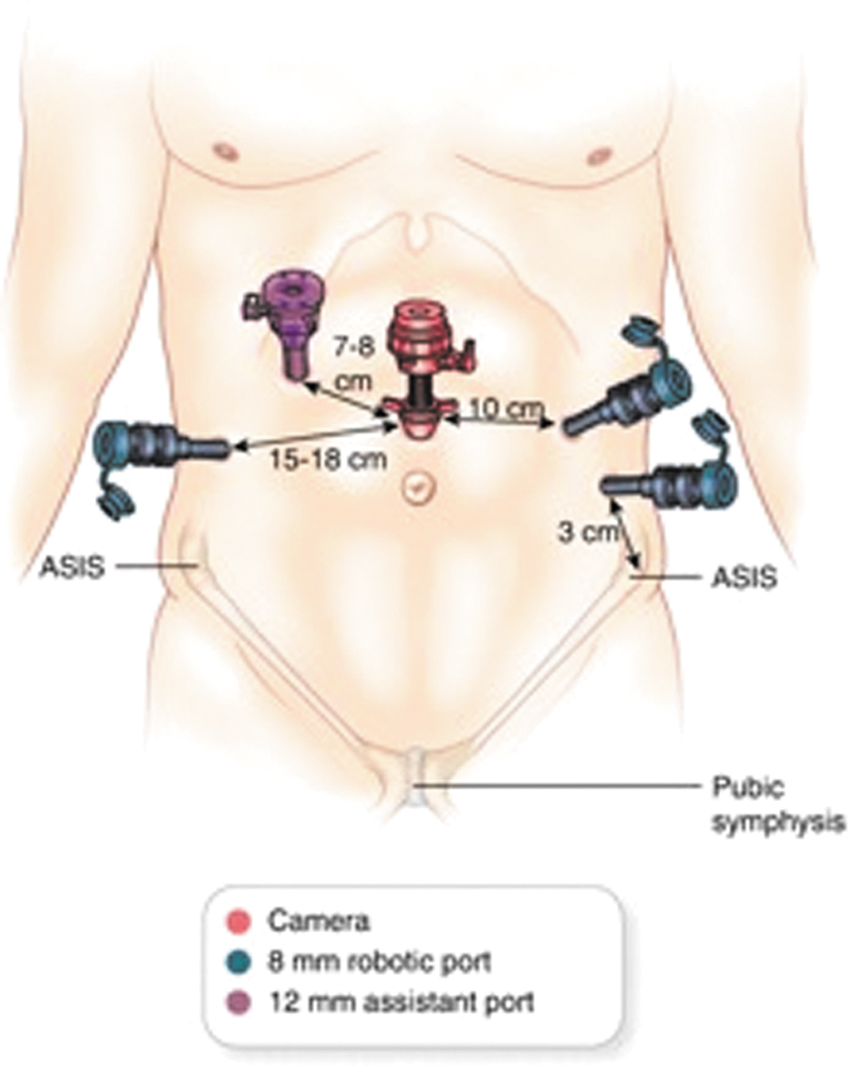
Port configuration.
For the low-lithotomy position, the robot is docked between the patient's legs or at the patient's side. For the modified lateral decubitus position, the robot is docked at the patient's side. We use the endoscope lens in a 30° down configuration.
Surgical Steps
Step 1: Exposure of the ureter
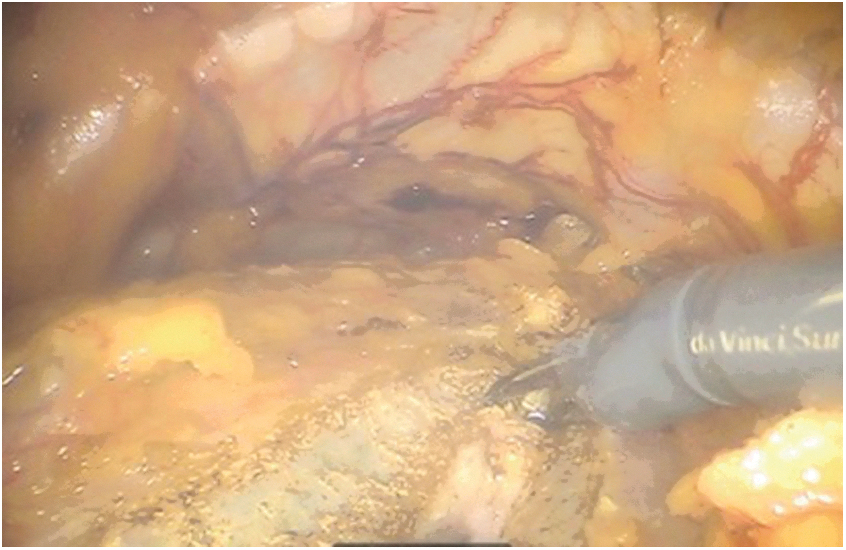
The peritoneum is incised longitudinally at the level of the iliac vessels, and the ureter is identified and isolated (Fig. 4). Peritoneum is incised over the ureter distally and proximally until healthy proximal ureter is encountered. Dissection should be continued down to the insertion of the ureter at the posterior bladder wall. For male patients where fertility is not a concern, the vas deferens can be ligated to improve exposure. For female patients, the ovary and ovarian ligaments are retracted anteriorly to facilitate exposure.
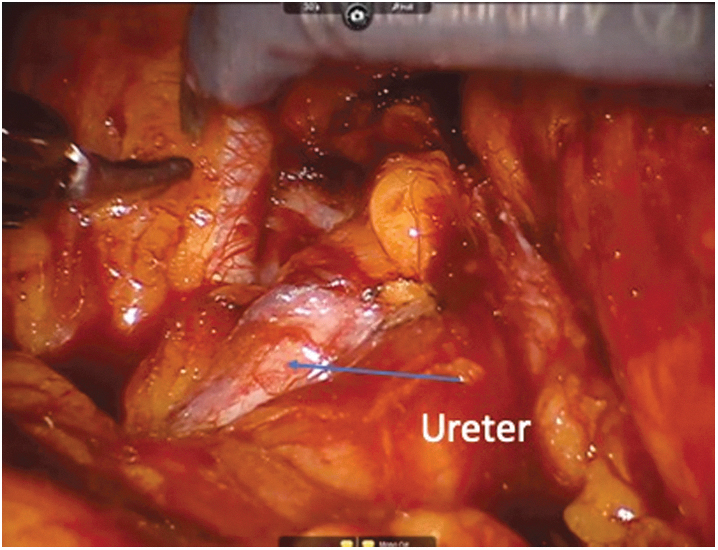
Ureter is identified and isolated.
Step 2: Division of ureter and segmental ureterectomy
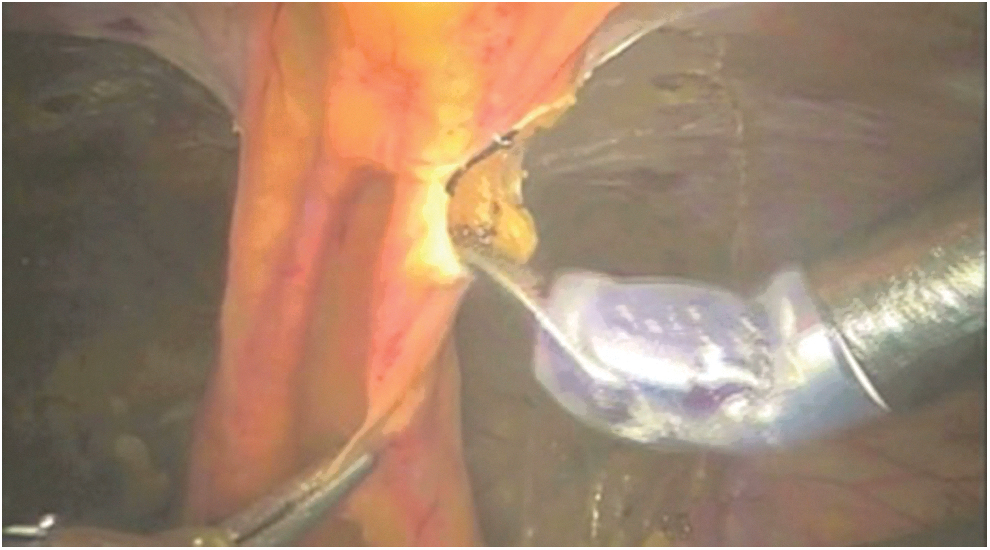
The ureter is transected just proximal to the diseased segment of ureter using the curved monopolar scissors. Care is taken to avoid crushing the healthy ureteral tissue. The ureter is spatulated using Potts scissors (Fig. 5). For patients with TCC of the distal ureter, a Hem-o-Lock clip is placed on the distal ureter before ureteral transection to avoid tumor spillage. For these patients, the bladder cuff is isolated and then cystorrhaphy is performed using 3-0 polyglactin suture with an RB-1 or SH needle.
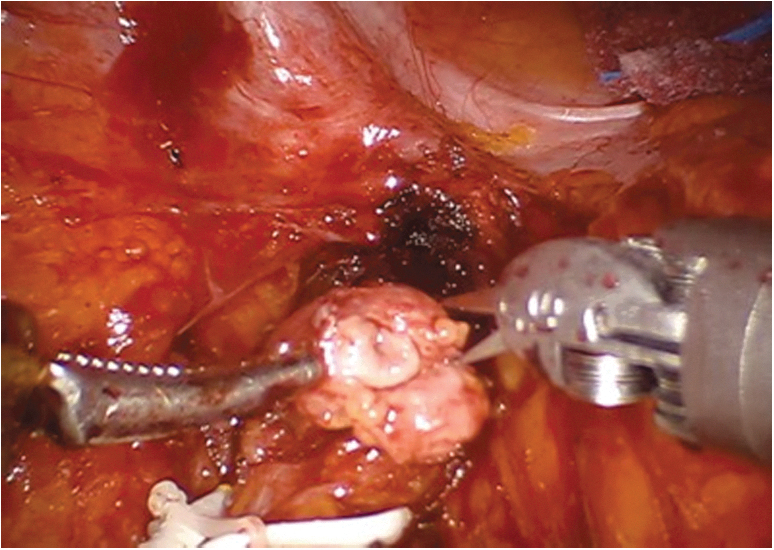
Spatulation of healthy proximal ureter.
Step 3: Mobilization of bladder and psoas hitch
If sufficient ureter is removed such that mobilization of the bladder and psoas hitch is necessary, we start by filling the bladder with 250 mL of normal saline through indwelling urethral catheter. The bladder is then mobilized off of the anterior abdominal wall using the same technique as for robotic prostatectomy. Peritoneum is incised lateral to the medial umbilical ligament, and the space of Retzius is entered and dissected down to the pubic bone. The urachus is transected (Fig. 6). If necessary, the space of Retzius can also be developed on the contralateral side with transection of the contralateral superior vesical pedicle to increase bladder mobilization, although this is rarely necessary.
Urachal transection.
Another approach to improve bladder mobilization is to incise the bladder horizontally and then close vertically in a Heineke–Mikulicz technique to stretch the bladder vertically toward the psoas muscle.
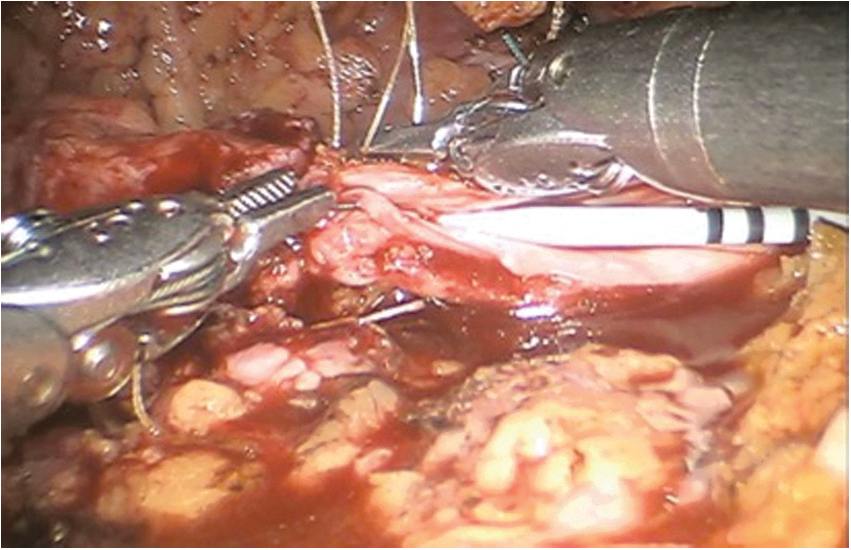
A psoas hitch is performed to minimize tension at the anastomosis. 2-0 polyglactin suture on an SH needle is used to fix the posterior bladder wall to the psoas muscle tendon. One must identify and avoid the genitofemoral nerve (Figs. 7 and 8).

Suture placed in psoas tendon parallel to genitofemoral nerve.

Psoas hitch of bladder to psoas tendon.
Step 4: Ureteroneocystostomy
Type 1: Refluxing extravesical reimplant
To perform the refluxing extravesical reimplant, the area for neocystostomy is identified on the lateral bladder dome. Using Potts scissors, the bladder wall and mucosa is incised, and the incision is extended for 1.5 cm. Keep the bladder filled with normal saline for this step (Figs. 9 and 10).

Detrusorotomy.

Neocystostomy.
The extravesical anastomosis is performed using two 4-0 Monocryl suture on an RB-1 needle. Place sutures on each side of the apex of the bladder incision and then in the apex of the spatulated ureter. In continuous manner, perform the anastomosis while ensuring mucosal-to-mucosal apposition of the bladder to ureter (Fig. 11). Before completing the anastomosis, introduce a Double-J ureteral stent through the assistant port over a sensor-tip guidewire. The assistant should have the stent preloaded on the wire, and once the wire is passed into the abdomen, the surgeon should advance the wire into the ureter and up to the kidney. The stent is then advanced over the wire under the guidance of the surgeon, and once in place, the stent is held using the robotic arms while the wire is removed through the assistant port. The distal curl of the stent is then placed in the bladder, again using the robotic arms. The position of the stent is later confirmed in the recovery room with a plain film. After completing the first layer of the anastomosis, have the bladder filled with a total of 300 mL of normal saline and assess for any urine leaks. Place additional sutures if necessary. Complete the anastomosis with a second layer closure of the bladder serosa to the ureteral adventitia.

Mucosa to mucosa anastomosis of spatulated ureter to bladder.
Type 2: Nonrefluxing extravesical reimplant
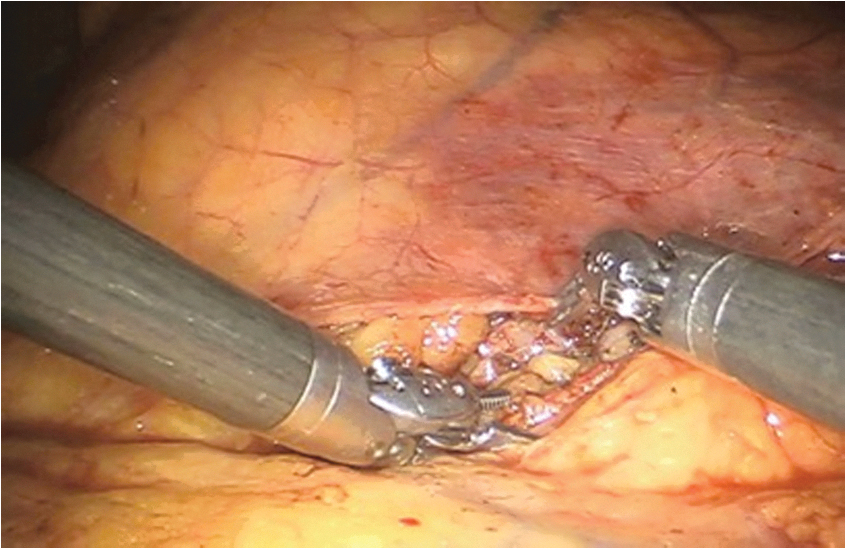
When performing a nonrefluxing extravesical reimplant, an incision is made in the detrusor muscle and extended distally for 5–7 cm to create two detrusor flaps. This incision is directed away from the ureter (Fig. 12). The detrusor flaps are used to create a submucosal tunnel. Anastomose the ureter to the bladder at the most distal aspect of this tunnel. The anastomosis is performed using two sutures running continuously as described previously. A ureteral stent is advanced in a retrograde manner before completion of the anastomosis as described previously. A second layer closure of detrusor muscle is then performed with interrupted 3-0 polyglactin suture to create a nonrefluxing tunnel (Fig. 13). Confirm watertight anastomosis by filling the bladder as described earlier.

Detrusorotomy.

Reapproximating detrusor muscle.
Type 3: Boari flap
For reimplantation using the distal mid-ureter, a Boari flap may be necessary. In some cases, psoas hitch with transection of the contralateral superior vesical pedicle is not sufficient to perform the anastomosis in a tension-free manner. If additional length is necessary, utilize a Boari flap to reach the distal ureter without tension.
Begin by filling the bladder with 300 mL of normal saline. The bladder is scored using a “V”-shaped configuration with the apex of the “V” at the most distal aspect of the bladder. Maintain a wide base to avoid stricture formation. Once the bladder is scored and the flap is confirmed to have sufficient length to reach the distal ureter, incise the bladder as scored using monopolar scissors with minimal use of electrocautery (Fig. 14). To minimize tension, the Boari flap can be sutured to the psoas muscle.
Incision for Boari flap after bladder mucosa has been scored.
The ureter is spatulated posteriorly. To begin the anastomosis, two 4-0 polyglactin sutures on an RB-1 needle are placed to approximate the apex of the flap to the apex of the spatulated ureter (Fig. 15). The ureter is anastomosed to the bladder flap in an interrupted manner. A ureteral stent is then advanced in a retrograde manner up to the kidney and then over the flap and into the bladder (as previously described). Once anastomosis is complete, the Boari flap is tubularized using running 3-0 polyglactin suture (Fig. 16). When the Boari flap is fully tubularized, the defect in the bladder is closed using continuous 2-0 barbed suture on an SH needle.

Apex of Boari flap sutured to spatulated ureter.
Tubularizing Boari flap over ureteral stent.
Step 5: Completion of anastomosis
At any time during anastomosis using any of the aforementioned techniques, intravenous indocyanine green (ICG) can be administered to ensure vascularity. 1,2 We recommend using 3 mL of dilute ICG, which consists of 25 mg ICG reconstituted in 10 mL of injectable saline.
Once anastomosis is complete, the pelvic peritoneum is closed over the anastomosis (Fig. 17). This extraperitonealizes the anastomosis.
Closure of peritoneum.
Step 6: Drain placement
Through the dependent lateral trocar on the side ipsilateral the ureter, advance a closed-suction Jackson–Pratt drain into the abdomen and position the drain near the anastomosis. Secure to skin with silk suture.
The operative site is inspected under reduced insufflation pressure to ensure that hemostasis is achieved. All trocars are removed under laparoscopic vision. Fascia is closed for all trocars 12 mm or larger.
Postoperative Management
Most patients remain in the hospital for 1–2 days postoperatively. Patients start ambulation on the same day as surgery, and they receive oral pain medication and a clear liquid diet.
Before removing the closed suction drain, drain fluid is sent for creatinine level to ensure this is consistent with serum creatinine. Elevated creatinine may indicate a urine leak, which may be managed with prolonged drainage. Patients are discharged with urethral catheter for bladder drainage for ∼10–14 days. Office cystogram is performed before removal of indwelling catheter to confirm there is no urine leak. Ureteral stent is removed during office cystoscopy 4–6 weeks after surgery.
Follow-up includes appropriate imaging studies to evaluate the repair. For patients with urothelial carcinoma, surveillance is continued according to guidelines.
Troubleshooting and Avoidance of Complications
Adequate ureteral resection is critical to an effective repair. In the aforementioned steps, we have described multiple techniques to properly identify the right level for ureteral transection. These include preoperative imaging, retrograde ureteropyelogram, and simultaneous ureteroscopy.
A tension-free, spatulated, and watertight anastomosis is essential to an effective reconstruction. Wide ureteral spatulation and apposition of ureteral mucosa to bladder mucosa will help prevent stricture and urine leakage at the anastomosis. Avoidance of excessive electrocautery using sharp dissection will help to avoid ureteral ischemia and stricture. Intravenous ICG may be used to confirm vascularity after the anastomosis is performed.
For most distal repairs, mobilization of the bladder with or without psoas hitch will be sufficient. For upper distal ureteral lesions or mid-ureteral lesions, additional mobilization should be anticipated. Transection of the contralateral superior vesical pedicle and/or Boari flap may be required.
Both refluxing and nonrefluxing reimplantation approaches are described earlier. A nonrefluxing reimplantation requires a submucosal tunnel and is considered technically more challenging, with higher risk of stricture formation. Care should be taken to avoid excessive narrowing of the ureter.
Footnotes
Recommended Videos from Videourology
1. Videourology 2015, Vol. 29, No. 2
Robot-Assisted Laparoscopic Ureteral Reimplantation: Our Technique and Outcomes
Daniel E. Zainfeld, Andrew P. Windsperger, Moben Mirza, and David A. Duchene
2. Videourology 2011, Vol. 25, No. 2
Bilateral Robot-Assisted Ureteroneocystostomy: The Ergonomic Advantages of the DaVinci System
Giovannalberto Pini, Ali Serdar Gözen, Michael Schulze, and Jens Rasweiler
Author Disclosure Statement
Dr. Stifelman serves as an Intuitive Surgical lecturer, VTI consultant, Ethicon lecturer, and he also serves on the CONMED scientific advisory board.
Funding Information
No funding was received for this article.
Supplementary Data
Supplementary Video S1
Abbreviations Used
References
Supplementary Material
Please find the following supplemental material available below.
For Open Access articles published under a Creative Commons License, all supplemental material carries the same license as the article it is associated with.
For non-Open Access articles published, all supplemental material carries a non-exclusive license, and permission requests for re-use of supplemental material or any part of supplemental material shall be sent directly to the copyright owner as specified in the copyright notice associated with the article.