
Abstract
Abstract
Background:
Esophagectomies are a notoriously difficult procedure that have undergone drastic changes over the last decade. In particular, the adoption of minimally invasive esophagectomies (MIEs) as the gold standard.
Methods:
We examine the evolution of the MIE, the support for this method, and our preferred methods for the creation of anastomoses following the resection.
Results:
The submission of techniques that, after many years of practice, have become our standard methods for anastomosing the Neo-esophagus to the remnant esophagus both at the neck, and within the thorax.
Conclusion:
No matter which MIE technique is chosen, these anastomotic methods are readily available. Each is provided with step-by-step instructions, performed with standard laparoscopic instruments, and in a safe and reproducible manner.
Introduction
The focus of this article is on the intricacies of creating an anastomosis between the esophagus and the stomach following surgical removal of the esophagus for either benign or cancer-related pathologies. While the surgery itself is complex and has several derivations, they can most easily be broken down into those requiring an anastomosis in one of two areas, either the chest or the neck. However, before the details of each operation, it is important to know a little of the background related to these two approaches.1–10
The removal of the esophagus, an unforgiving organ, has undergone many changes in operative technique over the last 100 years. The dawning of the laparoscopic age has opened the door for surgeries that move beyond the open esophagectomy and its many pitfalls, including significant blind dissection that can result in hemorrhage, tracheal injury, and recurrent laryngeal nerve injury. 11 In the 1980s, Kipfmuller et al., recognizing that less invasive options were available, went on to describe endoscopic esophageal dissections in animal models. 12
The number of minimally invasive esophagectomies (MIE) has increased dramatically since the first human operations in 1992.2,13 These began as laparoscopically assisted pursuits, but eventually, as surgeons became more skilled and equipment improved, DePaula et al. showed that complete laparoscopic esophagectomies were both possible and safe.14–16 Esophagectomies fall into two broad categories, those with thoracic anastomosis or Ivor Lewis two-site esophagectomies,17,18 and those with cervical anastomosis, a McKeown with three-site esophagectomies, or a pure transhiatal esophagectomy with a cervical anastomosis. 19 There are advantages and disadvantages to each method as well as certain pathologies that necessitate one or the other. 20 Additionally, within these two categories there are several ways to perform each anastomosis. We will offer our preferred method for each anastomosis with step-by-step instructions and helpful tips learned over the years.
Ivor Lewis Two-Site MIE Anastomosis
First we will discuss the Ivor Lewis two-site MIE. This approach is an option for patients who require a more distal esophagectomy and comes with the benefit of being completely laparoscopic in nature, as it does not require a neck incision and cervical esophageal dissection to make the anastomosis. However, the primary disadvantage of this technique is the catastrophic nature of leaks within the mediastinum and thoracic cavity. 18 These are difficult to drain and control and come with higher rate of morbidity and mortality as compared with cervical anastomoses. However, there appears to be a decreased rate of leaks for thoracic anastomoses and there are plenty of series with great outcomes. 21
The procedure begins with the abdominal portion of the dissection, which includes placement of ports in a traditional laparoscopic foregut orientation (Fig. 1), inspection of the abdominal cavity for metastatic disease, dissection of the intra-abdominal esophagus and crura, creation of the gastric conduit (Fig. 2), and placement of a feeding jejunostomy tube. One of the most critical portions of the abdominal dissection is the creation of the gastric conduit as its sole source of blood supply is from the right gastroepiploic artery and damage to or twisting of this artery leading to a kink or stricture may result in an ischemic conduit and an increased possibility of postoperative leak.
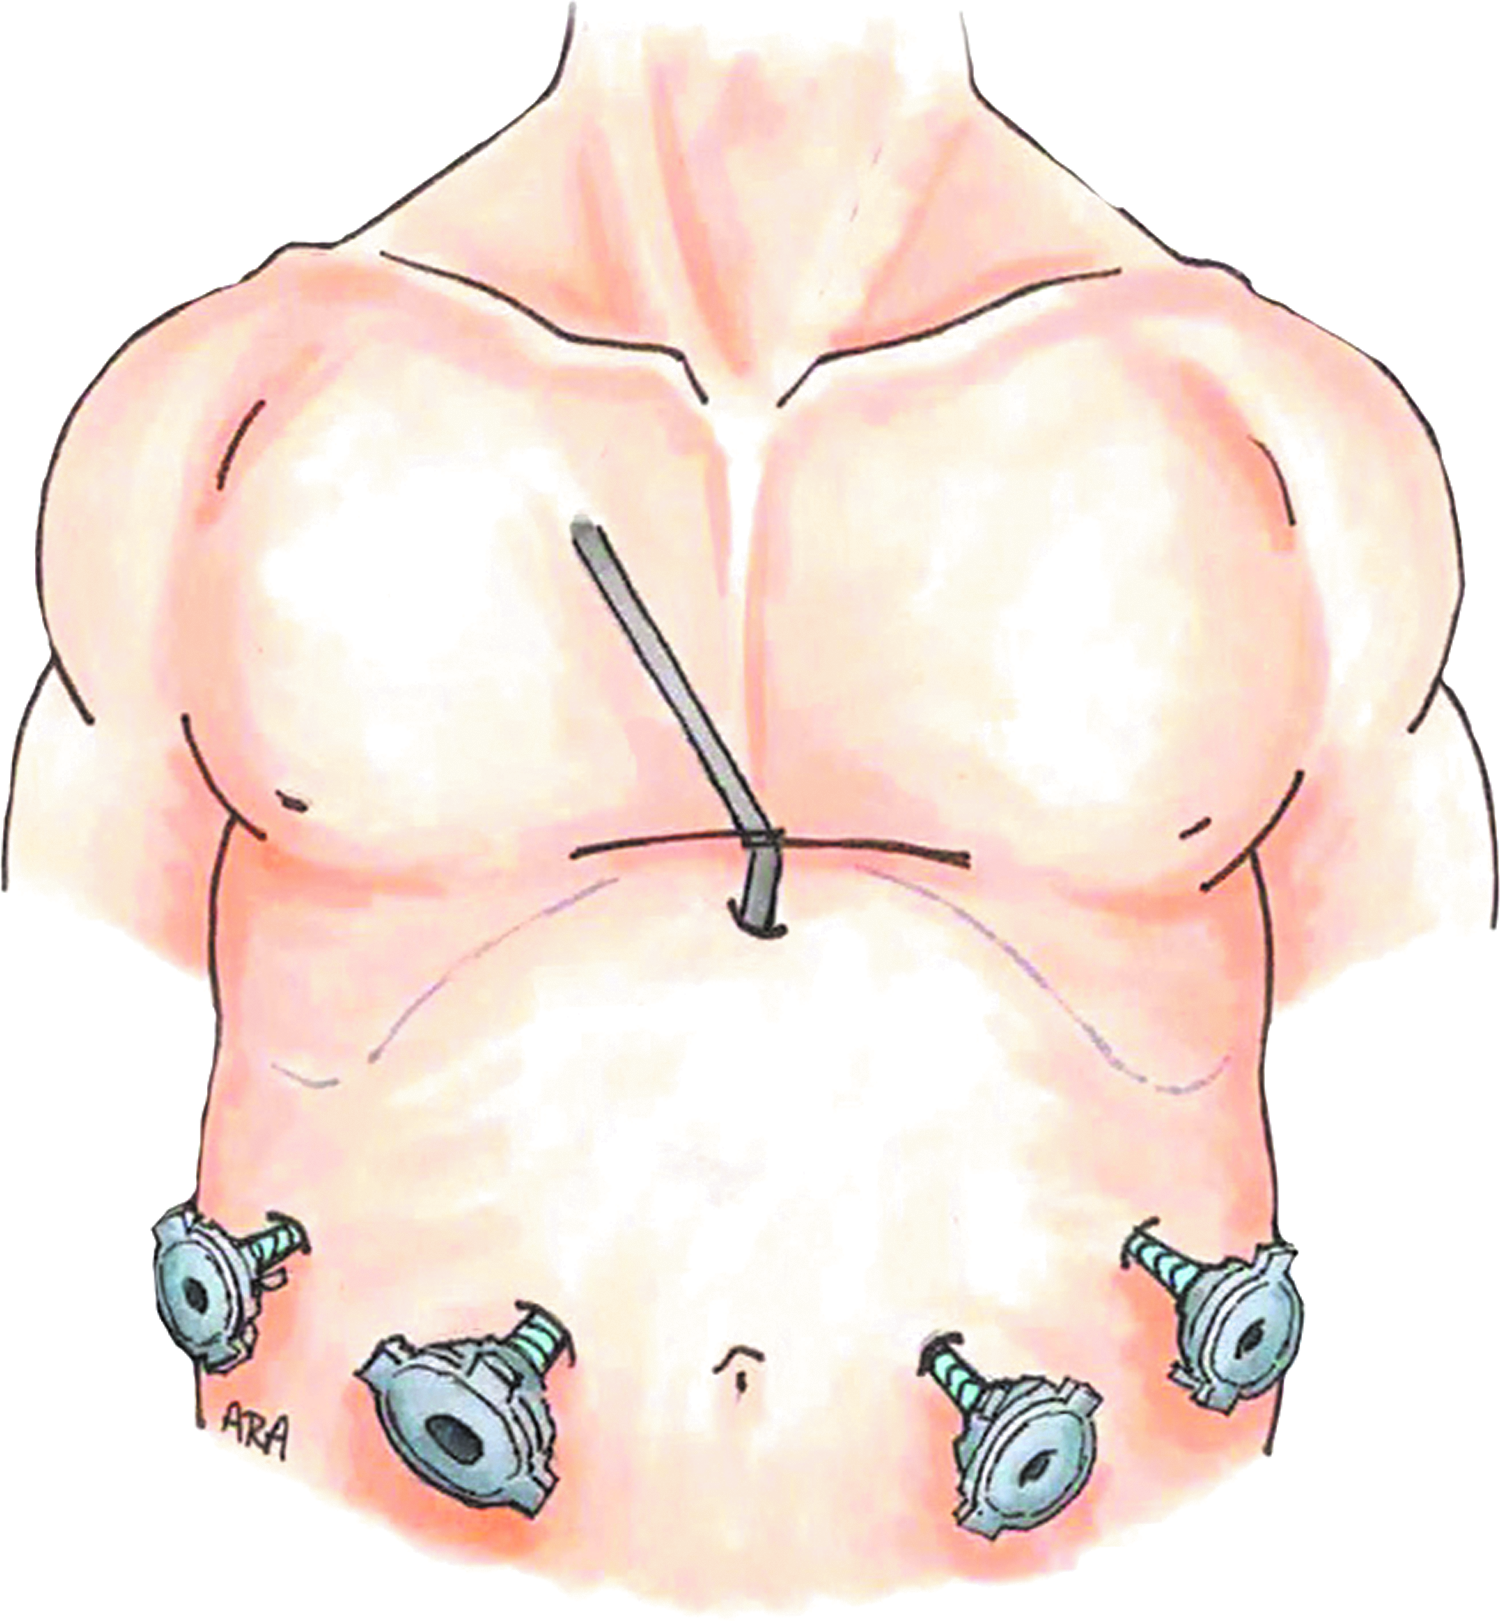
Standard fort port laparoscopic foregut orientation with a Nathanson Liver Retractor. Source: Illustrations by Anthony Andreoni.
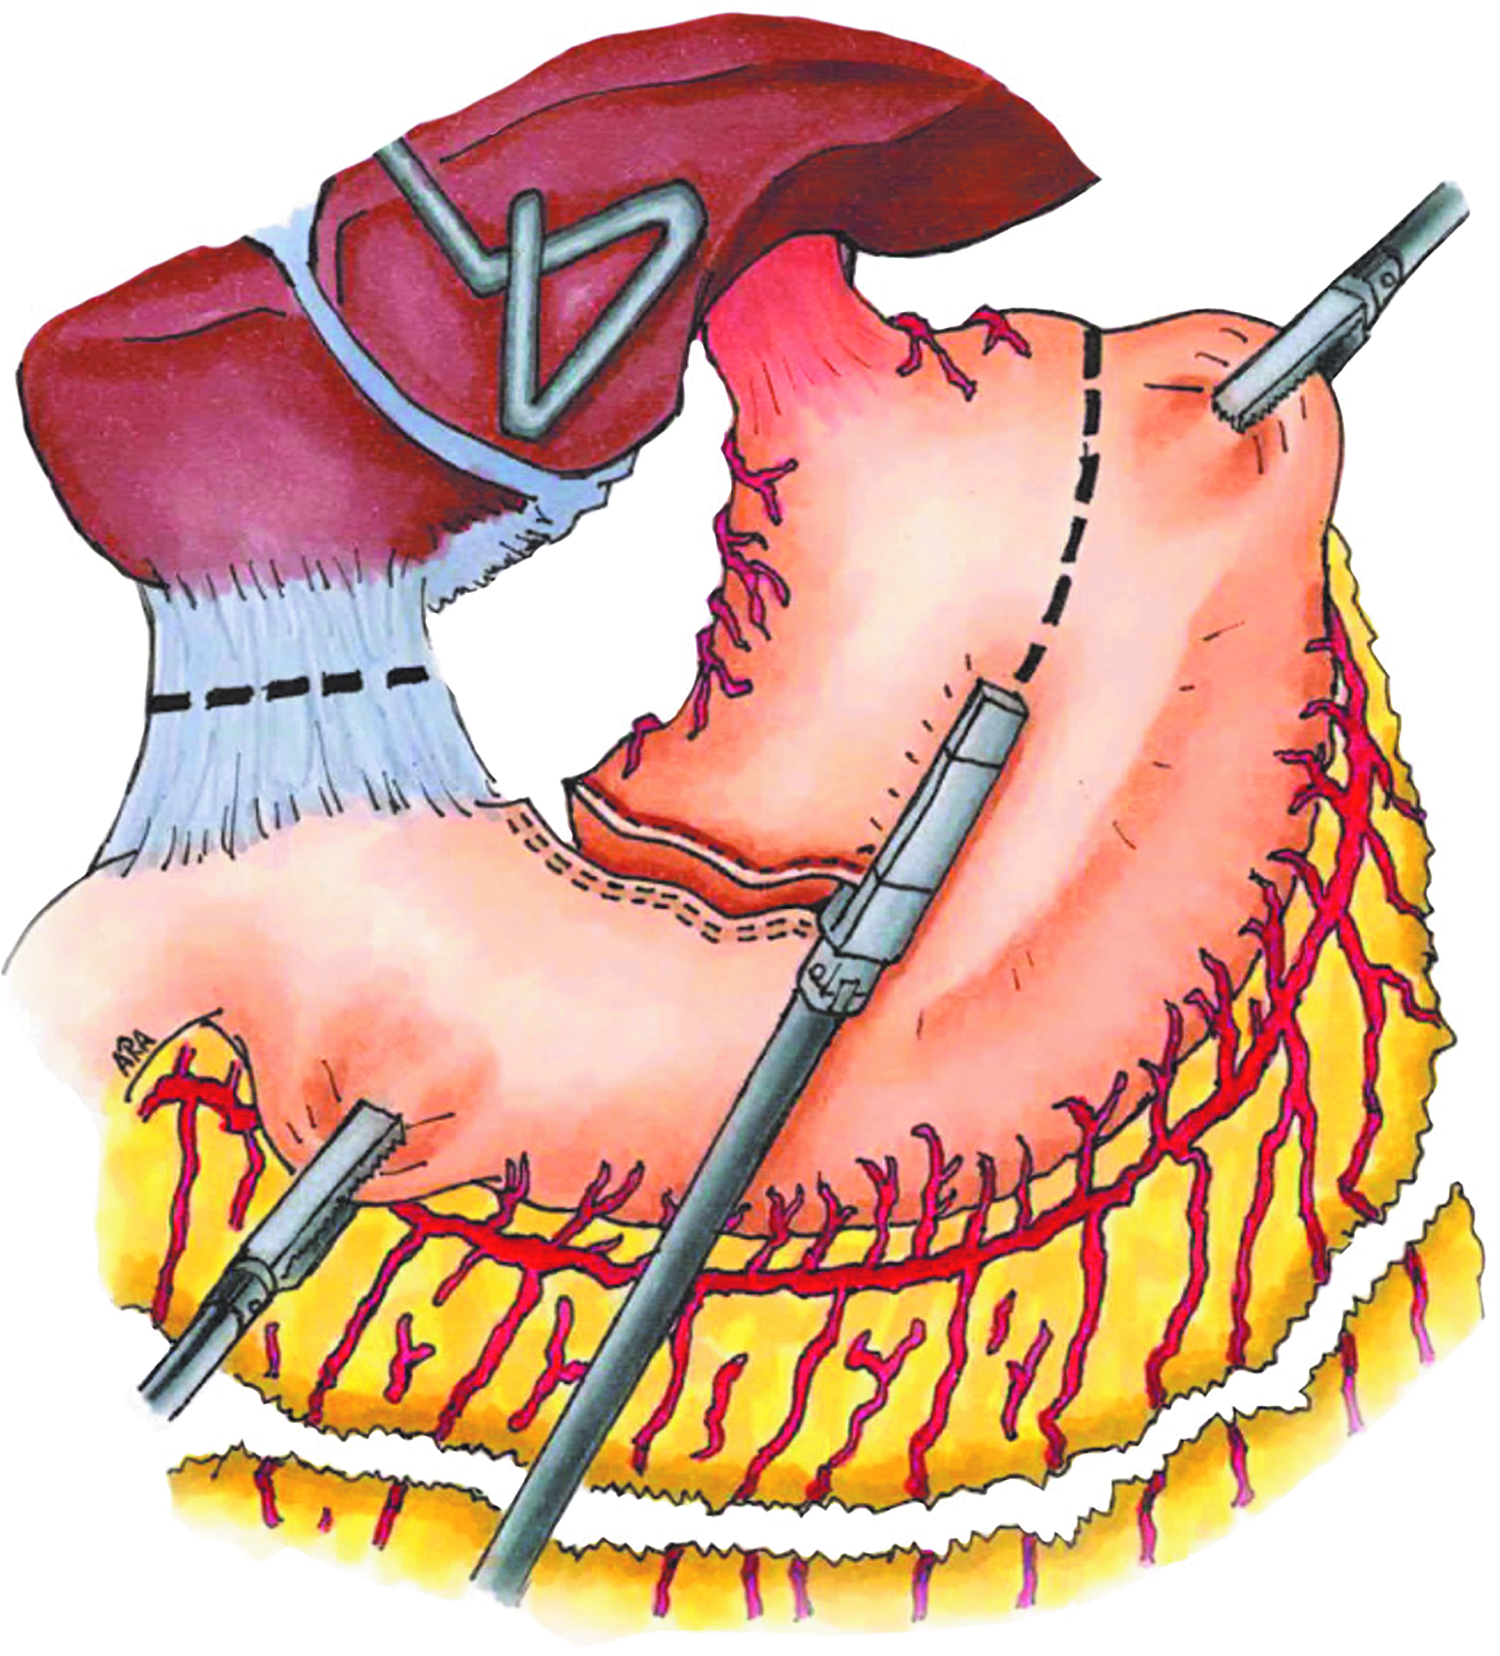
Creation of the gastric conduit with serial firings of the laparoscopic stapler. Source: Illustrations by Anthony Andreoni.
Creating the gastric conduit involves serial firings of a 60-mm laparoscopic stapler beginning on the lesser curve of the stomach about 3 cm from the pylorus. These are carried out in the direction of the angle of His with the goal of creating a conduit that is 6–7 cm in diameter. The 2-0 silk Lembert sutures are then placed at all of the junctions of the staple lines to help reinforce these junctions. The tails of these sutures should be left long (3–4 cm) as they will help facilitate retraction and direction of the gastric conduit while making the thoracic anastomosis. The proximal part of the gastric conduit is then affixed to the distal part of the specimen with silk sutures so it can be dragged into position in the thorax following the thoracic esophageal dissection.
At this point, the thoracic dissection of the esophagus is undertaken. The patient is placed in the left lateral decubitus position and the left lung is deflated with a previously placed bronchial blocker. Trocars are placed as noted in Figure 3 beginning with a 5-mm trocar placed in the subscapular region.
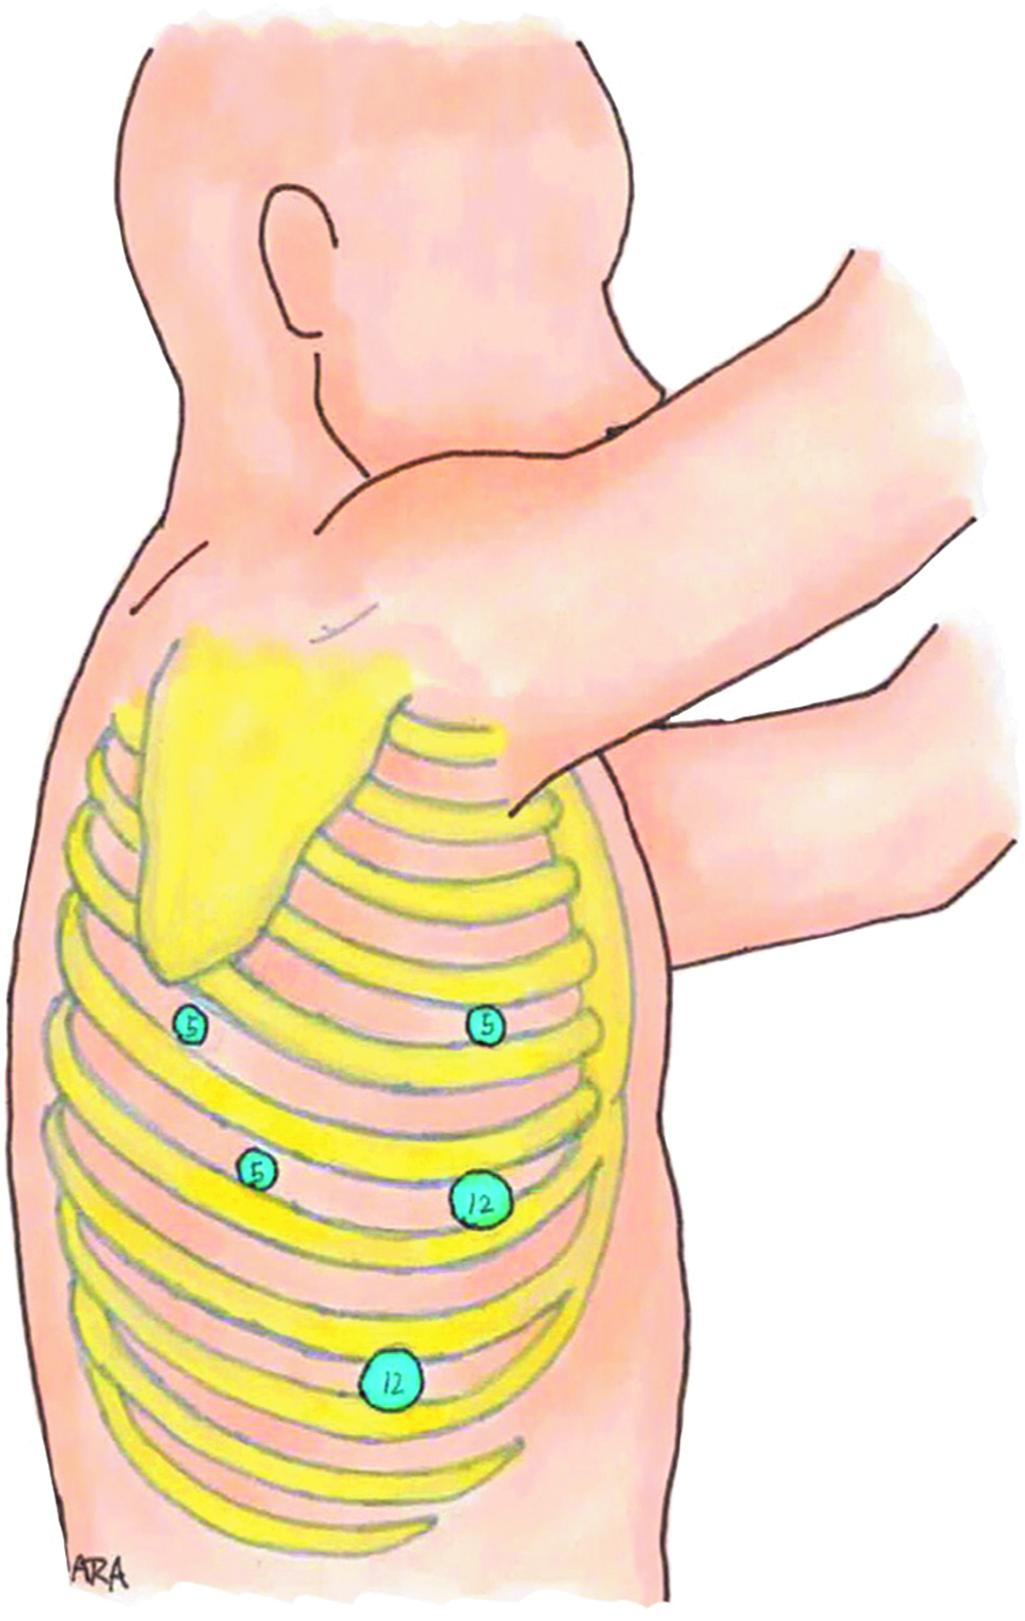
Five-millimeter trocar in the right subscapular region, 12-mm trocar in the 7th intercostal space anterior to the mid axillary line for retracting the lung, 5-mm port in the 5th intercostal space in line with the 12-mm trocar, 5-mm trocar in the 7th intercostal space posterior to the mid axillary line, and one 12-mm trocar in the 9th or 10th intercostal space along the mid axillary line. Source: Illustrations by Anthony Andreoni.
The esophagus is dissected circumferentially up to the level of the azygos vein, which is then transected with a vascular endostapler. The dissection is continued for an additional 3 cm in a cephalad direction, which should allow for adequate mobility and the ability to transect the esophagus with a stapler (Fig. 4). We are now ready to deliver the gastric conduit into the right chest cavity. This is done with traction on the esophagus while utilizing the stabilization Lembert sutures for additional traction and orientation.
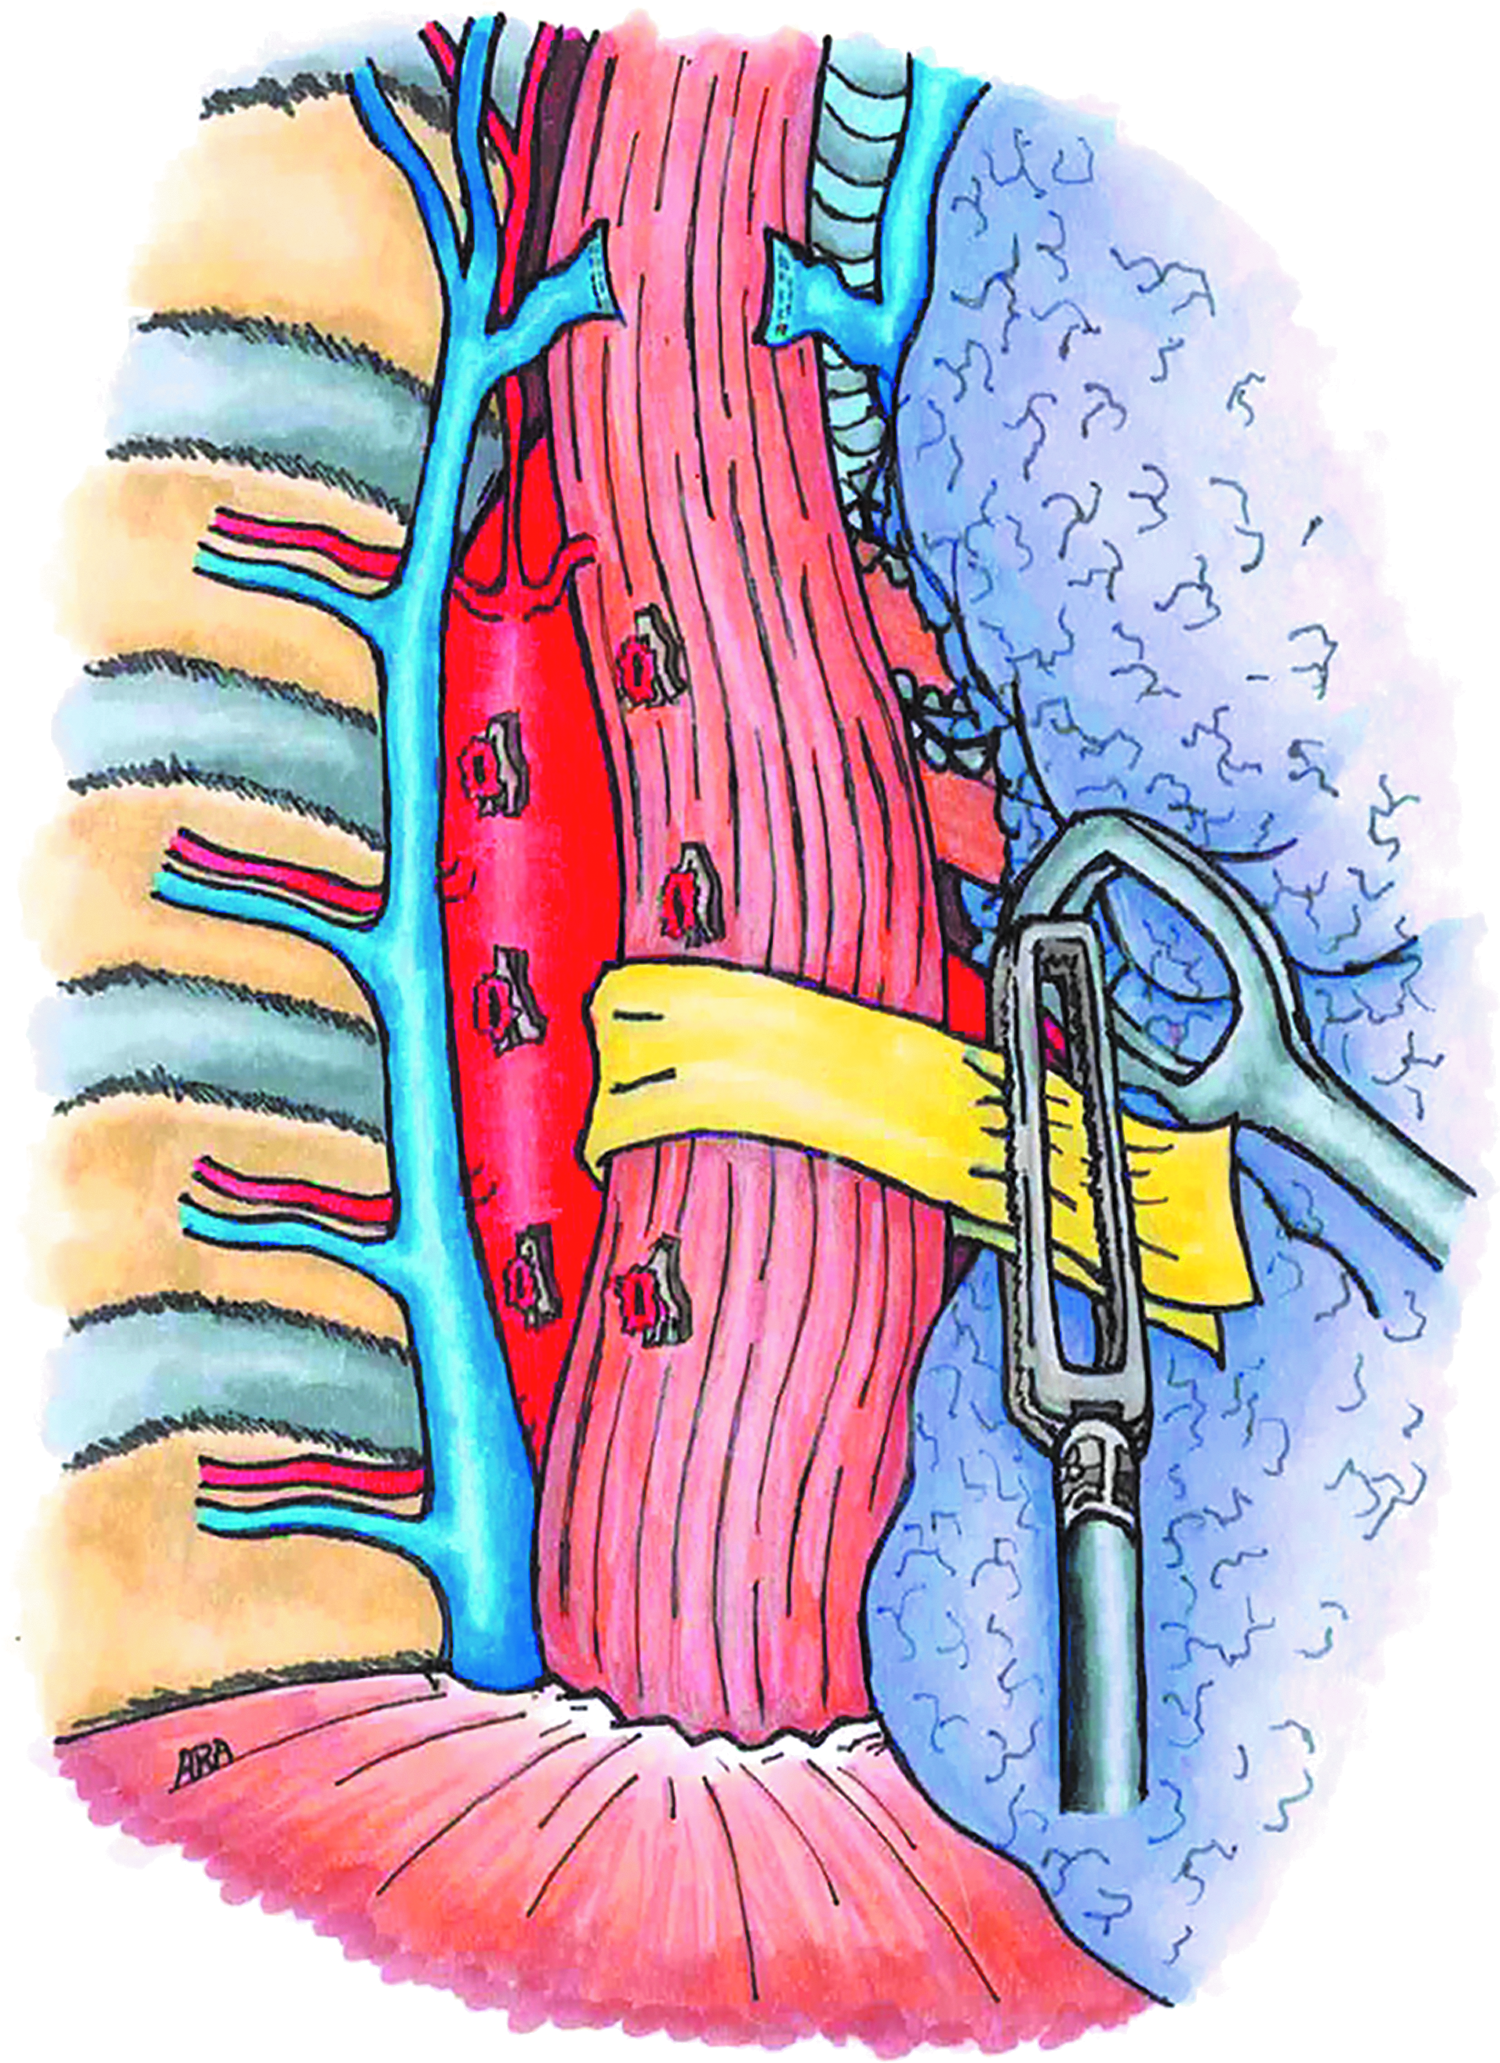
Dissection of the intrathoracic esophagus is facilitated with a Penrose drain and the Azygos vein is transected with a vascular stapler. Source: Illustrations by Anthony Andreoni.
Once the gastric conduit is in the chest cavity we are ready to begin the anastomosis. Although there are several ways to complete this step, we prefer a side-to-side anastomosis created with a 60-mm linear stapler as we feel it provides a larger and more reliable common opening as compared with a circular end-to-end anastomosis created with an end-to-end stapler. The side-to-side alignment of the esophagus and gastric conduit is created and preserved by affixing them together with 2-0 silk stay sutures with long tails for later manipulation. A large bore nasogastric tube (NGT) or red rubber catheter is advanced carefully into the esophagus and used as a guide for creating the esophagotomy. The gastrotomy is now made 8 cm from the proximal end of the gastric conduit and a 60-mm stapler is inserted into the enterotomies and fired (Fig. 5). This creates a 6 cm esophagogastrostomy with a common opening of the prior esophagotomy and gastrotomy that must be closed. Depending on the situation, the opening is approximated with either an absorbable braided inner layer or a stapler followed by a braided, nonabsorbable interrupted outer layer.
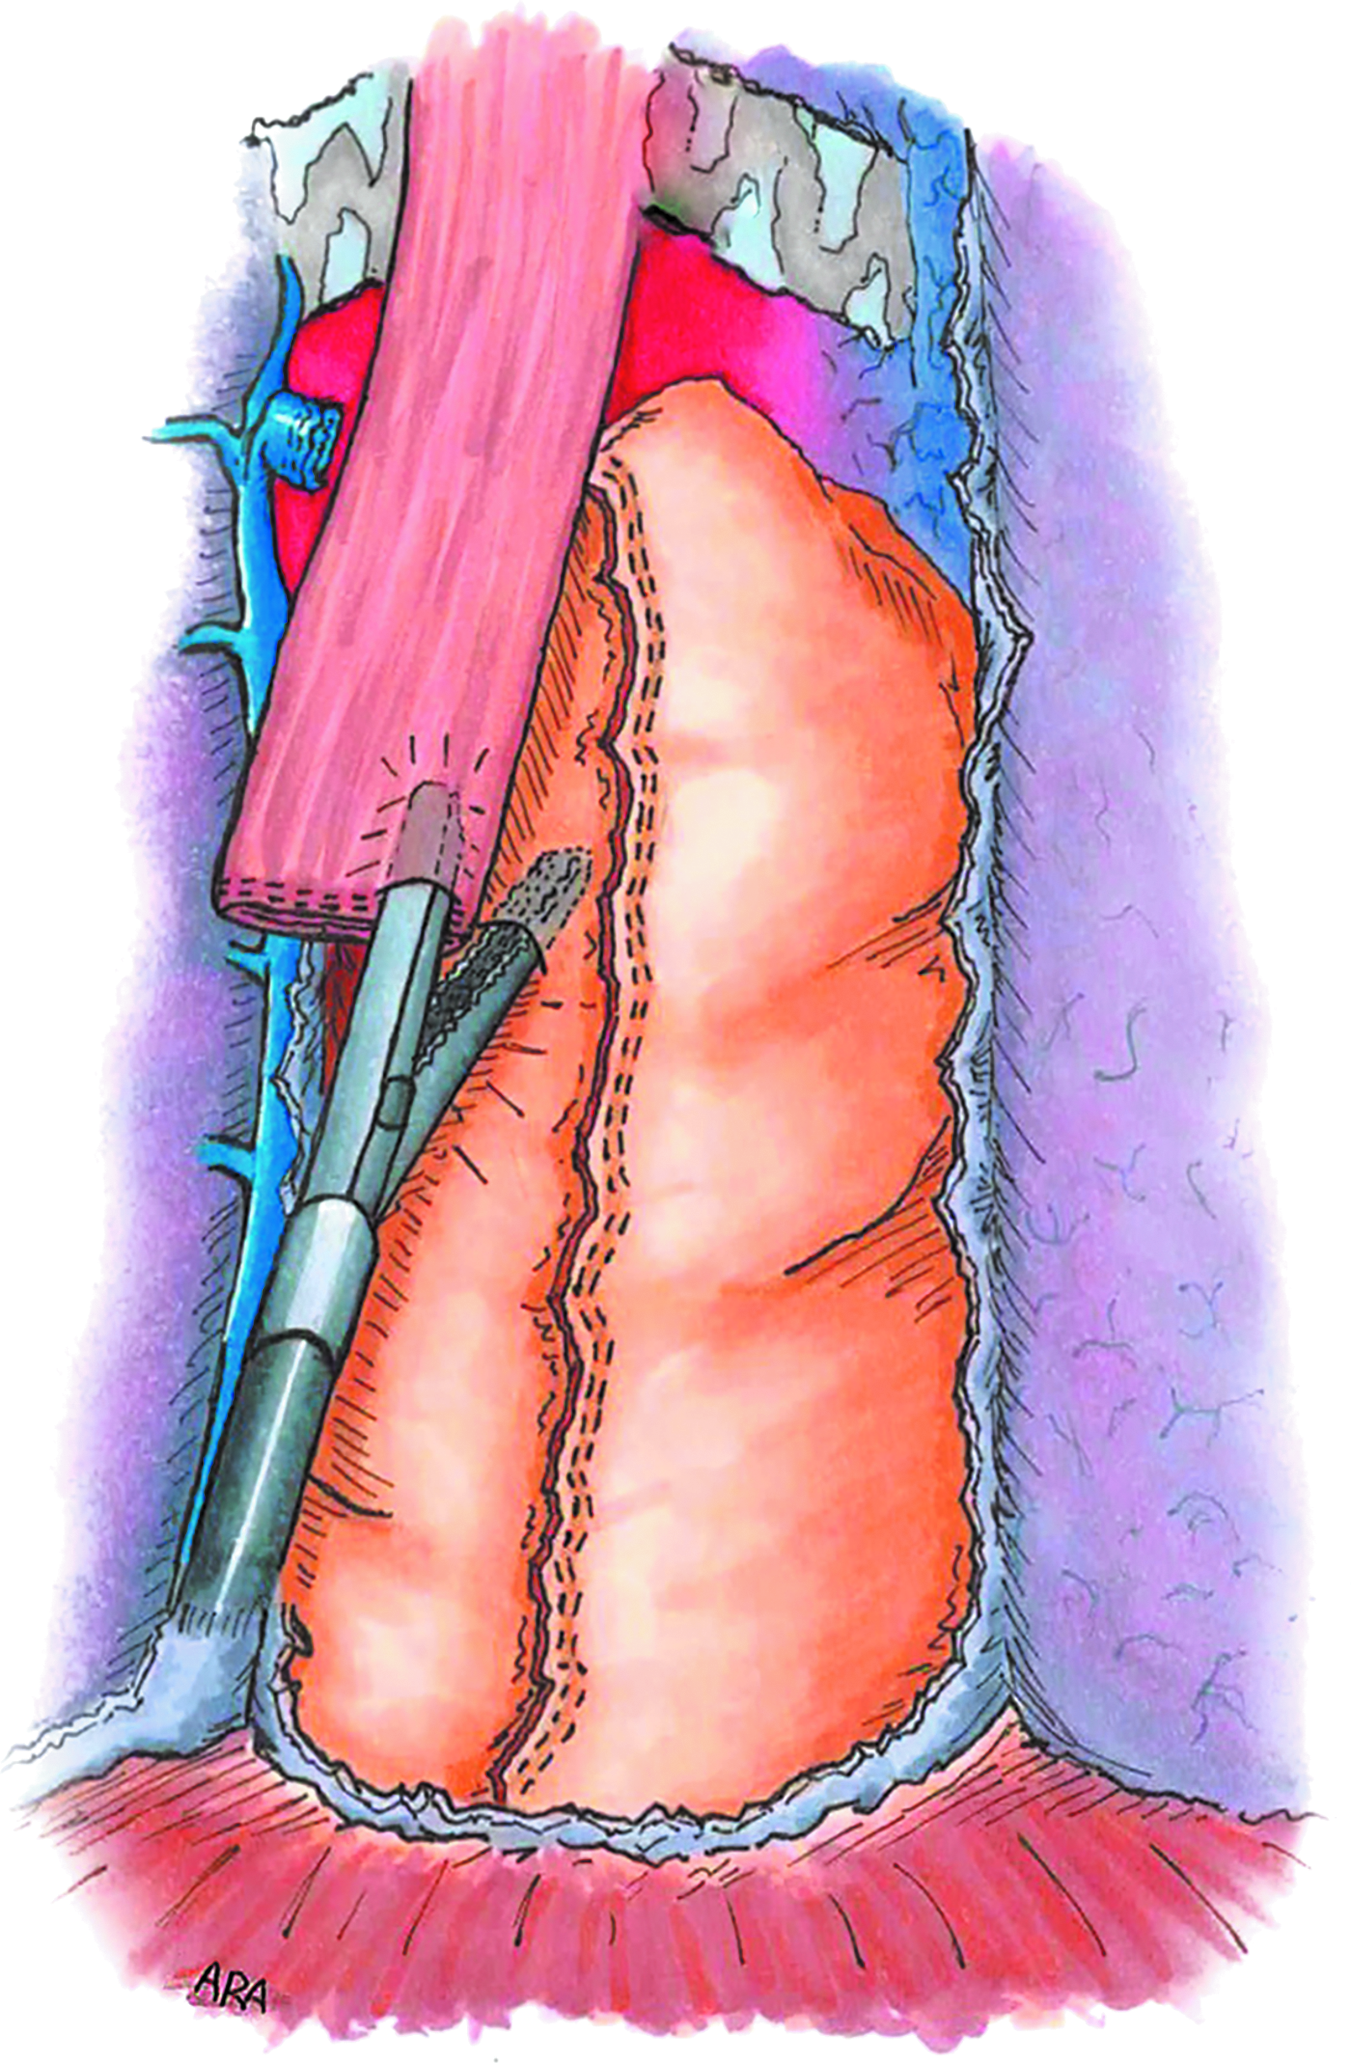
Depicts the creation of a thoracic esophagogastrostomy using a linear stapler. Source: Illustrations by Anthony Andreoni.
When the anastomosis is complete, an endoscopy is performed to visualize the patency of the conduit, inspect for bleeding, and test the anastomosis for leaks by insufflating air while the anastomosis is submerged. When satisfied with the anastomosis, the gastric conduit is secured to the diaphragm with two simple interrupted 2-0 silk sutures. Additional sutures securing the conduit to the pleura may be used if necessary.
The specimen is removed through a 3 cm thoracotomy at the 5th intercostal space that typically requires no rib spreading. A 24F chest tube is then placed in the posterior mediastinum to drain the area and monitor for leaks without the aid of suction. The NGT is also left in place. 17
McKeown Three-Site MIE Anastomosis
The McKeown MIE, as mentioned before, involves a cervical anastomosis instead of an intrathoracic anastomosis. This is our preferred method as it allows for easier management of an anastomotic leak if one is to occur. A simple incision and drainage of the cervical area is easier to handle than leaks in the thoracic cavity. Furthermore, the creation of the anastomosis is done extracorporeally so there is more direct control while operating. However, it does require an understanding of cervical anatomy and subjects the patient to additional surgical site. In reality, it is a short portion of the procedure that can be done safely and easily with a basic understanding of neck anatomy.
Differing from the two-site MIE, the three-site MIE begins in the right thoracic cavity with the patient in a left lateral decubitus position. Trocars are placed as shown below (Fig. 6) and the esophagus is dissected free circumferentially from the GE junction to the cervical esophagus. We place a Penrose drain around the esophagus to help with retraction in this setting. The azygos vein is taken with a stapler, as with the two-site procedure, and dissection continues to the level of the thoracic inlet. With the dissection completed as far up the esophagus as is safely possible, the majority of the cervical dissection should already be completed. The Penrose drain is then positioned at the most superior portion of the dissection to make it easy to find when the cervical dissection is started. It is also important to note that great care is taken to avoid entering the left pleural space and the abdomen during this portion of the procedure.

Right lung in deflated and 5-mm trocar is placed just inferior to the right scapula, 5-mm trocar directly posterior to the initial trocar in the posterior axillary line at the 7th intercostal space as the left hand working port for the surgeon, 10-mm trocar in the posterior axillary line at the 10th intercostal space for the right working hand of the surgeon, 5-mm trocar placed anteriorly in the 7th intercostal space and will be utilized for retraction of the lung through a fan retractor. Source: Illustrations by Anthony Andreoni.
Performing the dissection under direct laparoscopic visualization aids in recognizing and avoiding important structure such as the recurrent laryngeal nerve and the thoracic duct. If the thoracic duct is identified, we prefer to ligate and divide it so as to mitigate the chance of a chyle leak. Closing and drainage may be done in the manner you are choosing, however, we prefer to leave a 24F Blake drain in the posterior mediastinum that exits the inferior 10-mm trocar site.
The patient is now repositioned in the supine position with the left arm tucked and left neck exposed. The neck and abdomen are prepped and draped at this time. Attention is turned to the cervical site where a left neck incision is made anterior to the sternocleidomastoid muscle and the dissection is carried down to the esophagus, which should already be mostly dissected. After clearing the few attachments that remain, the Penrose is identified and secured with a Kelly clamp. The incision is covered with a damp lap pad while the abdominal dissection is completed.
Turning our attention to the abdomen, trocars are placed in a standard foregut laparoscopic orientation as noted above in Figure 1. The dissection and creation of the gastric conduit is carried out as described above (Fig. 2). After the gastric conduit is created and sutures are placed along the staple line for future manipulation, it is absolutely critical that the conduit is secure to the distal aspect of the gastric specimen well. We do this with several interrupted 2-0 silk sutures (Fig. 7).
Sutures are placed to facilitate delivery of the gastric conduit through the cervical incision while maintaining orientation. Source: Illustrations by Anthony Andreoni.
Revisiting the cervical site, the specimen and gastric conduit must now be delivered through the cervical incision. This is done with gentle but firm traction on the Penrose drain and the esophagus while the assistant laparoscopically maintains the orientation of the gastric conduit with the help of the 2-0 silk stay sutures, as it is imperative that the conduit does not twist as this will compromise the blood supply and dramatically increase the likelihood of a leak. After both the specimen and the conduit are delivered, we are ready to create the anastomosis.
The posterior aspect of the stomach and medial aspect of the esophagus are opposed with what will be the distal end of the esophagus and the proximal end of the gastric conduit pointing away from the patient. Electrocautery is used to enter the distal end of esophagus that will be preserved and the proximal portion of the gastric conduit 8 cm from the end. The NGT is retracted into the proximal esophagus at this time and a 60-mm heavy load stapler with peristrips is placed with the anvil in the esophageal opening and fired (Fig. 8), making sure the NGT is out of the way. After firing, the NGT is placed into the gastric tube through the anastomosis and a stapler is used to close the common opening. Note that it is at this point that the specimen is removed too. This staple line is strengthened with a running 3-0 PDS suture and two simple 3-0 silk sutures are placed to secure the crotch.
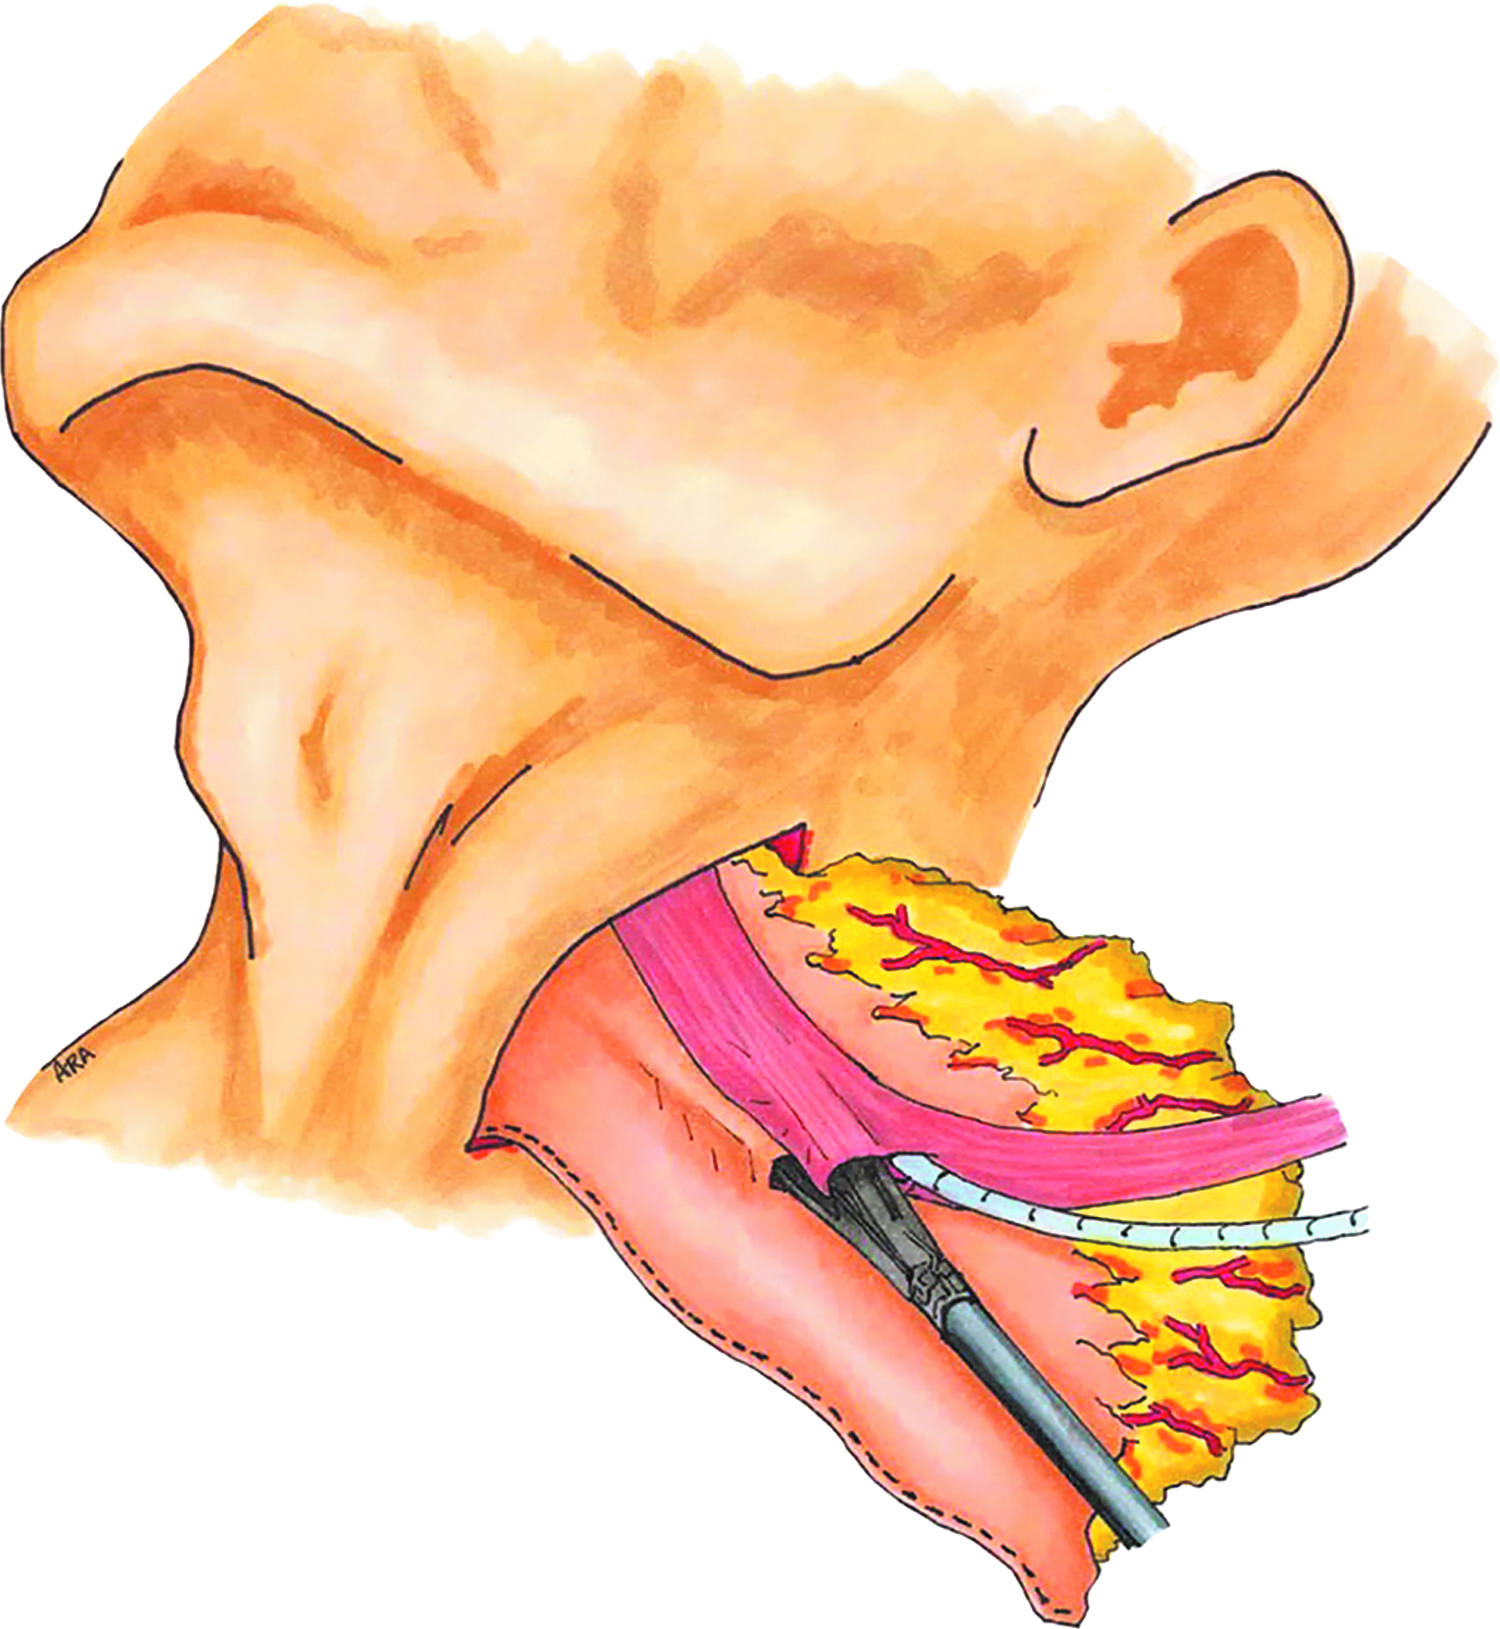
Creation of the extracorporeal esophagogastrostomy with a 6 cm linear stapler. Source: Illustrations by Anthony Andreoni.
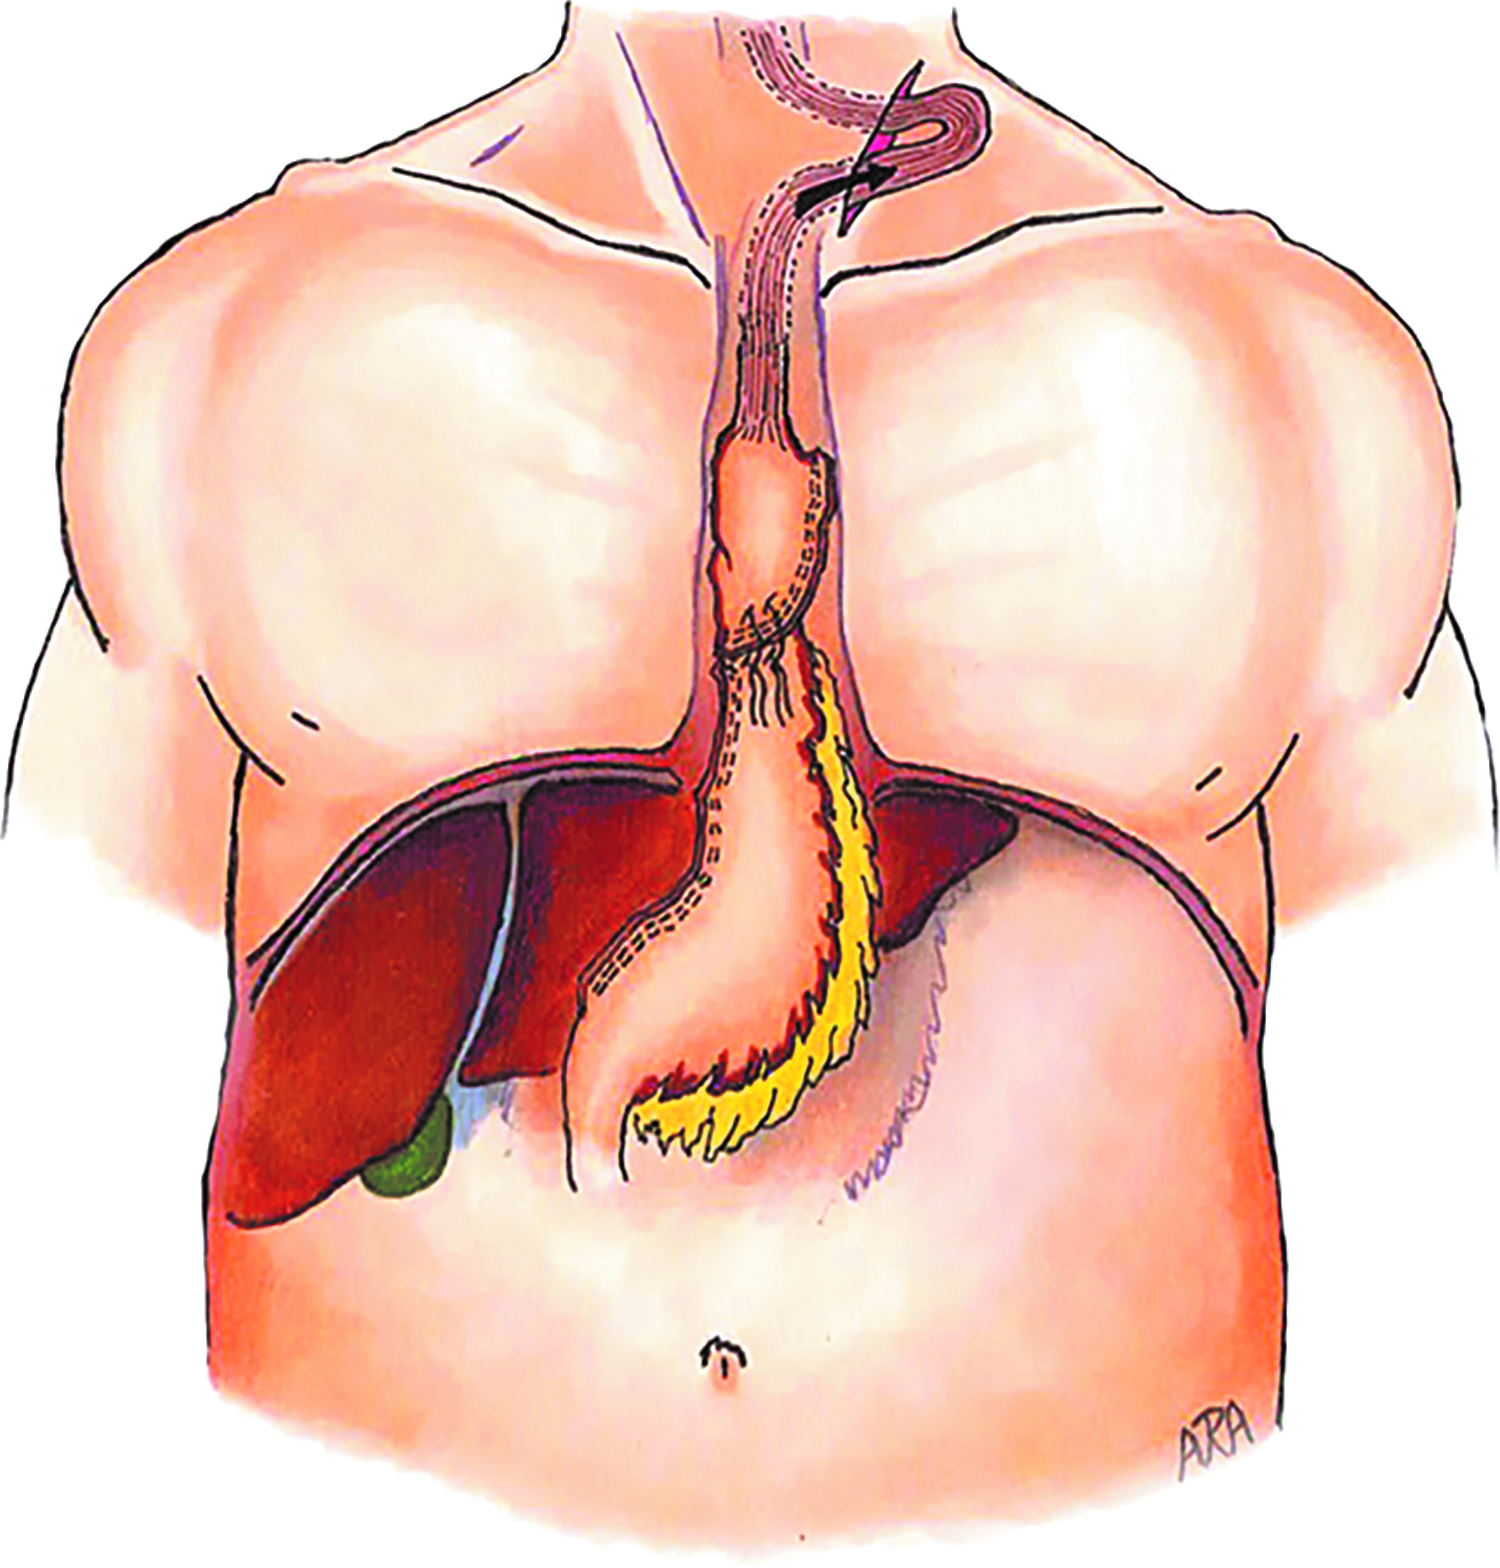
Arguably the most difficult part of the entire operation, we now deliver the anastomosis back through the cervical incision. Figure 9 shows how it will ultimately lay in the chest. A 7F drain is introduced through a stab incision and placed alongside the anastomosis. This drain is placed to gravity bag drainage, not suction. The thought is that the negative pressure of a Jackson-Pratt drain, as high as −117 mmHg, can damage the fresh anastomosis, and a leak will be readily apparent in the future without the help of suction. 22 Finally, the gastric conduit is secured to the diaphragm with two 2-0 simple silk sutures to help take some tension, courtesy of gravity, off the anastomosis. A 16F J tube is also placed. This allows for immediate feeding of the patient and is a great insurance policy in the event of a leak where the patient may remain NPO for several weeks. 23
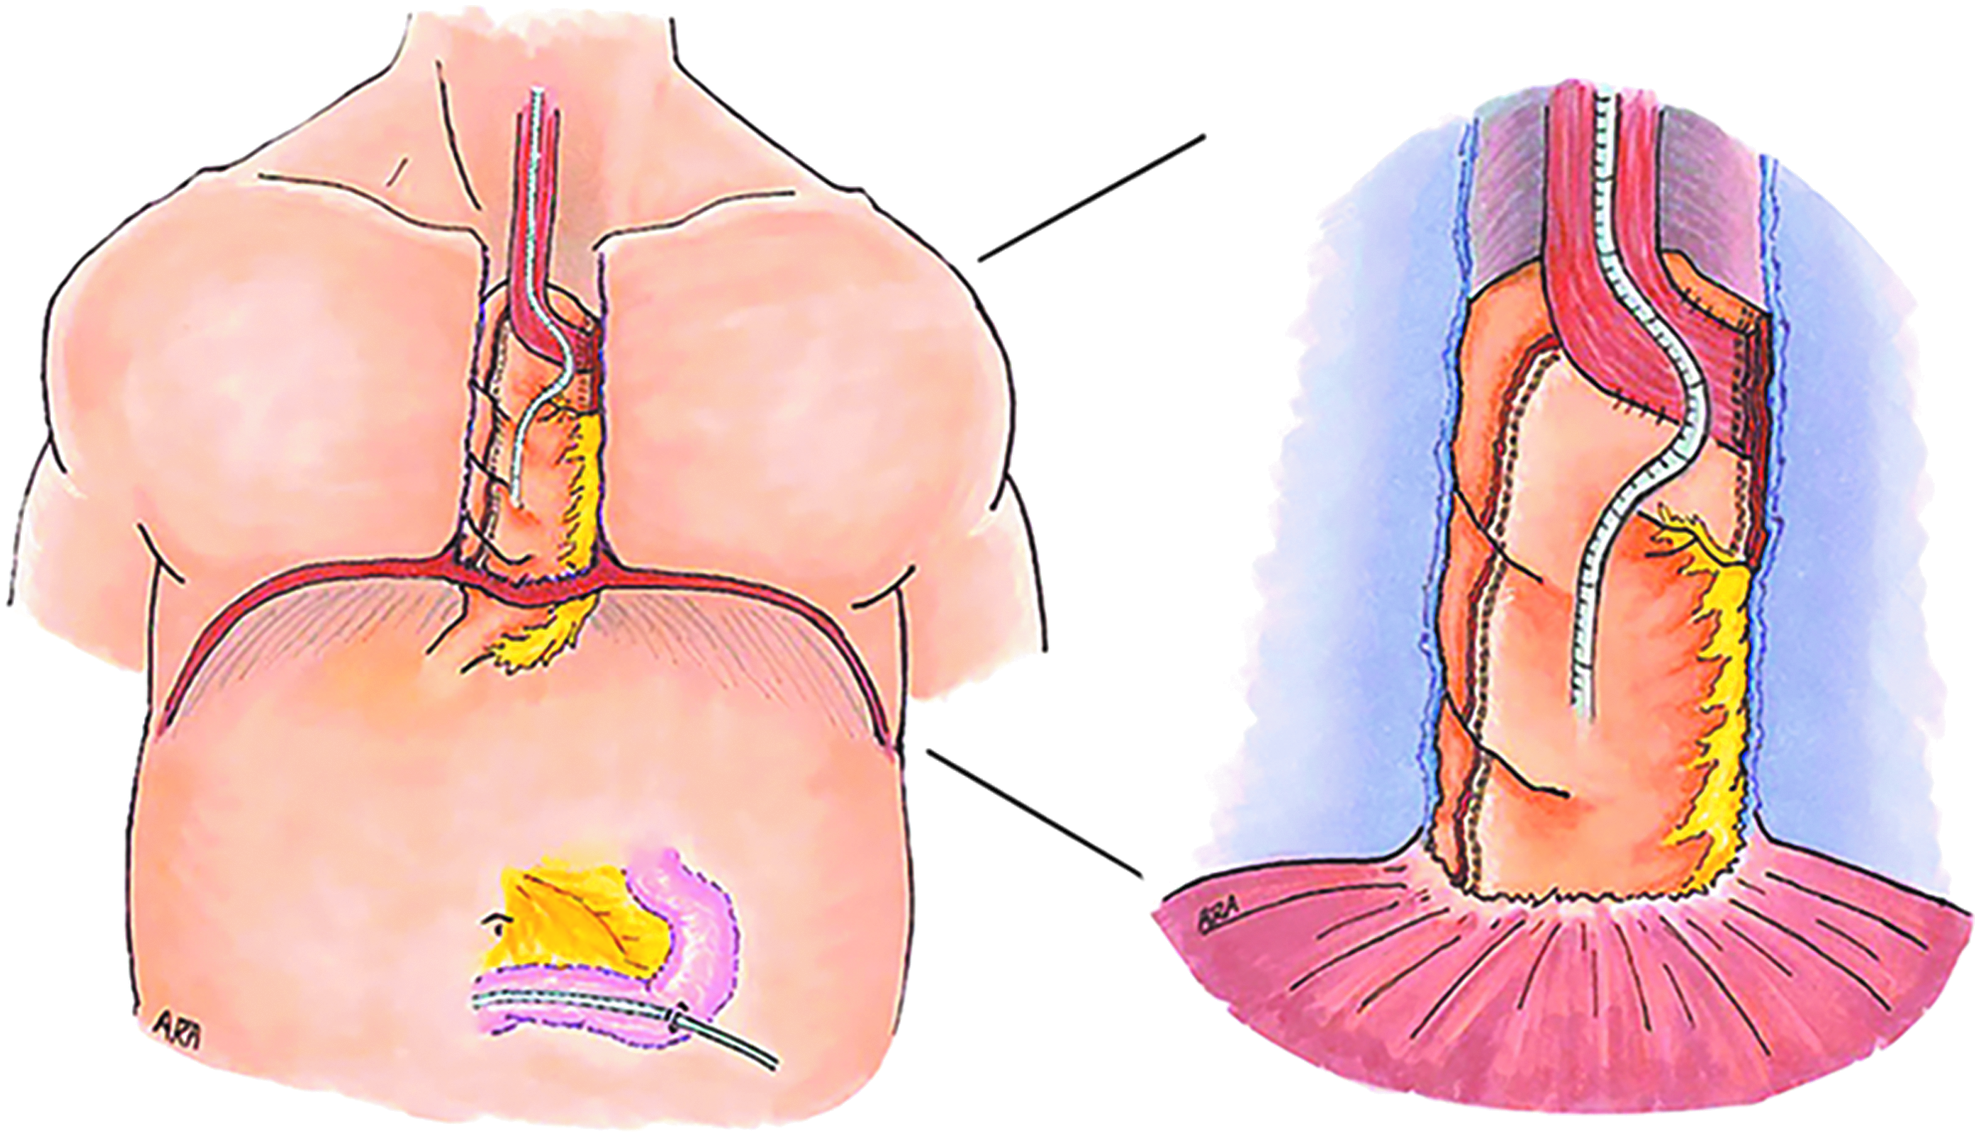
The orientation of the esophagogastrostomy as it sits in the chest after being delivered through the neck incision. The NGT shows the general course of the newly constructed alimentary tract. NGT, nasogastric tube. Source: Illustrations by Anthony Andreoni.
Postoperative Care
Equally important as the work that goes into creating the anastomosis in the operating room is the care the patient receives in the postoperative setting. This is an exercise in patience and teamwork with the overall goal being to ensure the anastomosis is acceptable for use before removing the drains and allowing the patient to eat. This whole process takes at least 5 days. The NGT is placed to low continuous wall suction with minimal gentle irrigation. This is kept in place until postoperative day 4 to prevent early aspiration events. Aspiration and dysphagia are unfortunately common following this operation and noted to be worse in patients with a cervical anastomosis.
On postoperative day one, the jejunostomy tube is used for feeding. This is started at 10 cc per hour and increased by 10 cc every 12 hours as tolerated. The dietitian, an integral member of the interdisciplinary team on our step-down surgical floor, determines the goal and formula based on the patient's caloric needs and weight. It is also worth noting that the most likely cause of morbidity following a MIE is pneumonia, which is seen in up to 28.5% of patients. 24 To combat this, patients are placed on a PCA pump while incentive spirometer use and ambulation is encouraged relentlessly by all members of the team. Physical therapists get involved on postoperative day 1 to get the patients out of bed and ambulating as tolerated.
The anastomosis is finally ready for evaluation on postoperative day 5. Although there are several options for testing the anastomosis, we prefer a fluoroscopic contrast swallow esophagram to assess for contrast extravasation and contrast accumulation in the drains. Following the successful completion of this study the patient is trialed on colorful clear liquids (usually cranberry juice) under direct surgeon observation. This is done both to assess for aspiration and accumulation in the drains. Again, it has been noted in the literature that most, if not all, patients have some degree of aspiration following an esophagectomy. 25 Speech and language pathologists help with this portion of the patient's recovery if there are issues and patients may need to abstain from thin liquids in the immediate postoperative setting. The neck drain, if present for the cervical anastomosis, is eligible to be removed at this time while the mediastinal tube will remain for one additional day. With all of these benchmarks passed, the patient is ready for discharge on a full liquid diet with gradual advancement back to a regular diet over the next several weeks.
If a leak is present on the fluoroscopic test, the patient will remain NPO for two more weeks before repeating the fluoroscopic test. The patient will also need to continue jejunal tube feeds for the duration of their wait. This is a trying time for both the patient and the clinician but strict adherence to this timetable leads to the resolution of most leaks. As long as the drains remain in place and source control is achieved, patients can usually follow-up as outpatients for the swallow evaluation and continue their recuperation at home or in a physical rehabilitation setting.
In summary, MIE have become widely accepted for both benign and malignant pathologies. However, a steep learning curve and the need for a well-trained ancillary staff have kept this technique from gaining universal acceptance. It is our hope that the anastomotic options and tutorials offered in this study will help to bring this technique, and its many benefits, to more centers and patients worldwide.
Footnotes
Disclosure Statement
No competing financial interests exist.