
Abstract
Abstract
Most young researchers leaving the safe haven of postdoctoral life for the unchartered territory of a PI position are confronted with a multitude of new tasks. For those using fish as their favorite model system, this often includes the daunting task of setting up and running a fish facility. New PIs are expected to know everything about this, and are even asked in job interviews about the precise details of the facility they anticipate using. Consulting other laboratories, talking to experienced facility managers, and sifting through books and web material will certainly help but can be enormously time consuming and at times frustrating. You will likely receive conflicting advice or encounter information that is overcomplicated and out of date. In this report, we summarize our collective experience of five different fish facilities, and outline what we consider to be the essential steps for setting up and running a successful facility. We also include valuable tips and tricks such as an optimized protocol for brine shrimp hatching. Our aim is to help researchers spend less time worrying about the technical aspects of their facility so that they can focus on their main job—research.
Introduction
We will summarize our own experience of starting a medium-sized fish facility. There are many acceptable ways to run a fish facility: this account is by no means comprehensive but it should nevertheless offer practical assistance to those undertaking a similar task. (Those who require a more in depth account of zebrafish husbandry may wish to consult Lawrence (2007). 1 )
Before You Start
Perhaps for the first time as a researcher you are in possession of a five or six digit sum that you are supposed to spend all at once in order to establish your fish facility.
Before you start thinking about purchasing your fish systems, you need to prepare the room allocated for the facility. If you are not lucky enough to find your room in the basement of your building, you may need to involve a structural engineer. Fish systems are heavy when filled: you need to allow 700 kg for each system unit or rack and around 1000 kg for a reverse osmosis storage tank. At this stage you will also need to involve an architect in preparing the room for your chosen aquatic system. Here are the major points to consider:
• Animal research is highly regulated with no exceptions for fish species, so you will need to factor in all relevant government legislation in relation to setting up and running an animal facility.
• Because your system will involve a large water source heated to 28°C, it is essential to have a good air treatment system to combat humidity. Water temperature can be achieved by passive or active heating. When actively heating the water, it pays to keep the room temperature close to 28°C to avoid condensation problems. 26°C is acceptable and makes for a more pleasant temperature to work in.
• Waterproof power points need to be placed in convenient locations but also need to be a safe distance from water sources. Also, make sure you have plenty installed.
• All of the windows need to be blacked-out in order to maintain a 13/11 hour day/night cycle, and you will need to install a device to regulate this cycle.
• It is important to consider illumination levels in relation to the layout of the aquarium. Because higher light levels increase the growth of algae, it is a good idea to keep lighting low directly above the fish tanks, while maintaining good lighting elsewhere for maintenance and breeding areas.
• Good floor drainage is essential; anyone who has worked in a fishroom where the drains are not at the lowest point on the floor will understand the importance of getting this right.
• You will need to install an alarm system in line with your institution's guidelines.
• Ensure there is plentiful surface space for setting up breeding cages (shelves, tables, or trolleys, for example) as well as storage cupboards for equipment.
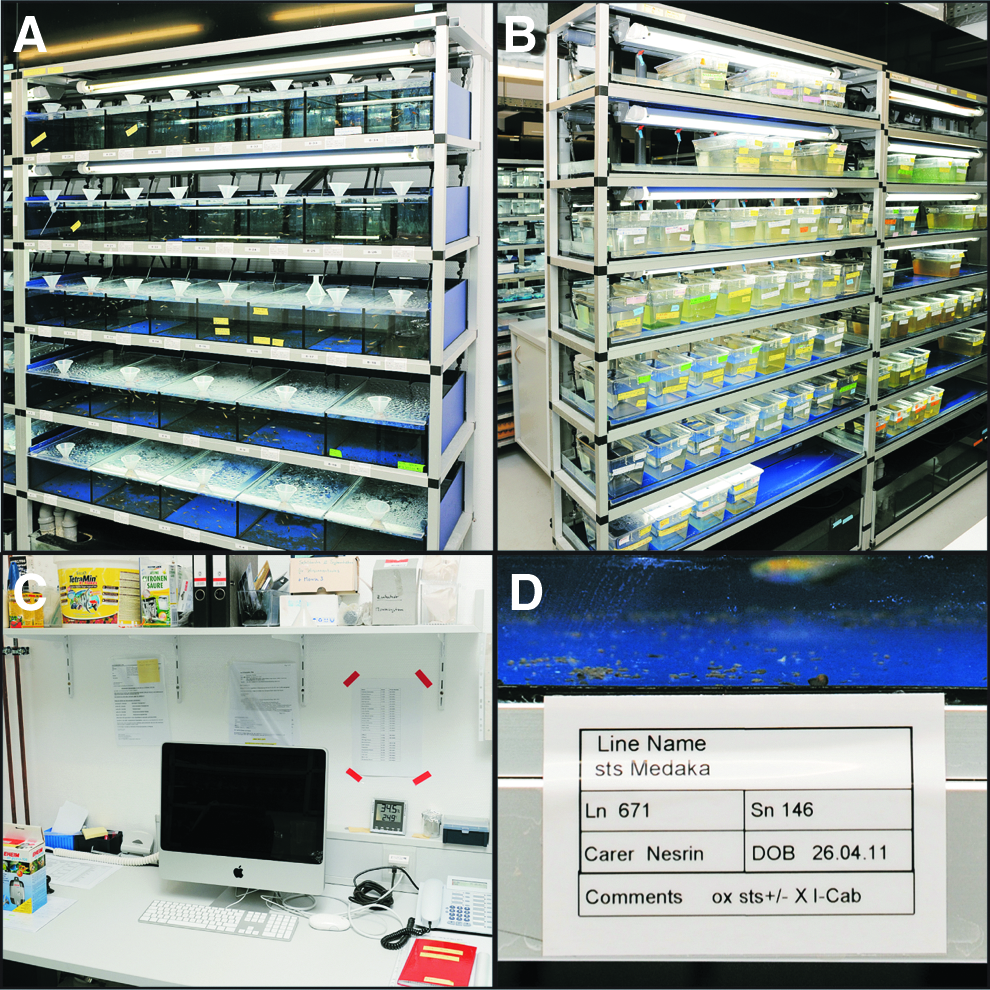
• Do not forget that besides a sink area/wet working space, you also need a dry bench for injecting and other procedures (and perhaps for a computer) if you don't have a separate room allocated for these things (Fig. 1).
The company you choose for the purchase of your aquatic housing system will need to work in consultation with the architect and electricians. The type of system you choose depends on your fish model, your finances, the space available, and personal preference. Regarding personal preference, it is wise to keep an open mind. Many post-docs who have already worked with fish will tend to favor the system with which they are familiar. However, companies often update and improve their systems, and it is therefore worthwhile looking at all the options available and consulting other labs before making your decision.
There are a number of options. These days, most laboratory aquariums are recirculating flow-through systems, involving some or all of the following types of filtration: mechanical, UV, carbon, and biological. Biological filtration is the most important of these, as well as the most significant point of difference between the various companies. Types of biological filtration media include fluidized bed (silicone bead), submerged bed, or drip through filter pads.
Housing systems can be either stand-alone or centrally filtrated multi-rack. In contrast to the latter, each stand-alone system (about 200 liters of tank space) has an independent water treatment system (Fig. 1A). A series of stand-alone systems therefore allows for the re-circulating water for each rack to be isolated. This may reduce the spread of disease or prevent the death of the wider colony due to problems with water quality. On the other hand, the great advantage to a centrally filtrated multi-rack system is that it is less cost and labor intensive in terms of filter maintenance and therefore better for larger set-ups. Moreover, water quality remains constant across the whole aquarium. It may be quicker and easier for a new PI to start out with one or two stand-alone systems. This would require a less complicated room fit-out and provide an opportunity to trial what the companies have to offer. When the time comes to expand, these stand-alone systems can be used as isolation units.
Tanks are made from either polycarbonate plastic or glass. The plastic tanks are usually removable and some claim to be self-cleaning, and for the most part this works, although algae can still accumulate over time. At least one of your systems should have removable plastic tanks for raising fry (Fig. 1B). The glass tanks are static and need to be manually cleaned (see below). Certain companies specialize in tanks for specific species and can even custom-make systems, for instance, medakafish prefer shallow water levels and need less volume than zebrafish. Whether you choose glass or plastic, you may want to have a variety of tank sizes to keep large stocks as well as smaller ones. Note that glass tanks can be made in much larger sizes if desired. Glass tanks may also be better suited to toxicological studies.
Besides the major sales companies, you should not overlook the possibility of finding smaller local sellers who might be able to provide you with better after-sale service.
In addition, you need to have a financial plan in place for the maintenance of the facility in the long term. The required number of man-hours per week will vary according to the number of tanks and the kind of system you are using. Based on our experience, a facility of 400 7–15 liter tanks needs to be staffed for 15–20 hours per working week. A little extra may be required to cover weekend feeding unless your researchers share the load. Basic running costs (additional to staffing) can be calculated at about 1 Euro per fish per year.
Finally, you need to employ a technician to run your facility. This job is about more than cleaning tanks and feeding fish; what you want is someone who will take the initiative to make constructive changes in the running of the facility, who can independently solve problems when required, and who, if the facility were to expand, would be a good manager of any additional staff. If they take a genuine interest in the research, they are assisting, even better. Staff turnover can be high because of the challenging working conditions (high humidity and artificial light), so it is wise to fully brief prospective employees on the demands of the job. Ideally they will spend a few hours working alongside you in the room before committing to the post.
Setting Up the Fishroom
Once your system has been installed, make sure it is thoroughly clean before you fill the tanks and sumps. This may mean removing glue or oil residue using sponges and high-pressure water. This process may need to be repeated several times.
Once clean, you can start running the systems with conditioned water. If you don't have an automated system, you can use deionized water or water from your reverse osmosis system and add a bit of artificial sea salt (1 gram per 100 liters). You can then adjust the conductivity to a value of your liking. Values differ a lot among labs and range between 250 and 1500 μS, somewhere in the middle, around 500 to 800 μS, is probably about right.
You will also want to obtain a stable pH of around 7, but this will be easier to establish once the nitrogen cycle is in its final stages. To begin the nitrogen cycle, inoculate your system with bacteria. This establishes nitrifying bacteria on your biological filters, which will convert (toxic) ammonia to nitrites and nitrites to (less toxic) nitrates. You can monitor this with water testing kits. First, you detect a buildup of ammonia as a colony of bacteria establishes, then the ammonia levels will decline and the nitrite levels will increase. Finally, a second type of bacteria establishes, and nitrites decline as nitrate levels rise. The cycle is complete when there are no detectable levels of ammonia or nitrite, and nitrates have stabilized at about 25 mg/L. Nitrate levels are kept stable by regular partial water changes (5%–10% daily). Depending on the effectiveness of your system's biological filtration, it can take between 3 weeks and 2 months to complete the cycle.
A quick way to kick start the nitrogen cycle is to use a bacteria-soaked filter from a laboratory that you know has a clean bill of health, for example, the one you intend to obtain adult fish from at a later stage. If you are concerned about contaminating your system, there are a number of commercially available bacterial solutions designed to get the cycle underway. Alternatively, if you don't want to introduce any foreign bacteria into a brand new system, then it is possible to get the cycle going by just adding clean (bleached) embryos to your system and slowly building up fish numbers. As the fish grow and the amount they are fed increases, the bacteria colony will gradually increase and stabilize.
During this period, take the opportunity to order and test all the equipment you require for the daily routine. Here is a checklist of key items, many of which you will be able to acquire from the company you buy your system from (maybe as part of an ongoing service contract):
Breeding
• breeding tanks
• aquarium nets
• plastic tea strainers
• marbles
• 1 liter plastic wash bottle for embryo medium
• tanks for raising fry (see below)
Feeding
• brine shrimp hatching funnels
• standard aquarium air pumps for hatching brine shrimp (the most powerful you can buy)
• 125 micron strainers for collecting brine shrimp
• feeding funnels for the tanks, if required by your chosen system
• 1 liter squeezable wash bottles for feeding
• lab spatulas/spoons
• brine shrimp cysts and dry food (see below)
• a small fridge/freezer
Water and room parameters
• water softening tablets, if required by your chosen system and local water supply
• test kits to measure various water values (nitrates, nitrites, ammonia, dissolved oxygen)
• thermometers for measuring water and room temperature/humidity
• handheld pH and conductivity probes
• sodium bicarbonate (for adjusting pH levels)
• artificial sea salt (for maintaining water conductivity)
Cleaning supplies and system maintenance
• cleaning equipment (mop, buckets, floor squeegee, sponges, etc.)
• cleaning products (bleach but not detergent, unless a safe brand like Virkon)
• a step ladder
• disposable overshoes (optional, but saves time on cleaning floors)
• a commercial dishwasher (optional but extremely useful)
Stock tracking and record keeping
• a computer
• database software
• a label printer
• coloured tape and labels
Finally you will need to keep track of your fish lines. It is wise to set up a database for this purpose. There are some commercial packages available, but you might be better off custom-making your own with a software program such as Filemaker Pro. You will need to investigate any animal research legislation to establish what information you are required by law to record. Your database could include information about tank position, strain, stock number, date of birth, user, origin, breeding history, comments relating to mutations or transgenes; you could also include information about fish deaths. It is also useful to keep track of all regulated procedures carried out on your fish. Consider incorporating a labeling system into your database, rather than doing this separately. While larger facilities use barcode labeling systems to keep track of huge numbers of fish, simple labels containing the essential information does the job in smaller facilities (Fig. 1D).
Running the facility: The daily routine
Once you have the first fish swimming in your aquarium and you have adjusted the light cycle in your fishroom—13 h light and 11 h darkness (14/10 is also used)—the daily feeding procedure starts. Many labs feed three times a day, although twice a day is sufficient. It is even enough to feed only once on weekends, although feeding less often could have a negative effect on the fecundity of your fish. Whichever you choose, rest assured you will be feeding them more often than the average pet shop does.
Feeding is always a big matter of discussion between laboratories. There seems to be a general consensus that adult fish do best on a combination of newly hatched brine shrimp (artemia) and commercially available dry fish food either in flake or granular form. 1 The greatest difference in opinion is usually about what and when to feed your growing fry.2,3 To get fry through the critical early stages of growth, it is generally considered beneficial to use paramecium, a ciliate protozoan. But this involves the hassle of maintaining a culture. Recent findings have shown that it is perfectly acceptable to raise zebrafish on a diet of commercially produced food only.4,5 Table 1 presents two independent approaches to raising fry that don't require the tedious job of culturing paramecium. At this point, we would like to emphasize that these two approaches have worked for us and can therefore serve as a guideline. But the account is by no means comprehensive, and other feeding schemes may be adopted in their place.
Newly hatched brine shrimp are high in nutritional value. While fry as young as 12 dpf can start to be fed brine shrimp, it is crucial not to feed empty shells or unhatched shrimp to your fish because they can get stuck in their gut and cause sickness or death. This is particularly the case with young fry, so it is very important to separate hatched brine shrimp from their shells.
Alternatively, you can avoid the hassle of having to separate hatched from unhatched cysts and empty shells by decapsulating (Fig. 2). Essentially this involves soaking the brine shrimp cysts in a strong bleach solution just long enough to dissolve the tough outer shell, leaving the brine shrimp enveloped in a thin membrane ready for hatching. This has the added advantage of optimizing the hatch rate and completely sanitizing the brine shrimp, thereby reducing the risk of introducing bacteria and diseases into the aquarium.
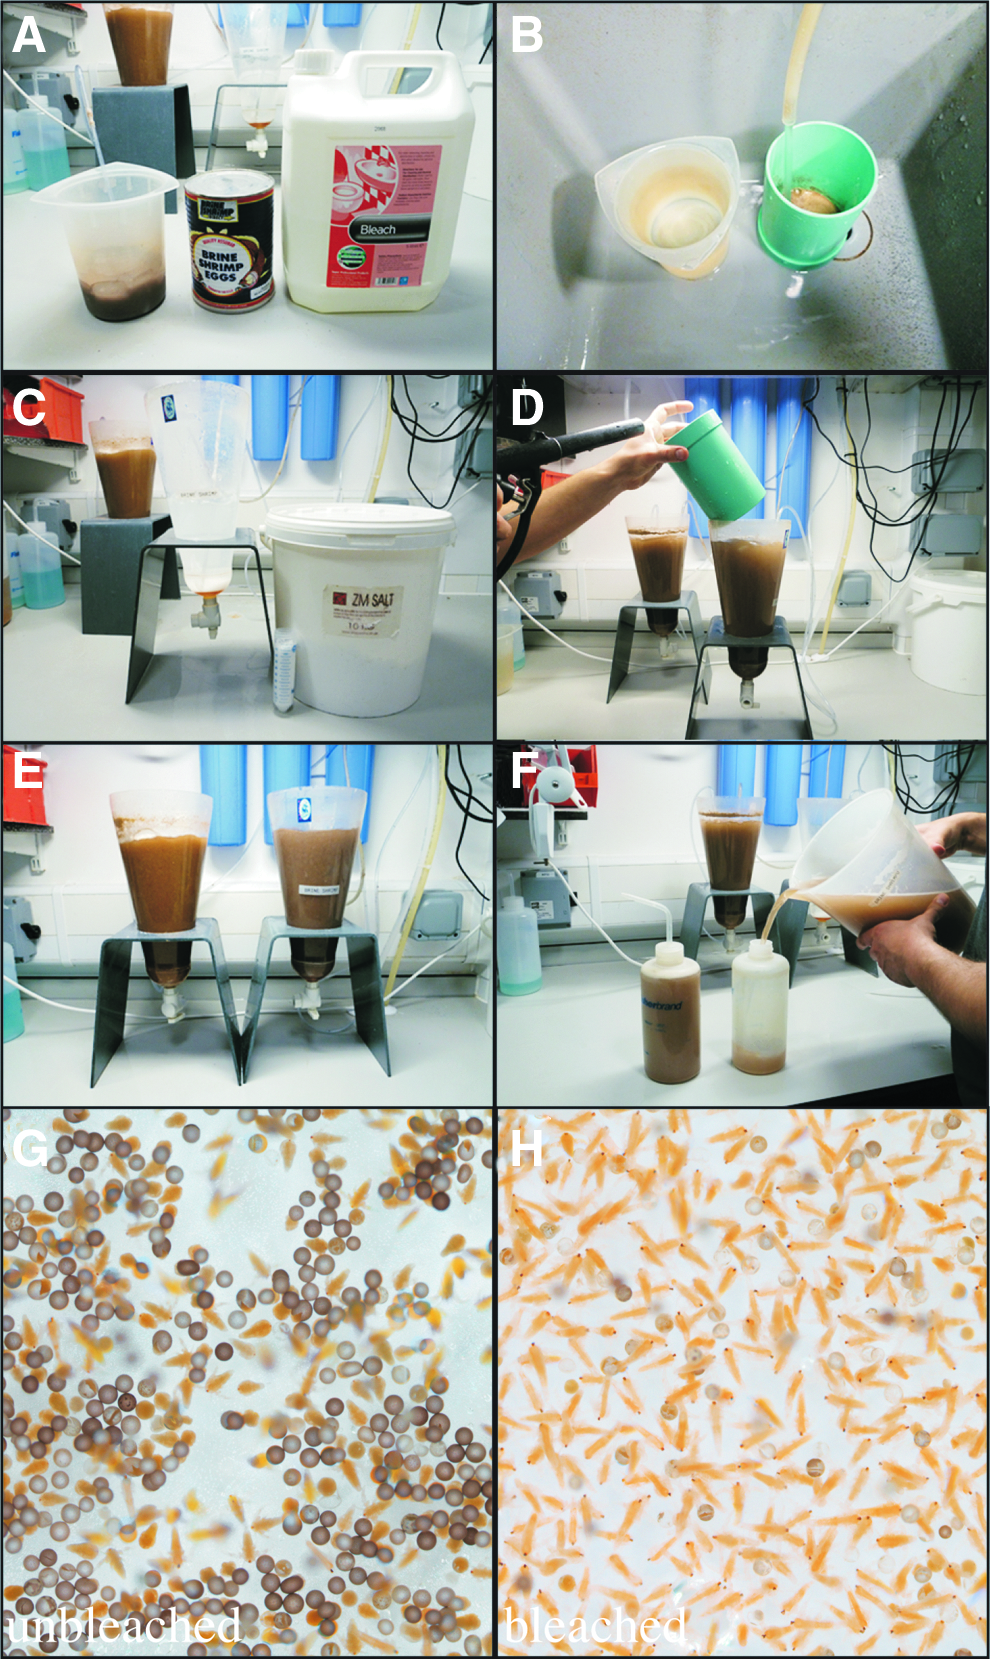
You will find a number of rather long-winded online protocols for decapsulating brine shrimp. Here we present a refined protocol that takes less than 10 minutes. It is possible to store decapsulated brine shrimp in a brine solution, but because this method is so quick, we find it easy to do as part of the daily feeding routine. The following protocol will produce enough brine shrimp to feed about 15,000 fish.
In a beaker, add 200 mL of standard household bleach (5% sodium hypochlorite) chilled to 4°C to 15 g brine shrimp cysts (e.g., brine shrimp direct grade A cysts) (Fig. 2A). It is important to chill the bleach because the oxidation process is exothermic and if the reaction temperature gets much above 40°C, this will be lethal for the brine shrimp. Aerate with a powerful standard aquarium air pump for 3–4 min. You should see the cysts start to change color from brown to orange, at which point you need to strain them into a 125 micron strainer (100 mm) and rinse vigorously under a running tap for about 4 min (Fig. 2B). Timing may vary slightly depending on the quality (shell thickness) of the brine shrimp you are using. Finally, rinse with system water.
To prepare your brine shrimp for hatching, fill a 2-liter brine shrimp hatcher with system water, add 40 g of artificial sea salt and place the aeration tube from your aquarium air pump so that it sits at the bottom of the hatcher (Fig. 2C). Once the salt has dissolved, add your recently decapsulated brine shrimp (15 g dry) (Fig. 2D). Leave for 24 h with good illumination somewhere in the fishroom, at around 26°C is ideal. By the next day, most of the cysts should have hatched (even if some haven't, they are still safe for your fry to eat because you have decapsulated them) (Fig. 2E). Remove the aeration tube and simply collect cysts with a 125 micron strainer, rinse and re-suspend in 4 liters of system water. Feed brine shrimp with squeezable wash bottles, squirting in enough so that fish can feed for 2 to 3 minutes (Fig. 2F). The brine shrimp can be stored at 4°C for feeding later in the day.
If your only option is to use tap water to set up your brine shrimp, this may result in accumulating limescale. This can be removed using 0.1% citric acid (household quality)/tap water. Once finished, rinse the funnel thoroughly and make sure it is completely dry before reuse.
After feeding, remove any dead fish and look out for any diseased fish and cull them immediately to avoid illness spreading. Symptoms might include loss of scales, swellings, open wounds or sores, ulcers, fin rot, and red or white spots. Do not forget to record any deaths and to check your water temperature (which should be 28°C) and the other system parameters (water conductivity/pH and room temperature/humidity). It is helpful to keep a log of these checks so that you can monitor changes, and so that others can see what has been done and when.
The cleanliness of the fishroom should also be daily priority, and floors and surfaces washed as often as required. Test your water values weekly (nitrate<75 mg/L, nitrite<10 mg/L, ammonium 0 mg/L).
It is important to keep your system clean. If your system is self-cleaning, this simply means cleaning tanks as you use them or spot cleaning tanks with excessive build-up of algae or uneaten food. These systems seem to stay pretty clean (unused tanks will probably need cleaning about once every 6 months). Cleaning involves removing tanks, scrubbing with a brush and, if you have one, rinsing at high temperature in a commercial dishwasher. While it is best not to use any detergents, a small amount of bleach in the dishwasher will ensure sterilization. Make sure all equipment is completely dry before reusing. Non-self-cleaning systems may need to be cleaned more often on a rotational basis, perhaps every 2 months. If you cannot remove your tanks from the system, then this will require a high-pressure water-jet to remove debris and dirt and a sponge to remove algae. Alternatively, you might find it more practical to siphon debris on a more regular basis. If you are draining your system, be careful not to remove more than half the water or you risk harming the biotope. Filters can be replaced if disposable, or washed with a high pressure hose nozzle. UV filters need a replacement bulb every year. RO (reverse osmosis) water systems will need to have prefilters changed every 2–3 months and membranes changed every 2–3 years.
Once you have made your facility manager familiar with the routine, you can finally concentrate on doing what you are hired for!
Footnotes
Acknowledgment
We thank Rene Kasper for taking photographs, Müller & Pfleger for allowing us to publish the pictures, and Victoria Coldham-Fussell and Bill Harris for critical reading of the manuscript. This work was supported by the DFG298/3-1 and the Wnt–Forschergruppe 1036 (AP-2) to MC.
Disclosure Statement
No competing financial interests exist.