
Abstract


Ms. Torres left the workshop excited about what she learned about evidence-based practices and confident that she is already implementing many of them. For example, the presenter said that providing behavior-specific praise is an evidence-based practice and that it helps with classroom management. Ms. Torres knows she uses behavior-specific praise, but she also feels like she is constantly redirecting students. She wonders why the praise is not helping more with student behavior. Maybe she is not doing it correctly . . . or maybe she is not doing it enough? She wishes she had a way to know and mentions her concerns to her principal, Ms. Harrison, after the faculty meeting. Ms. Harrison suggests she try self-monitoring to see if she really is providing as much praise as she thinks.
Delivering high-quality instruction grounded in evidence-based practices is one of the most important responsibilities of special education teachers. However, simply implementing effective evidence-based practices is not enough to ensure positive results; the practices must be implemented with fidelity (Cook & Odom, 2013). Although there are many aspects to fidelity, in general, fidelity means that crucial features of a practice are implemented correctly and consistently. Even after reading about or seeing a demonstration of an evidence-based practice, it can be difficult for teachers to know if they are implementing the practice with fidelity. Teachers may not receive regular feedback on their teaching and may be unsure if they are implementing practices effectively. Self-monitoring is a strategy for obtaining performance feedback that is readily available to classroom teachers, and it does not require having someone else conduct an observation.
Self-monitoring is an evidenced-based strategy that involves systematically observing one’s own behavior and recording whether or not a target behavior occurs (Cooper, Heron, & Heward, 2007). Many special education teachers have taught students to self-monitor as a component of behavioral or academic interventions, and it can be successful in helping students change their behaviors. For example, students have been taught to use self-monitoring to decrease rates of stereotypy (Crutchfield, Mason, Chambers, Wills, & Mason, 2015), increase time on task (Boswell, Knight, & Spriggs, 2013), and increase the quantity and quality of writing (Goddard & Sendi, 2008). Although many teachers may have taught their students to use self-monitoring, they may not have considered using it as a tool for examining their own behaviors.
Although many teachers may have taught their students to use self-monitoring, they may not have considered using it as a tool for examining their own behaviors.
Teachers have successfully used self-monitoring to improve their instructional performance, including increasing praise statements (Kalis, Vannest, & Paker, 2007; Simonsen, MacSuga, Fallon, & Sugai, 2013), increasing the accuracy of discrete trial instruction (Belfiore, Fritts, & Herman, 2008), increasing correct implementation of behavior support plans (Pelletier, McNamara, Braga-Kenyon, & Ahearn, 2010), and maintaining use of evidence-based classroom management practices (Oliver, Wehby, & Nelson, 2015). Student teachers who implemented self-monitoring interventions as a required component of their field placement reported that it was easy to implement, helped them improve their teaching, and was worth the time it took to implement (Hager, 2012).
Video Self-Monitoring
An effective way to collect data for self-monitoring is through the use of video-recording (Alexander, Williams, & Nelson, 2012; Pelletier et al., 2010). There are many advantages to using video self-monitoring. Video self-monitoring eliminates the need to record data during instruction; thus, the teacher can fully attend to instructional delivery and decision making during the lesson. It allows the teacher to view the video at a convenient time, and it provides the opportunity to view the lesson multiple times. Viewing the video more than once enables the teacher to review a section to ensure accurate data recording and to take data on multiple behaviors, if desired. In addition, technology has advanced to the point that video-recording in the classroom is readily accessible (see Video Recording Procedures and Equipment section).
Implementing Video Self-Monitoring
Using video is an effective way to evaluate and improve teaching (Knight, 2014). Following a systematic set of procedures can ensure that relevant behaviors are targeted for intervention and that data, rather than instincts, drive decision making. An overview of the steps involved in using video for teacher self-monitoring is presented in Table 1.
Steps for Teachers’ Use of Video for Self-Monitoring

Step 1: Obtain Required Consents
Before video-recording in your classroom, consult with your principal or special education director to determine if consent from parents or guardians is required to video-record in the classroom. Many districts allow video-recording for educational purposes without obtaining individual consent from families, but it is important to determine district policy before proceeding. Also, it is important to note that in order to observe many teaching behaviors, it is not necessary to have students appear in the video; the camera can be positioned to record only the teacher. Whether or not students appear in the video, it is essential that the video remain confidential and is treated with the same care as other educational records.
Step 2: Identify Video-Recording Procedures and Equipment
Video-recording in a classroom was once a rather cumbersome process but is now readily accessible using smartphones, tablets, and laptops. The quality of the video and audio from these devices is adequate for video self-monitoring. Access to a device such as Swivl (n.d.), which enables the camera on a phone or tablet to track a teacher’s movement around the classroom, is helpful but not necessary for conducting video self-monitoring. Instead, inexpensive stands can be purchased to hold a smartphone or tablet in the correct position to record the teacher, or the device can be propped up by books or against a shelf. To use the camera on a laptop, simply position the laptop on a nearby table or desk so that the camera is facing you. Students may be interested in the device and its purpose, so explaining the reasons for video-recording can be a teachable moment; it is beneficial for students to understand that teachers also continue to learn and practice skills.
It is best to determine optimal positioning of the device and record a test video when students are not present in the classroom. To conduct the test, identify where you will likely stand, sit, or move within the classroom during the lesson and position the camera accordingly. Next, start a recording and talk in a normal classroom voice for a few minutes while moving around the space as you typically do during a lesson. Finally, view the tape to ensure that your voice and movement were adequately captured.
Step 3: Select Instructional Group and Time of Focus
Identify a specific instructional group or lesson to video-record. Whether you already have a specific behavior in mind or are unsure of which behavior to target, the first step is to identify whom and when to record. Most likely there is one aspect of the day—a particular group of students (e.g., students in the third-period resource room), a time during the day (e.g., transition time after lunch), or a content area (e.g., reading intervention)—that would serve as an excellent starting point. If you are unsure initially of whom and when to target for self-monitoring, select any instructional group you teach at least three times per week. If you do not have a specific group or time in mind, review your recent evaluations to see if any groups or content areas were identified by your principal or instructional coach during the observation. If you have a specific behavior already selected to monitor, for example, an error correction strategy used in reading lessons, select a reading group you teach at least three times per week. Explain to the students that you will be video-recording the lesson and why; be clear that the purpose of the video is to help you be a better teacher, and it is not about their performance.
Ms. Torres reads more about self-monitoring and decides to give it a try. She checks back with Ms. Harrison to be sure she understands the school video-recording policy and then gets out her tablet to find the video app. She selects her midmorning reading group to video-record, because it is her biggest behavioral challenge most days. Some days it feels like she spends as much time getting the students back on task as she does actually teaching. She hopes the video will help her see what she is missing.
Step 4: Collect Sample Video and Select Target Behavior(s)
Record the selected instructional group for three consecutive sessions. You will use these videos to (a) identify the behavior to monitor (if you have not already done so), and (b) record baseline levels of the target behavior (see Step 6). Baseline levels identify the amount of the behavior occurring prior to self-monitoring; but first, a clear, strong target behavior needs to be identified.
If you have not yet identified the behavior to monitor, watch the sample video recordings all the way through and note any behaviors you engage in too frequently, too infrequently, or inconsistently. It may be helpful to have an instructional coach or a fellow teacher view the videos with you to help you select a behavior. You may see that you have high rates of redirections or low rates of praise. You may observe that you engage in a behavior, such as error correction, inconsistently or that you do not always implement all steps of a procedure. If you identify more than one behavior, select the behavior you believe will have the most influence on student learning. Any behavior that you can clearly define and measure and that you would like to increase or decrease is a behavior you can target for self-monitoring.
Clearly defining the behavior is crucial. Developing an explicit definition of the behavior will enable you to consistently record its occurrence. Include all the important aspects in your definition. For example, you might define behavior-specific praise as any statement that describes the desired behavior, identifies the student or group of students who are engaging in the behavior, includes a praise statement about the behavior, and is provided contingent on the performance of the identified behavior. An individual academic opportunity to respond can be defined as an opportunity for an individual student to respond to an instructional request, such as “What word?” or “Point to the capital of the United States on the map.” The definition will be used as you watch the videos and record data about the occurrence of the behavior. It is important to have an explicit and complete definition of the behavior to ensure you are implementing the practice correctly. For example, if you increase your praise statements but are not providing them contingent on appropriate student behaviors, you would not be implementing the practice correctly. Thus, focusing only on frequency is insufficient; you would also want to observe that you provide praise contingent on desired student behavior. Asking your instructional coach or a fellow teacher to review your definition and data collection system can give you confidence that you are performing the practice correctly.
It is important to create an efficient data collection sheet that allows you to quickly record the relevant aspects of the behavior you are monitoring.
If you identify a behavior you would like to decrease (e.g., redirections), you should also identify a corresponding behavior to increase. For example, if you find you provide too many redirections, it is likely that providing clear behavioral expectations at the beginning of the lesson and focusing on increasing praise statements for meeting those expectations will result in a decrease in redirections. See Table 2 for examples of instructional behaviors and criteria.
Example Behaviors and Criteria

Step 5: Develop a Data Collection Sheet
After a target behavior is identified and defined, develop a data collection sheet. It is important to create an efficient data collection sheet that allows you to quickly record the relevant aspects of the behavior you are monitoring. The most common aspects of behavior used for data collection are how often it occurs (frequency data), how long it continues (duration data), and how long before it begins (latency data). If you want to monitor how many opportunities to respond you provide, frequency recording would be the most appropriate type of data to collect. Duration data would be collected to determine how much think time you provide after asking a question, and latency data are collected if you are concerned with how long it takes you to provide reinforcement after a student’s desired social behavior. Put as much information on the data sheet as possible, so that minimal information is recorded during data collection. The most efficient data sheets require marking only tallies, check marks, and so on during the actual data recording because the rest of the information (e.g., definitions, labels) is already on the form. See Figure 1 for example data collection forms.

Example data collection forms
Step 6: Code and Graph Baseline Data
To code baseline data, watch each of the three sample videos again. For data collection, you will record data on the target behavior only during the first 10 minutes of the video. Recording data during the first 10 minutes of the lesson will minimize the time data collection takes while still providing information on your performance. If the behavior you are monitoring occurs only during a specific part of the lesson (e.g., error corrections during decoding practice in the reading lesson), begin your 10-minute data collection at that point of the lesson. In order to compare the data across lessons, it is important to select the same part of the lesson each time and to record data for the same length of time. For example, opportunities to respond will likely vary across parts of the reading lesson, so always collecting data during the same portion of the lesson is important to have a valid comparison across lessons. Recording data from these videos provides your baseline—your level of performance of the behavior before video self-monitoring. One of the advantages of collecting data from video is that you can watch it more than once, if necessary, to record accurate data. Complete the data collection form for each of the three baseline sessions. Keep in mind that to determine the rate of a behavior (e.g., three praise statements per minute), the time period of data collection needs to be the same (for example, 10 minutes for each data collection session). See Figure 2 for an example of a data sheet with baseline data recorded.
It is difficult to interpret data by looking at data collection sheets, but once the data are graphed, patterns of behavior are more easily interpreted.
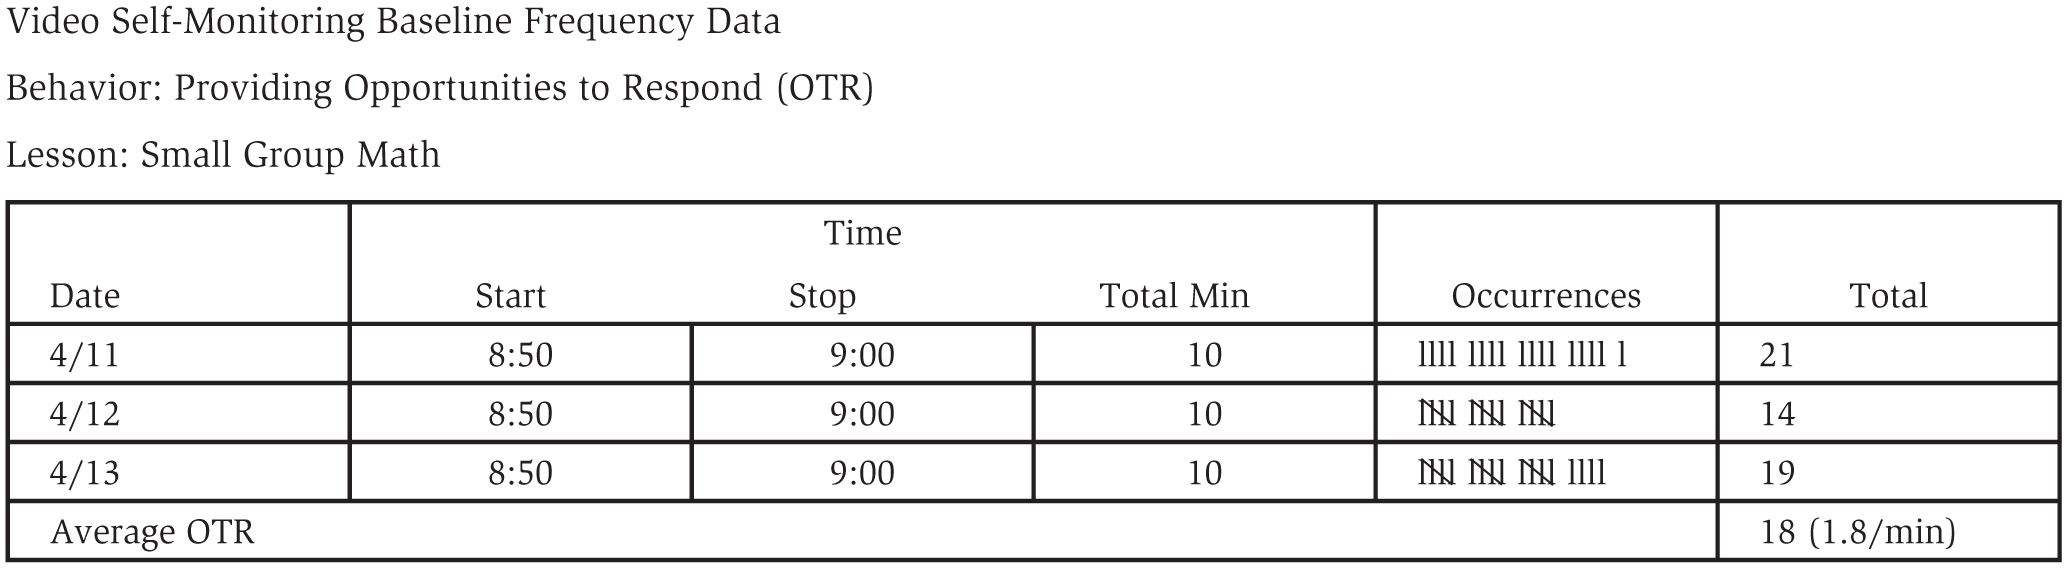
Example data collection sheet with baseline data recorded
Graphing the data is an important step in analyzing performance to identify patterns, changes, and so on. It is difficult to interpret data by looking at data collection sheets, but once the data are graphed, patterns of behavior are more easily interpreted. Graphs are set up in a standard way. There are two axes: the abscissa, or x-axis, which is the horizontal line across the bottom of the graph used to represent time (e.g., dates), and the ordinate, or y-axis, which is the vertical line on the left side of the graph used to show the amount of the behavior you are monitoring. For example, the number of opportunities to respond or the number of praise statements provided are indicated on the y-axis. Graphs may be hand-drawn on graph paper or created using a program such as Excel. Figure 3 is an example graph. In Table 3, online resources for creating graphs are provided.

Example graph with baseline and intervention Opportunities to Respond data recorded
Online Resources for Creating Graphs

After video-recording her lessons for 3 days, Ms. Torres watches them and confirms that behavior-specific praise is the behavior she wants to self-monitor. She is very surprised to find that she does not praise nearly as much as she thought she did! Once the first student gets off task early in the lesson, she sees that she mainly focuses on redirecting the students who are engaging in problem behaviors and largely ignores the students who are on task. She knows what she wants to change for the next lesson.
Step 7: Identify Target Criterion
To set the target criterion, you need to determine your goal—that is, how many times you want to perform the behavior (frequency data), how long you want to continue to engage in the behavior (duration data), or how long before the behavior occurs (latency data). You have probably written many individualized education program goals that contain performance criteria, and you will use the same process to identify your target criterion. First, determine the relevant aspects of the behavior–if it is important to perform the behavior often, only under specific circumstances, or for a length of time during each occurrence. Examples include providing four to six opportunities to respond per minute, providing at least four praise statements for every redirection, and scanning the rest of the classroom every 45 seconds when working with a small group. If you are unsure what target criterion you should set, consider asking to observe a highly regarded colleague and take data on that colleague’s performance of the same behavior. Write your target criterion on the graph. Table 2 provides examples of possible criteria.
Step 8: Video-Record and Collect Data
Video-record your lesson every day that you teach it. You will collect data on only 10 minutes of the lesson, but it may be easier to let the recording run until a convenient time to turn it off. Also, keep in mind that if the behavior you are monitoring occurs only during a specific part of the lesson, the 10 minutes you will view may not be at the beginning of the lesson. Identify a time to watch the video and record and graph data every day, as the more immediate the feedback, the more effective self-monitoring will be. A planning period or right after the students are dismissed for the day is a good opportunity to view the video. As you are watching only 10 minutes of the video, watching the video, recording data, and graphing data should not require more than 15 minutes per day.
Step 9: Monitor Progress
Compare your daily performance with the target criterion to monitor progress. Analyze the data and make data-based decisions, just as you do when you monitor student progress. You can do this by drawing an aimline on your graph as follows: (1) record baseline on a graph, (2) estimate how long it will take to reach criterion and mark the criterion data point, and (3) draw a line from the baseline data point to the criterion point. Once you have at least six data points, analyze your progress. If some data points are above and some below, you are making progress and should continue self-monitoring. If three consecutive data points are below the aimline, self-monitoring alone may not be enough to change your behavior. You should consider adding prompts. For example, if your goal is to vary praise statements, you could post a visual prompt in your sight with various praise statements. You could also use a MotivAider (see http://habitchange.com/index.php), which is a device that works like a timer, but it vibrates rather than rings, so it is not disruptive. It can be set on a fixed or variable schedule to vibrate and provide a private prompt. For example, if your goal is to increase praise, it could be set on a variable, 1-minute schedule to remind you to provide a praise statement.
After Ms. Torres identifies her baseline level of providing behavior-specific praise, she sets a goal of providing at least six praise statements every 10 minutes. She creates a simple data collection sheet that she completes every day during her planning period. She watches 10 minutes of each lesson and makes a tally mark for every behavior-specific praise statement she made. She records the data on a piece of graph paper she has in her classroom and is so pleased when she makes her goal by the end of the 1st week! She is even more pleased when she reflects on how much easier it seems to manage the reading group; she even notices she is getting through more material in the reading lesson each day because the students are more engaged.
Step 10: Record Maintenance Data
Once you reach your target criterion, you will want to collect maintenance data to ensure you continue to perform at the criterion level. You can video-record this same group every couple of weeks and use the same data recording and graphing procedure you have already established. If your performance falls below 80% of your criterion, begin daily self-monitoring until it returns to the target level.
Conclusion
Teaching is complex and challenging; it can be difficult to determine if you are delivering evidence-based instructional practices with a high level of fidelity. Implementing a video self-monitoring program is an evidence-based strategy that enables you to identify how well you are implementing effective teaching strategies and provides a strategy to improve your performance. By following the steps described in this article, you will be well on your way to providing more effective instruction.