
Abstract
Clear aligner therapy requires complete tray seating, effective engagement of attachments, and good patient compliance. Commercial aligner seating and removal aids are often expensive, less accessible, or prone to distortion, while the use of fingernails or sharp objects can damage the aligner and injure the gingiva.
This article describes the fabrication and clinical application of a simple, multifunctional orthodontic safety tool made from 19-gauge stainless steel wire with helices, reverse S- and Z-loops, and angulated triangular hooks that permit locking and unlocking.
The single or locked double hooks facilitate aligner removal from both arches and aid in intra- and inter-arch elastic placement, while the flexible helices assist in aligner seating through the biting forces. The tool is easy to fabricate, sterilizable, reusable, economical, and safe for soft tissues, and it minimizes aligner distortion.
This multifunctional safety tool improves patient convenience and clinical efficiency during clear aligner therapy and can serve as a cost-effective alternative to commercially available aligner accessories.
Keywords
Introduction
Orthodontics is the oldest dental specialty, with a history of nearly 2,000 years. 1 Orthodontic appliances have progressed from the ribbon arch to modern clear aligners with improved biomechanics. What began with Kesling’s 1945 vacuum-formed tooth positioner has evolved into a fully comprehensive 3D-programmed aligner system.1-3
Custom-made orthodontic appliances are made to adapt around the clinical crown of the tooth, and for delivering biological forces to individual teeth based on the morphology and physiology of the periodontium. Increased esthetic concern and improved mechanics have made aligners so popular. The ideal appliance should deliver biological forces without compromising the oral hygiene and comfort of the patient.
Aligner therapy outcomes are primarily determined by patient compliance because maintenance, insertion, and removal are performed by the patient.3-5 Present third-generation aligners are delivering forces most effectively with the help of attachments (grip) over the tooth surface. So, the aligner tray should completely engage the attachment and fit around the teeth for delivering preprogrammed mechanics.3, 5, 6
Continuous aligner tracking between appointments is essential for tray progression. Patients should avoid damaging the aligner during removal, as difficulty in seating and disengaging from attachments is common; therefore, orthodontists must train patients in proper insertion and removal and provide auxiliary tools for ease of use.3, 7
Chewable Invisalign Chewies, Movemints, and Clenchy are commercially available aligner-fitting tools for eliminating the gap between the aligner tray and teeth surface. Owing to their limited availability and elevated online pricing, these tools remain inaccessible to many patients. In general, patients use fingernails and sharp hooks for tray retrieval, which leads to distortion or tear of the aligner and pokes the gingiva. 4 Many patients experience difficulty in placing and removing elastics from intraoral attachments or hooks, which can be frustrating and may result in poor compliance and inadequate settling. 7 To overcome the elastics application hurdle, an auxiliary, like a safety tool, is necessary. 6
Although commercial aligner removal aids such as the pull ultra light (PUL) tool are available, their plastic tips tend to distort and may not function effectively. Systems like PUL and Clenchy 2 can assist in both aligner retrieval and seating; however, this article describes the fabrication and use of a simple safety tool.
Steps Involved in Fabricating the Safety Tool (Figures 1-14)
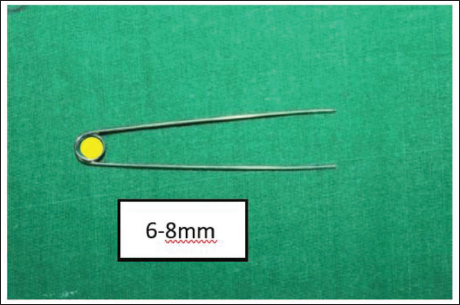
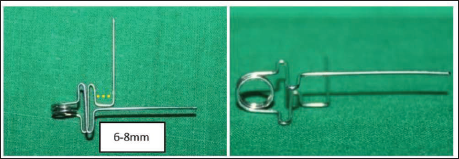
Take a 25 cm long, 19-gauge stainless steel wire and turn three helices of internal diameter 6-8 mm at the midpoint, from where the upper and lower arms arise (Figures 1 and 2). At a 6-8 mm distance, bend a reverse S loop in the lower arm, and a reverse Z loop in the upper arm perpendicularly (Figures 3 and 4).
Parts of Safety Tool 25 cm Long, 19 Gauge Stainless Steel Wire.

Fabrication of Three Helices (6-8 mm Diameter).
Initial Bend of Reverse -S Loop in Lower Arm.
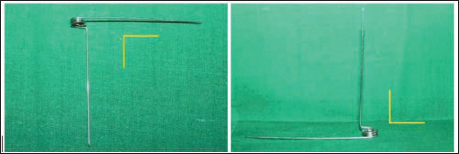
Final Bend of Reverse -S Loop in Lower Arm.
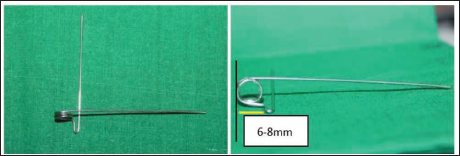
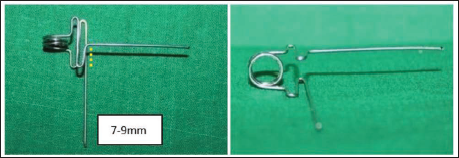
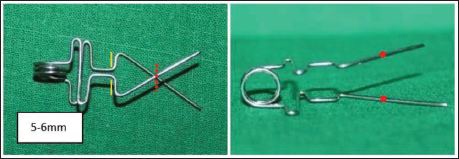
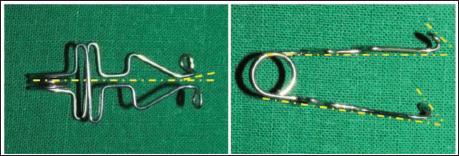
In the reverse S loop of the lower arm and the reverse Z loop of the upper arm, the distal, middle, and proximal bridges are 2 mm away, parallel to each other, and on the same plane as their respective arms (Figure 13). The width of proximal bridges is 6-8 mm, distal bridges are 7-9 mm, and middle bridges are 12-16 mm, respectively (Figures 5-8).
Initial Bend of Reverse -Z Loop in Upper Arm.

Final Bend of Reverse -Z Loop in Upper Arm.

Initiation of Vertical Arm in Upper Arm.
Initiation of Vertical Arm in Lower Arm.

The distal bridge continues parallel to the imaginary long axis as a vertical segment in both upper and lower arms.
At a distance of 6-8 mm distal from Z- and S-loops, give a half-triangular loop in both upper and lower arms (Figures 9 and 10). Mark the intersection point on the distal ends of the half-triangular loop in both the upper and lower arms. From this mark, the distal segments are made parallel to the imaginary long axis and vertically extended to hold the triangular hooks (Figures 11-13).
Initiation of Half Triangular Loop in Upper Arm.
Initiation of Half Triangular Loop in Lower Arm.

Completion of Half Triangular Loop in Both the Arms.
Completion of Distal Vertical Segment in Both the Arms.

Completion of Triangular Hook in Upper Arm.

45-degree, downward angulation of the triangular hook to the long axis of the upper and lower arms facilitates easy retrieval of aligner trays.
The distal segment of the lower arm is angulated outward by approximately 10-15° to the imaginary long axis, thereby improving the locking mechanism of the upper arm (Figure 14).
Completion of Triangular Hook in Lower Arm.
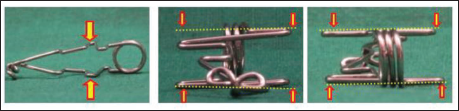
Locking Safety Tool

With one hand, hold the safety tool with hooks pointed down.
With the index finger of the other hand, apply a left and downward force over the Z loop of the upper arm, directing the upper arm’s triangular hook to engage.
The upper arm triangular hook should be directed backward and downward around the lower arm triangular hook.
The safety tool is locked around the distal extensions of its arms.
Safety Tool for Engaging Elastics
The locked/unlocked triangular hooks can be used to engage intra-maxillary and inter-maxillary elastics.
Safety Tool for Fitting the Aligner Tray
The reverse Z and S loops are wide enough to maintain the plane while biting. The loops and helix are flexible enough to transfer the biting forces to fit the tray. Sharp ends of triangular hooks should be trimmed and polished to get smooth ends.
Safety Tool for Retrieving Aligner Tray

The triangular hooks, in their locked or unlocked position, facilitate disengagement of the aligner tray from the tooth surface, enabling easy removal.
Discussion
The name “safety tool” was given as the design, and the locking mechanisms of this tool just resemble a safety pin. The loops and helix provide a finger grip while pulling the tray out, and are flexible enough to seat the tray.
Functions
Single-eyed triangular hooks of either arm or two-eyed triangular hooks (locked) can be used for the removal of the tray from the maxillary and mandibular arches (Figure 15).
Even this triangular hook (unlocked)/hooks (locked) can be used for engaging inter-arch or intra-arch elastics.
In the hinge end, the helices and loops of the upper and lower arms are very flexible to seat the tray with the help of biting forces, and the locked arms are strong enough to seat the tray (Figure 15).
Safety Tool for Fitting and Retrieval of Tray.

Advantages
Easy to fabricate.
Easy to use and biocompatible.
Easy to carry and store in an aligner box.
Can be sterilized, reused, and has a less chance of fracture.
No need to grow nails on your finger, no injury to nails and gums.
No need to search for newer aligner tools in online marts.
A single multifunction tool can be used with locking or without locking, as a fitting and retrieval tool.
Conclusion
This single, multifunctional safety tool effectively functions as an aligner removal aid, aligner seating tool, and elastic placer during aligner therapy, with the potential to replace existing commercially available aligner tools.
Footnotes
Declaration of Conflict of Interests
The authors declared no potential conflicts of interest with respect to the research, authorship, and/or publication of this article.
Ethical Approval
Ethical Approval was not required as this article describes technical note on the fabrication of an orthodontic instrument without involving patient data.
Funding
The authors received no financial support for the research, authorship, and/or publication of this article.
Informed Consent
Informed consent was obtained from the participants for the study.