
Abstract
Background:
Persistent pain after reverse total shoulder arthroplasty (RTSA) is a difficult problem to manage. Anterior shoulder pain may arise from conditions, including anterior impingement, conjoint tendonitis, or coracoid fracture after RTSA. Clinical function and anterior pain may improve after release of the conjoint tendon. An open technique for conjoint tendon release has been described. The purpose of this video is to describe and illustrate a technique for arthroscopic release of the conjoint tendon after RTSA.
Indications:
Patients with recalcitrant pain at the tip of the coracoid, lesser tuberosity, and conjoint tendon origin after RTSA, combined with painful internal rotation, are candidates for arthroscopic decompression and conjoint tendon release. Nonoperative management before surgical intervention can include an injection at the conjoint tendon origin, with care taken to avoid steroid injection into the shoulder joint space or in the RTSA prosthetic components. This injection may be both diagnostic and therapeutic.
Technique Description:
The patient is positioned in the lateral or beach-chair position, depending on the surgeon's preference. Because RTSA does not have an accessible joint space, the scope is placed immediately into the subacromial space. Additional anterior, lateral, and inferolateral portals are placed with spinal needle guidance and blunt instrumentation. Debridement, cultures, coracoplasty, and conjoint tendon release are performed arthroscopically.
Results:
The conjoint tendon release technique may relieve anterior, coracoid, and lesser tuberosity pain and improve function after RTSA in appropriate patients.
Discussion/Conclusion:
Arthroscopic conjoint tendon release allows the surgeon to evaluate and manage the painful RTSA using a minimally invasive technique. Arthroscopic conjoint tendon release after RTSA provides a minimally invasive method to assess the painful RTSA and may relieve pain and improve function for patients with persistent conjoint tendonitis.
Patient Consent Disclosure Statement:
The author(s) attests that consent has been obtained from any patient(s) appearing in this publication. If the individual may be identifiable, the author(s) has included a statement of release or other written form of approval from the patient(s) with this submission for publication.
This is a visual representation of the abstract.
Keywords
Video Transcript
The author has a consultancy agreement with a company whose products are seen during the video.
Background
Persistent pain after reverse total shoulder arthroplasty (RTSA) is a difficult problem to manage. RTSA is now the most performed type of shoulder arthroplasty in the United States, and volume continues to increase annually. Glenohumeral joint mechanics are significantly altered with the placement of RTSA. Distalization of the center of rotation allows the deltoid muscle to be retensioned and accommodate a damaged or dysfunctional rotator cuff. However, this positioning increases the tension in structures that cross the glenohumeral joint. Acromial stress fractures, axillary nerve palsies, brachial plexopathy, deltoid fatigue, and coracoid stress fractures have all been described. Anterior shoulder pain may arise from conditions such as conjoint tendonitis, anterior impingement, or a coracoid fracture after RTSA. 2
Arthroscopic management of painful RTSA has been described3,5 to address lysis of adhesions, synovectomy, cultures, tissue biopsy, subacromial impingement, and acromioclavicular arthritis. Mechanical implant failure and subclinical infection have also been identified via arthroscopy, 1 with a minimum of 5 cultures captured. Shoulder arthroscopy has limited utility for patients demonstrating instability or component malposition. 7
Open release of the conjoint tendon was described after it was found to be effective for pain relief in a small group of patients after RTSA. 10 Prophylactic release at the time of arthroplasty has also been described, 6 as has arthroscopic excision of the coracoid. 9 The open technique involves direct exposure and release of the conjoint tendon; 4 we describe a technique for arthroscopic release of the conjoint tendon after RTSA. 10
Indications
Patients with recalcitrant pain at the tip of the coracoid, lesser tuberosity, and conjoint tendon origin after RTSA, combined with painful internal rotation, are candidates for arthroscopic conjoint tendon release. Nonoperative management before surgical intervention can include an injection at the conjoint tendon origin, with care taken to avoid steroid injection into the shoulder joint or into the RTSA prosthetic components. This injection may be both diagnostic and therapeutic, helping identify patients who are likely to respond to surgical release of the conjoint tendon, but it is not required.
Technique Description
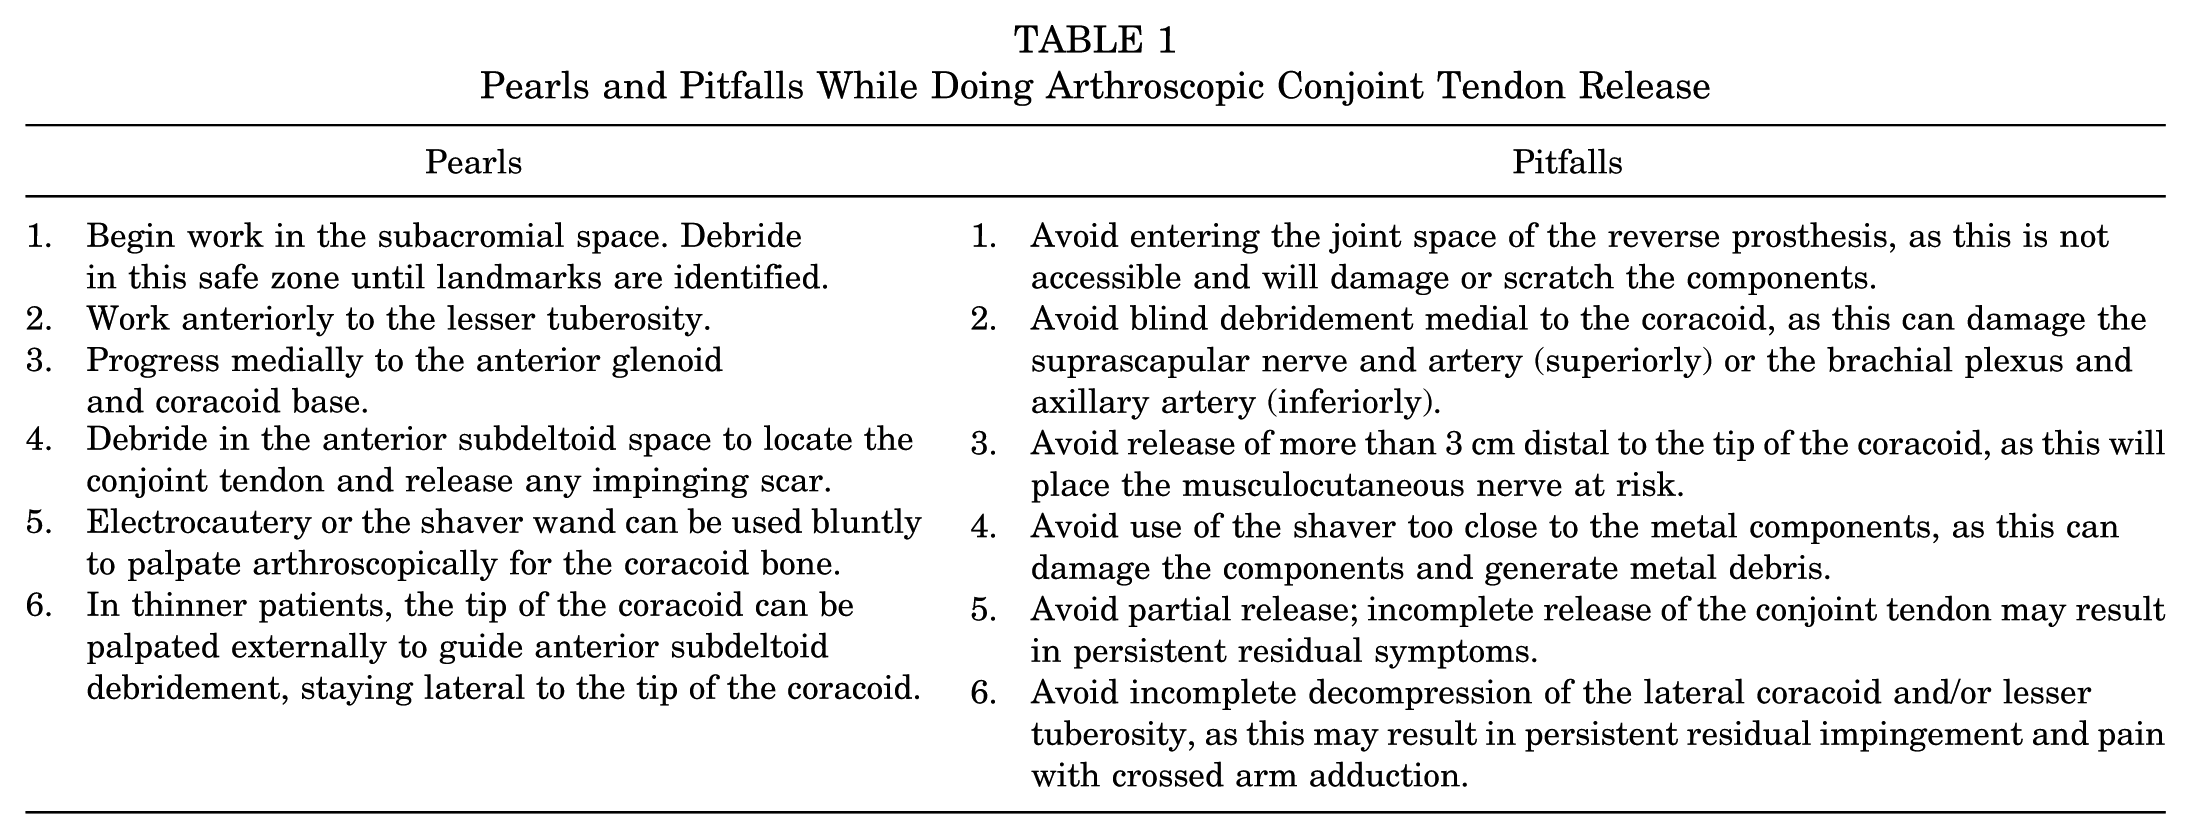
Pearls and pitfalls of this procedure are outlined in Table 1.
Pearls and Pitfalls While Doing Arthroscopic Conjoint Tendon Release
Positioning
Positioning can be performed in a lateral or beach-chair, depending on the surgeon's preference. This procedure is best performed with the use of a 70° arthroscope to allow adequate visualization.
Portal Placement
Anatomic landmarks are mapped. A standard posterior arthroscopy portal is placed. Anterolateral and posterolateral portals are placed 1 to 2 cm distal to the lateral border of the acromion. A standard anterior working arthroscopy portal is also created. An additional inferior anterolateral portal is placed using a spinal needle to define a trajectory to the anterior and lateral coracoid and conjoint tendon origin. The inferior anterolateral portal is typically in line with the oblique deltopectoral incision from the initial arthroplasty, as seen here.
Minimize use of the shaver adjacent to the component to avoid generating metal debris; use cautery to debride the scar and to identify landmarks. The shaver may be safely used once landmarks have been identified. Debride the greater tuberosity and visualize the implant interface adjacent to the greater tuberosity to evaluate the fixation of the humeral component. Work anteriorly and debride the anterior space, including the lesser tuberosity and the subscapularis insertion.
If necessary, expose the prosthesis under the remaining rotator cuff (if any) by incising in line with the cuff fibers. This will allow exposure of the superior glenosphere and the glenoid baseplate from superiorly. Depending on the implant design, the bone-metal interface may be readily visualized. Evaluate the baseplate for osseous integration and visible loosening.
Next, debride the rotator interval and continue onto the anterior glenoid neck and base of the coracoid. Evaluate the baseplate-bone interface at this location. Evaluate the polyethylene for impingement or notching. This assessment can be made by internally rotating the humerus and assessing for contact between the lesser tuberosity and the coracoid. Delineate the conjoint tendon by locating the linear fibers running inferiorly from the tip of the coracoid, and evaluate for initial impingement between the lesser tuberosity and the conjoint tendon and coracoid. Identify the coracoacromial ligament and the bony coracoid; then debride laterally to the coracoid as necessary to expose the bone to the tip of the coracoid. Perform bony coracoplasty as necessary for any impingement in internal rotation.
Identify the conjoint tendon running inferiorly from the tip of the coracoid and debride any surrounding scar tissue laterally and anteriorly. Release the conjoint tendon completely from the tip of the coracoid, starting laterally and using electrocautery. Be mindful of the brachial plexus and axillary artery that run medially and inferiorly to the coracoid. Remember the musculocutaneous nerve inserts on average 3 cm from the tip of the coracoid. You may complete the release of the medial 10% of fibers using an elevator in a controlled fashion if preferred over electrocautery. After conjoint tendon release, perform a final evaluation for anterior impingement by taking the arm through internal rotation. Any impinging soft tissue on the lesser tuberosity can be debrided, and a bony tuberoplasty of the lesser tuberosity may also be performed as necessary.
Postoperative Rehabilitation
Immobilization after conjoint tendon release is minimized, with discontinuation of the sling 2 days postoperatively after the block has completely resolved. Activities of daily living are encouraged immediately postoperatively. Physical therapy or a home exercise program for progressive stretching and range of motion is started in the first week, with a focus on internal rotation, forward elevation, and extension. Nerve glides, passive stretching of the conjoint tendon, and modalities to the coracoid and biceps are also encouraged. No limits on lifting are utilized, and formal strengthening—including biceps and elbow flexion—can be initiated at 4 weeks postoperatively, if indicated. Cross-body adduction may be progressed after 4 weeks.
Results
This technique provides the advantages of diagnostic arthroscopy, combined with the benefits of open conjoint tendon release, for patients with conjoint tendonitis after RTSA.
Discussion
In a small series of open conjoint tendon lengthening by Gomez et al, 4 of 7 patients, 6 had complete or near-complete relief by the first postoperative visit at 2 weeks. This has also been our experience. Several recent studies have demonstrated a better range of motion after z-plasty lengthening or release of the conjoint tendon after RTSA, suggesting that clinical function may also improve after release of the conjoint tendon.6,8
Patient Experience Testimonial
“So you had the shoulder replacement, and you did OK after surgery, and then what happened?”
“All of a sudden, I was getting severe pain in this area. The shoulder was fine, but in here, when I would brush my teeth, lift a fork to my mouth, try to, you know, fix my hair, it would be like a stabbing pain, like it just jolted through me.”
“And then we talked about the arthroscopic surgery, and what's your experience been? We're about 6 weeks out from the arthroscopic surgery. What could you tell after that surgery?”
“As soon as the block wore off, the very next day, I had immediate relief. It was like night and day. All of a sudden, I could lift, move, and stretch. I stopped wearing the sling right away. I had no restrictions. It was amazing because nothing was restricted. I felt like I didn't even have surgery after that.”
Conclusion
Arthroscopic conjoint tendon release after RTSA provides a minimally invasive way to assess the painful RTSA and may relieve pain and improve function for patients with persistent anterior pain and conjoint tendonitis.
Footnotes
Acknowledgements
The author thanks Kendall Rozen, BA, for creating the illustrations, and Diane Morton, MS, MWC, for editorial assistance with manuscript preparation. Please note that the radiographs, intraoperative images, and patient experience are a composite of several different patients who underwent arthroscopic conjoint tendon release. Still images of patients in clinical settings were generated using artificial intelligence.
One or more of the authors has declared the following potential conflict of interest or source of funding: K.A.B. is a paid consultant for Arthrex, Inc; all other potential conflicts are not relevant but are available on ![]() . AOSSM checks author disclosures against the Open Payments Database (OPD). AOSSM has not conducted an independent investigation on the OPD and disclaims any liability or responsibility relating thereto.
. AOSSM checks author disclosures against the Open Payments Database (OPD). AOSSM has not conducted an independent investigation on the OPD and disclaims any liability or responsibility relating thereto.