




Abstract
Digital cameras, when used correctly, can provide the basis for telemedicine services. The increasing sophistication of digital cameras, combined with the improved speed and availability of the Internet, make them an instrument that every health-care professional should be familiar with. Taking satisfactory images of patients requires clinical photography skills. Photographing charts, monitors, X-ray films and specimens also requires expertise. Image capture using digital cameras is often done with insufficient attention, which can lead to inaccurate study results. The procedures in clinical photography should not vary from camera to camera, or from country to country. Taking a photograph should be a standardised process. There are seven main scenarios in clinical photography and health professionals who use cameras should be familiar with all of them. Obtaining informed consent prior to photography should be a normal part of the clinical photography routine.
Introduction
The nature of digital photography suggests that images are disposable, easy to delete and can be discarded and re-shot if unsatisfactory. Perhaps this is the reason that, commonly, insufficient attention is paid to image capture. Poor imaging can lead to inaccurate study results. Health-care professionals work in a high-pressure environment, so it is important that they understand image capture techniques in order to produce accurate pictures.
Digital cameras, when used correctly, can provide the basis for telemedicine services. In 1999, the Swinfen Charitable Trust (SCT) recognised the potential of the digital camera and the Internet and established a telemedicine link to support doctors in Bangladesh. Doctors used the service to obtain expert advice about diagnoses and/or case management. The process involved an email message being sent to an administrator who decided on the most appropriate specialist to address the question. All services were provided free of charge. Vassallo et al. reported that during the first 12 months, 27 telemedicine referrals were made, of which 24 were judged to be beneficial (due to diagnosis, reassurance to patient and doctor, and change of management). 1 By 2002 the service had grown to include 50 hospitals from 18 countries, and the referral rate had increased to 5-10 cases per month. For the last five years, the average referral rate has been about 250 cases per year.
Over time the number of referring doctors, referrals and specialists have increased. However, the quality of the attached images appears to have decreased. The reason for this is probably that people believe that cameras have become so good that they do not need to consider composition and photographic technique. The SCT published a guidebook on clinical photography in 2004, with the aim of raising standards, but it appears to have had little impact. 2 Since then, a set of photography tutorials have been developed, and they have been offered free of charge to referring doctors. Although very few doctors have completed the tutorials, those who have done so have increased their skills dramatically. Increasing the photographic skills of the doctors and other health-care workers produces more rapid completion of case consultations as no re-shooting of images is needed. Also the advice given by the specialists can be more specific, which in turn improves treatment and management.
Clinical photography skills are not just required for taking images of patients. Photographing charts, monitors, X-ray films and specimens also requires expertise.
Digital photography
During the 1960s NASA began to use digital imaging to map the surface of the moon. In 1986, Kodak developed the first 1-Mpixel camera and released its first professional camera five years later. The first consumer digital camera was produced in 1994, with two more models released in 1995. Now, over a decade later, almost 20 new digital camera models are released every month.
Technology is increasing the capabilities of cameras, while simultaneously their size and price are decreasing. Cameras are often purchased because of the number of megapixels and the number of functions available. In a clinical situation these factors are not always the most relevant.
Terminology
Evolution of the camera
Digital imaging technology is not a passing fad – it is our present and our future. It is now possible to instantly review, re-shoot and utilise camera pictures. However, digital camera shutter reactions are not instant and incorrect exposures can result in a loss of detail. By understanding the basic processes of digital photography, the amount of ‘lost’ information can be reduced and the instant nature of the results can be used to best advantage.
A digital camera works in a very similar way to an ordinary film camera (Table 1). That is, light from a scene being photographed passes through a lens and falls onto a solid-state image sensor, instead of falling onto photographic film.
The old (analogue) and the new (digital) image capture processes

Resolution
Resolution is the number of pixels in a given area of the image. These dimensions, together with the bit depth, determine the resolution. Cameras are manufactured and sold according to the number of ‘megapixels’. The more pixels, the more detail can be depicted and the higher the quality of the image.
Compression
Image files can be compressed to make them smaller. Images which have been compressed require less storage space on a computer, and can therefore be transmitted more quickly than the originals. Compression involves using a mathematical algorithm on the image file to produce encoded data, and thus the image occupies less storage space. The most common type of compression is JPEG. The Joint Photographic Experts Group defined the JPEG compression algorithm in 1992. Most digital cameras record files in the ‘.jpg’ format. This compressed file format has become an international standard for saving, transmitting and reviewing digital images.
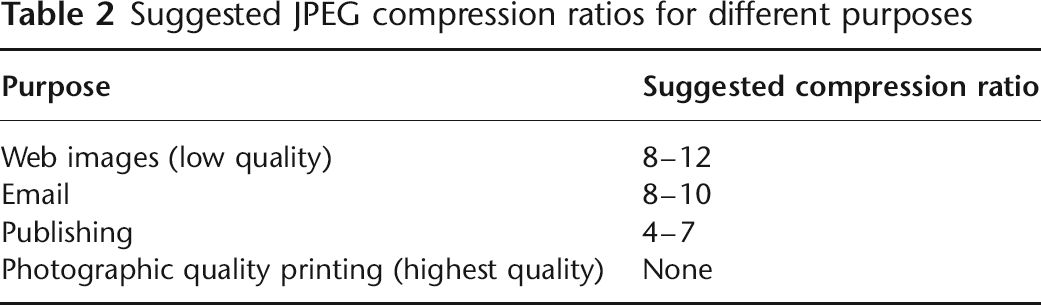
JPEG files are the result of ‘lossy’ compression, which means that the reconstructed image will not be identical to the original because some image information has been discarded. The extent of the image degradation depends on the amount of compression, with less compression giving a higher quality image. It should be noted that once lossy compression has occurred, detail within the image cannot be recovered or uncompressed. Choosing the best JPEG compression to use for a given purpose is a subjective decision (Table 2).
Suggested JPEG compression ratios for different purposes
The other type of compression is lossless. As the name suggests, lossless compression does not discard any of the image information. However, this results in larger file sizes than are produced with lossy compression. Lossless compression is reversible, i.e. the original image can be accurately recovered from the compressed file.
JPEG2000 or JP2 is the latest version of the JPEG file format. It is possible to use it in both lossy and lossless modes, and it has higher compression ratios with less visual degradation of the image. It uses a wavelet-based image coding system, which provides many options for compression depending on the nature of the file (for example text, graphics, full-tonal range) and the output. JP2 is not yet supported by many web browsers and is not available as a standard component in imaging software. Further information can be found on the JPEG2000 web site. 3
Memory cards
Removable memory cards are storage devices for digital images. Once images have been downloaded onto a computer they can be deleted from the card and the storage space on the card can be reused. The number of images that can be stored on the memory card varies according to the image file size and the capacity of the memory card.
There are three methods of transferring images from camera to computer: by using a wireless device, by using a card reader that plugs into the computer and by using a USB/fire wire cable. Most consumer digital cameras do not have wireless image transfer capabilities. The two common methods for data transfer are by using a card reader or a connecting cable. Card readers provide the most rapid rate of data transfer and they can be permanently attached to the computer.
Batteries
Digital cameras consume substantial electrical power. In particular, prolonged use of the LCD screen will cause the batteries to drain quickly. Cameras are supplied with an AC mains adaptor, although it will be rare that one can capture an image while the camera is plugged into the wall socket. The following types of batteries are commonly available:
Alkaline (non-rechargeable). These ‘household’ batteries are not suitable for the high power requirements of a digital camera. Ultra/Advanced/Super Alkaline (non-rechargeable). These will last 30–40% longer than standard alkaline battery. However using non-rechargeable batteries can be expensive and wasteful. Lithium (non-rechargeable). Long lasting lithium batteries can be purchased in standard sizes, such as AAA and AA. Nickel Cadmium, NiCad (rechargeable). The least desirable rechargeable batteries are NiCad. This is due to the presence of cadmium, which can be harmful to the environment when the batteries are disposed of. After several uses, NiCad batteries suffer from a memory effect, which causes the maximum capacity of the battery to decrease over time. Nickel Metal Hydride, NiMH (rechargeable). Although NiMH batteries have high energy capacity, they will discharge quickly. In a one-month period a NiMH battery will lose 40% of its charge at room temperature, or 10% if it is kept in a freezer. Lithium Ion, Li-Ion (rechargeable). Li-Ion batteries are the most expensive rechargeable battery type. They have a higher energy density than most and a very low discharge rate.
The more expensive digital cameras are normally supplied with NiMH or Li-Ion batteries. Budget permitting, these should always be the first choice.
Camera technique
Background
The perfect background is a non-reflective and neutral grey. As this is not always available, the next best option is a green or blue surgical drape, or a white sheet. The neutral grey background is preferable, as the colours will not influence any of the colours in the image (Figure 1). If a drape or sheet is not available, a clean wall or the back of a door is appropriate.
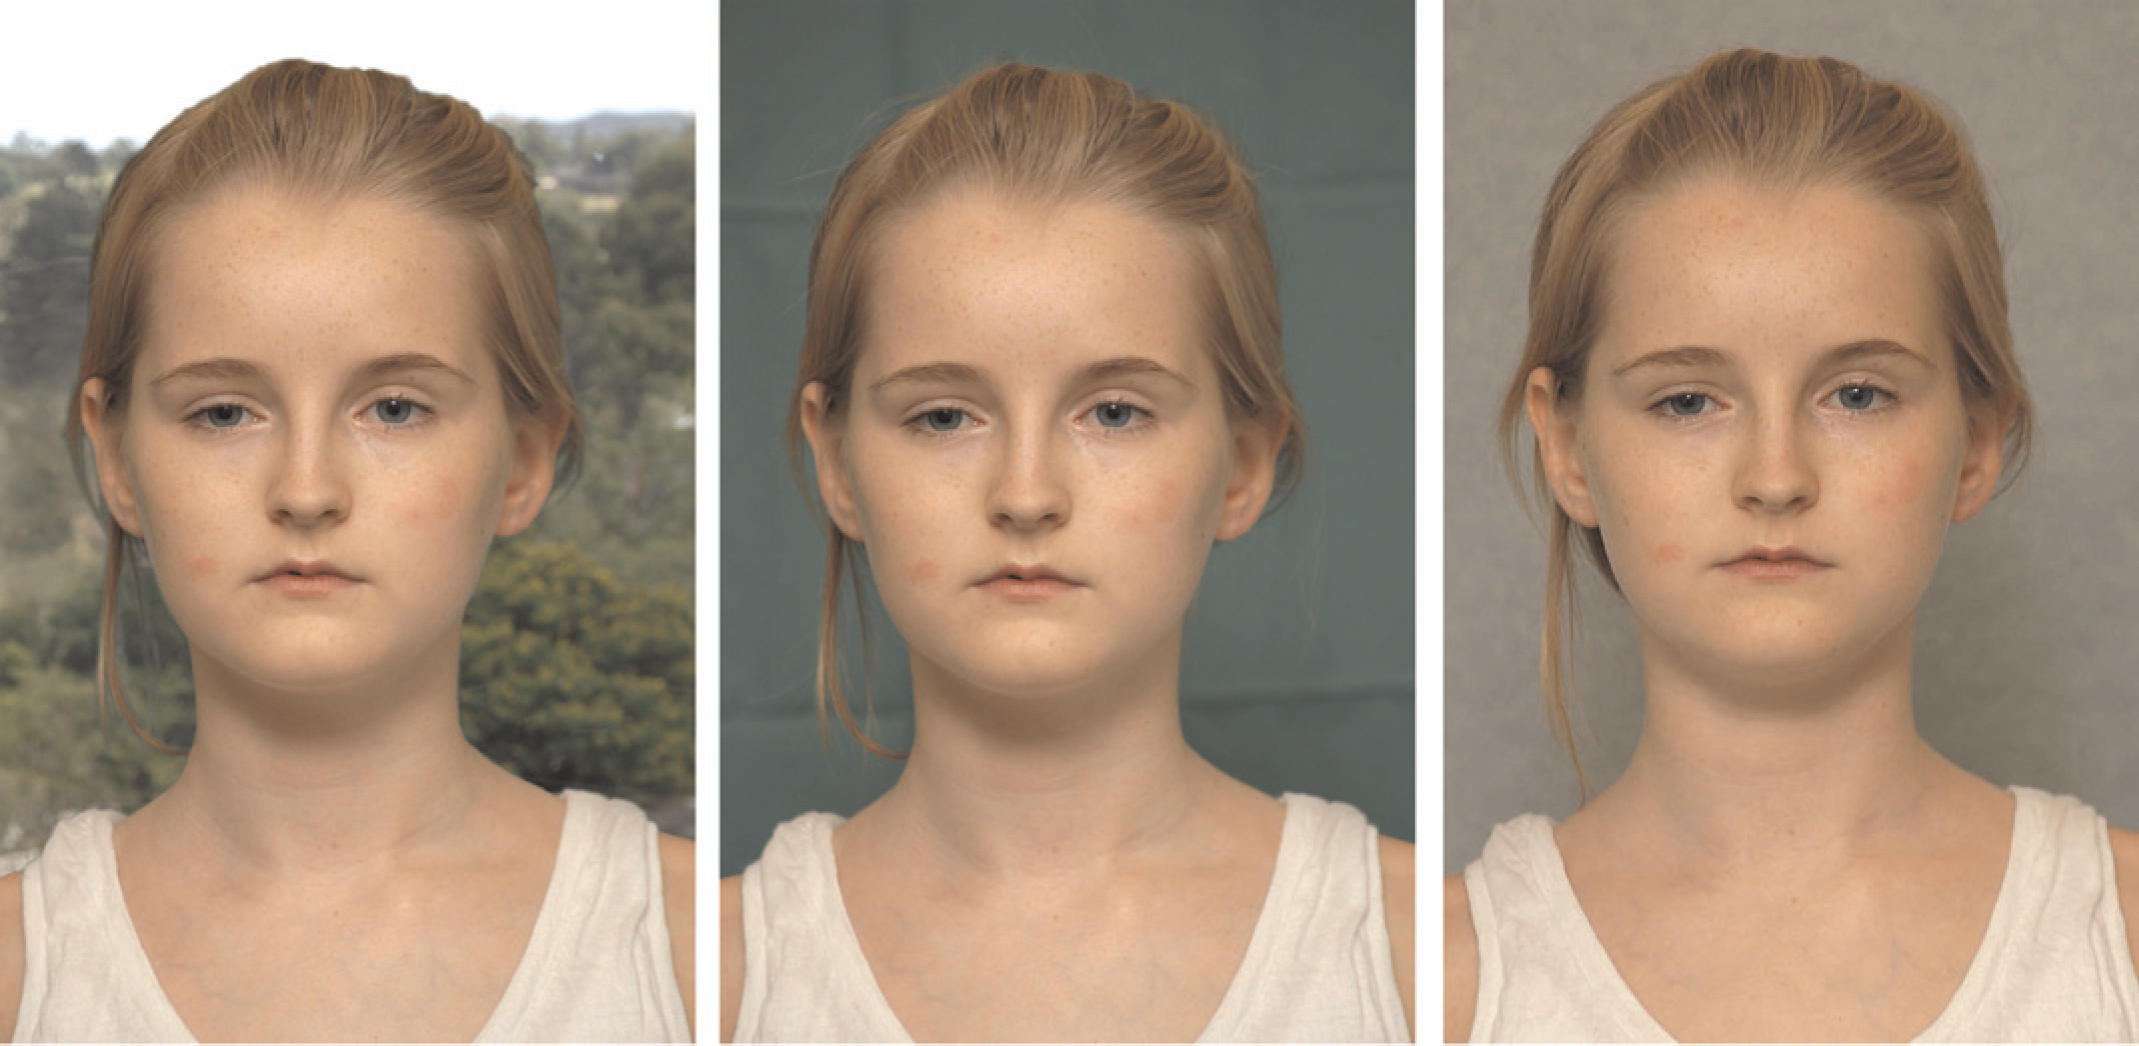
The difference between three backgrounds
Tripod
Tripods can make a big difference to the quality of the image. First, a tripod will stabilise the image, and second it will force the photographer to think about composition (Figure 2). If you do not like the awkwardness of a tripod, consider a monopod instead. Alternatively, rest the camera on a bench top or something solid. Tripods are usually essential for macro and specimen photography.

Camera on a tripod
Flash
All consumer digital cameras have a built-in flash. Often this is too bright and may not be adjustable. Many cameras will not offer the possibility of using a second flash. Lighting options will be increased if the camera has a hot-shoe for attaching a flash unit, or a thread around the lens for attaching a ring flash.
Attachments - dermoscope
Simple dermoscopes can be attached to some compact digital cameras (Figure 3), and do not require any additional changes to the camera settings, i.e. the camera can be left in Automatic mode. Dermoscopes usually provide a cross-polarised light source that removes reflections from the surface of the epidermis. This is a non-invasive and low cost method for viewing structures just underneath the surface of the skin.

A dermoscope. The Dermlite can be attached directly to a compact digital camera
The LED light source is balanced to daylight and flash. A dermoscope view covers a field of view of about 25 × 25 mm and captures images at a magnification of 8-20x.
Lighting
The light emitted from different sources will have different colouring or hue. The colouration is called the colour ‘temperature’ and is measured in degrees Kelvin (Table 3). The image captured by a camera will be affected by the colour of the light illuminating the scene. Digital cameras are equipped with a white balance adjustment that allows the camera to compensate for the colour of the light source and thus avoids unnatural colouring in the resulting image. Digital cameras have white balance settings to correct for different conditions, such as daylight or fluorescent lamps or flash. The automatic setting, which is normally very accurate, adjusts the white balance for any lighting condition. Some cameras will permit the white balance to be set manually – this is done by pointing the camera at a neutral white or grey surface and recording a reference image.
Common light sources and their corresponding colour temperatures

Details of various light sources, where they might be encountered and how to use or avoid them, are shown in Table 4.
Light sources

The aim when photographing clinical subjects is to create an environment with neutral white, diffuse and even light. Various situations where clinical photographs might be taken are listed below.
Lighting techniques
The best technique to use for lighting the subject will depend on the setting in which the photographs are being taken.
Studio
The ideal environment for photographing patients is a studio. The background should be neutral grey and non-reflective. The patient should stand approximately one metre in front of the background. Two diffuse ‘soft-box’ light sources should be positioned 45° from the patient. This produces ideal lighting conditions. Figure 4 is a birds-eye view.
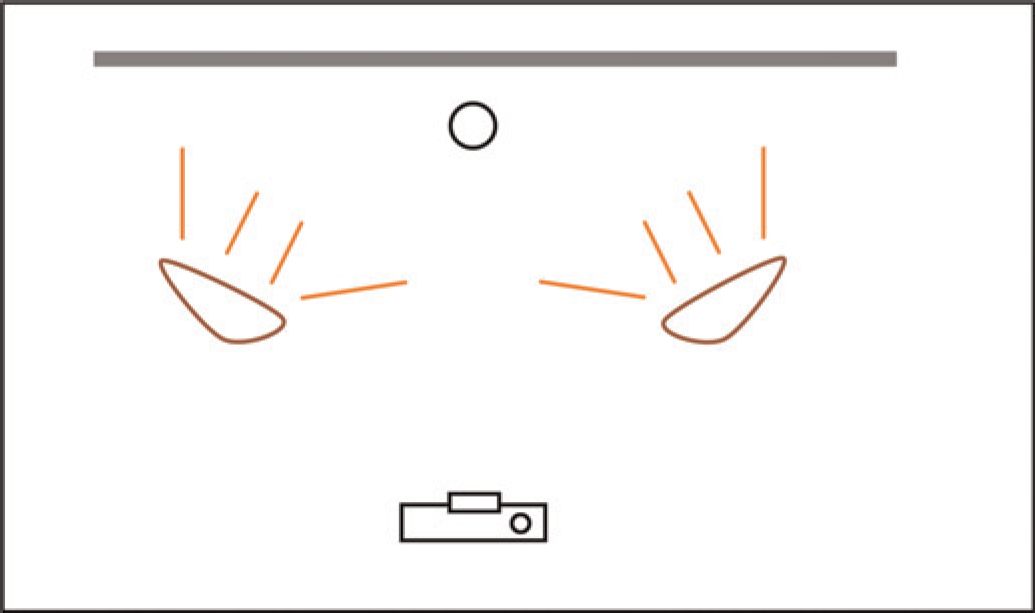
A birds-eye view of the patient in front of the camera
Naturally lit room
Well-lit rooms with natural lighting are useful for photography. However, the patient should not stand in direct sunlight as this causes excessive contrast and dark shadows. The ‘shaded’ area of the room will provide even, diffuse lighting, see Figure 5. If the light is strong enough there should be no need to use the camera's built-in flash.

Photography using natural daylight. If there is a window in the room, the patient should not stand in direct sunlight
Room without natural lighting
In a room without natural lighting, the built in flash on the camera should be used. For best results the flash light source should be diffused using a flash ‘sock’, a white plastic bag or some opaque sticky tape (Figure 6). This will reduce the contrast created by the shadows.
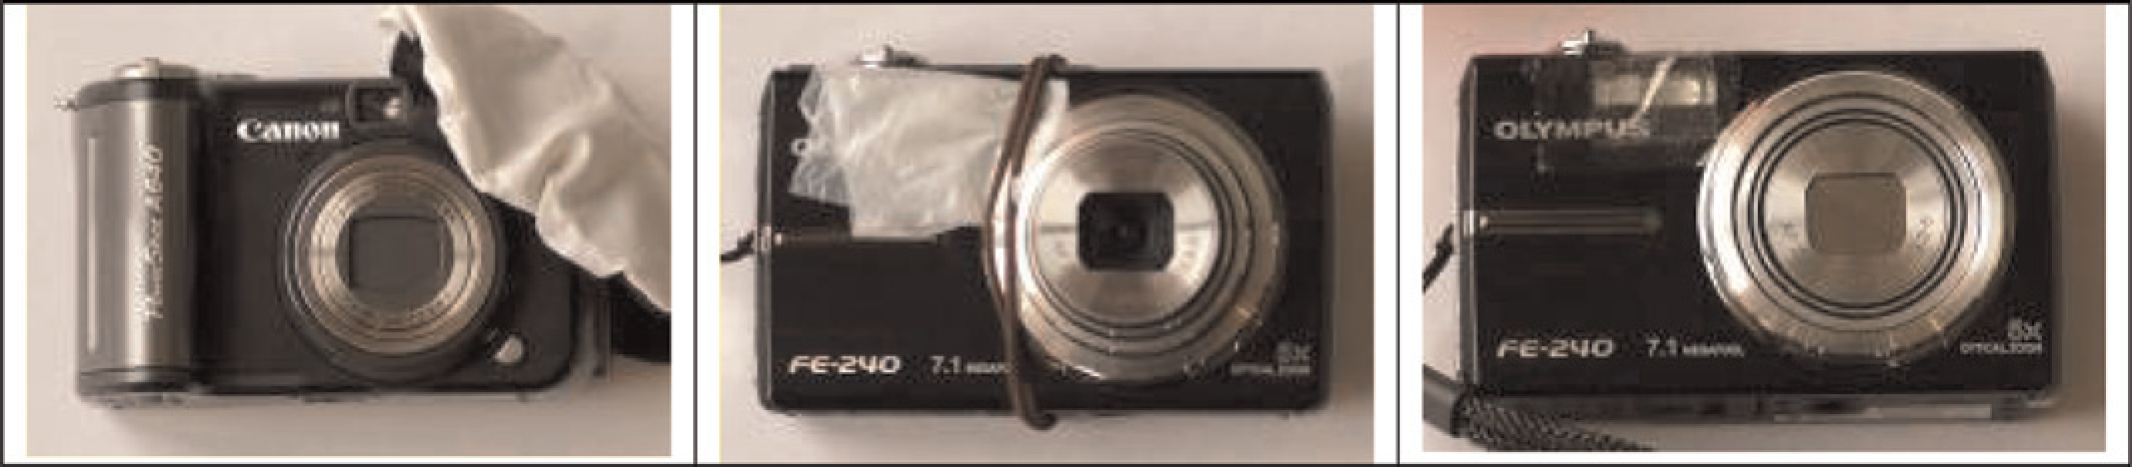
A flash sock, a plastic bag and sticky tape
Outside
When photographing outside, photograph the patient in a shaded area. The sun represents a point light source, which means that harsh, distracting shadows will be cast on subjects if they are photographed in direct sunlight (Figure 7).

Harsh, distracting shadows will be cast on patients if they are photographed in direct sunlight
Operating theatre
When photographing inside the operating theatre, switch off the operating theatre lights and use the camera flash. A ring flash will provide the best results, as most images are likely to be close-ups.
Ward
On a ward, use the same principles as in a naturally-lit or unlit room. Make sure the patient is afforded privacy while being photographed.
Camera equipment
Purchasing a compact digital camera
There are a number of camera functions which should be considered when purchasing a compact digital camera. These include:
Automatic mode. All digital cameras have an automatic mode that sets the focus, exposure and white balance without further intervention from the user. The automatic mode will be acceptable in most situations. Aperture number. The aperture number refers to the iris opening in the lens through which light passes onto the light sensitive chip. The lower the aperture number the better the camera will perform in low light and macro conditions. Lens thread. If capturing good dermatology images is important then being able to use attachments such as a dermoscope or a ring flash will be useful. This will require a thread around the camera lens, where fittings can be screwed on. Although few compact cameras have this feature, the Canon Powershot A640 is a model which does. Manual focus. Auto focus is useful in common situations, but if you are photographing a neutral subject, or one with little tonal range, you may find that the automatic focus will not work correctly. Manual focussing is very helpful for repeatedly capturing images at the same magnification. For example, if you set your focus range at 15 cm then you will have to move the camera to exactly that distance to achieve a sharp image. This means you can repeatedly capture images at the same distance and magnification. Megapixels. In the case of clinical imaging, quality is much more important than image size. A 3-Mpixel camera will produce an image of sufficient quality for clinical assessment, and will also be suitable for publication up to A5 size. A larger file size would be necessary only if enlargements greater than A4 size are required. Shutter delay. Digital cameras have a delay in capturing the photograph once the shutter is pressed. This is because they have to take a pre-exposure, focus, change the colour balance as required and calculate the correct exposure. Pressing the shutter-release button halfway down signals the camera to choose focus, colour balance and exposure. By doing this in advance, you can reduce the subsequent delay when you take your shot. Unfortunately camera manufacturers do not normally publish the length of this delay in the camera specifications, so it must be tested manually. Video from your digital camera. Video from a digital camera can be useful for demonstrating things like gait and range of motion.
4,5
Because video files can be extremely large, they should be recorded in a compressed format (such as MPG). Video should always be shot in landscape, not portrait, format.
Camera settings
The methods of selecting the settings on a camera will vary between manufacturers, and also between models from the same manufacturer. The camera settings of three popular brands of cameras are demonstrated in the following examples. Figures 8a-i show what symbols are depicted on the LCD screens when changing the desired setting. The image on the left is from a Canon camera, the centre image is from a Nikon camera and the image on the right is from an Olympus camera. Where images are missing it means that the setting was not available on the model used in the demonstration.

The images in the left column are from a Canon camera, images in the centre column are from a Nikon camera and images in the right column are from an Olympus camera. (a) Selecting the resolution. (b) Selecting the image compression. (c) Selecting the flash. (d) Macro settings. (e) White balance. (f) Exposure compensation. (g) Black and white settings. (h) Night or long exposure. (i) Focus
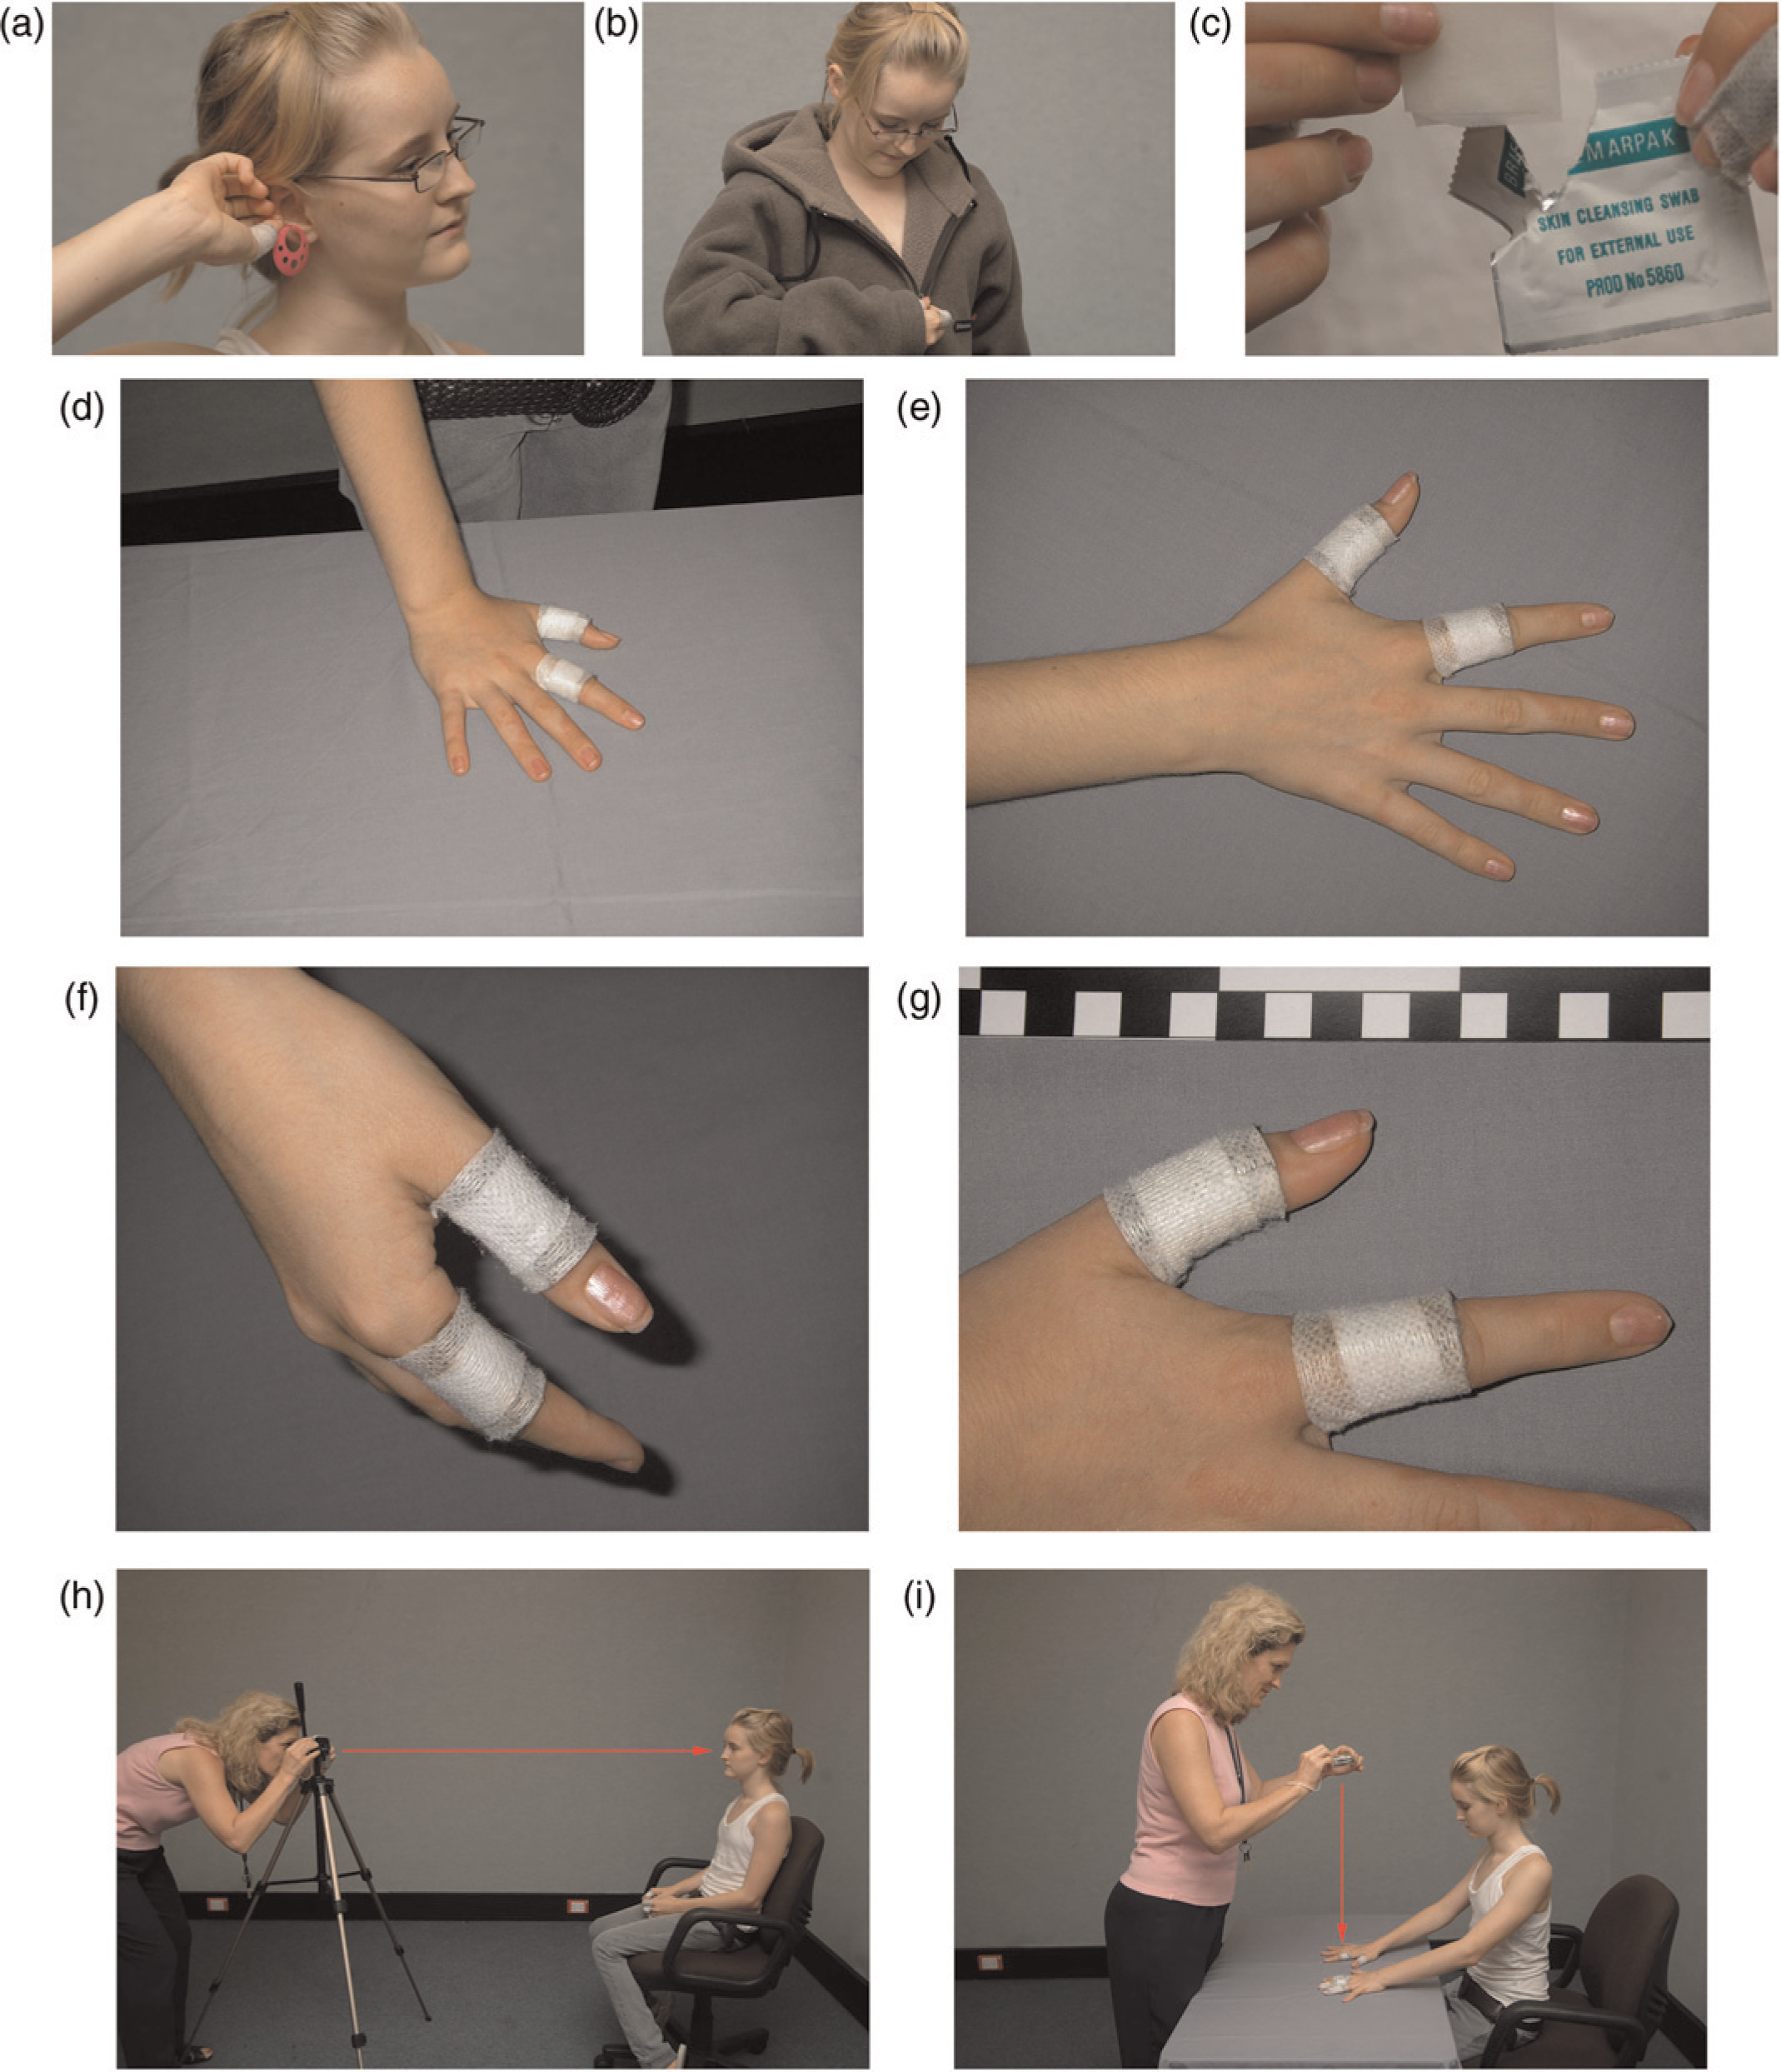
(a-b) removing obstructive items, (c) cleaning the area, (d-g) examples of incorrect and correct anatomical positions, (h-i) example of correct stance between photographer and patient
Clinical photography techniques
As mentioned above, clinical photography involves accurately capturing clinical and scientific situations so that quantitative data can be derived from the image. A standardised and methodical approach must be taken so that the process can be repeated.
The procedures in clinical photography should not vary from camera to camera, or from country to country. Taking a photograph should be a standardised process. The steps include:
Ask the patient to remove jewellery, tie their hair back and remove any clothing that obstructs the area of interest; Clean the area, removing any blood, fixing tape or other obstructions; Use a clinical background such as a drape or a clean wall; Have the camera settings ready and some idea of which patient series you need to capture; When using a scale or colour chart makes sure that it is parallel to the frame of the image; Always use correct anatomical positions.
There are seven main scenarios in clinical photography. It is worth becoming familiar with all of them and becoming an expert in the ones you will use regularly.
Photographing a patient
The equipment which will be required for photographing a patient includes: a suitable background, a scale, a tripod and other camera accessories. The steps are:
Ask the patient if they consent to photography AND explain where the images will be used. This is called ‘Informed Patient Consent’ (see Appendix). Ask the patient to sign a consent form, or if they are under 18 years old, ask a parent or guardian to sign the form on their behalf. Know the desired output (Internet, study, publication) and adjust your camera settings accordingly. Check the environment. You will need a private room and a clean background. Consider the lighting carefully. Ask the patient to remove clothing as appropriate, jewellery and glasses. Clean the area of interest if necessary. Photograph the patient's ID sticker or something that will later enable identification of the patient. This is important if several patients are to be photographed, or the memory card is not downloaded for sometime. Photograph the patient using a standard series and then additional pictures as desired (see Figure 10). While taking the photographs consider these things:
overview regional view regional view with additional markings close-up The four characteristics of an excellent clinical photograph are:
correct perspective scales and colour charts used where appropriate (and aligned with the image frame) even lighting clean background. Download the images to a computer, rename the files and store them in a database (see the footnote at the end of this section for more information).
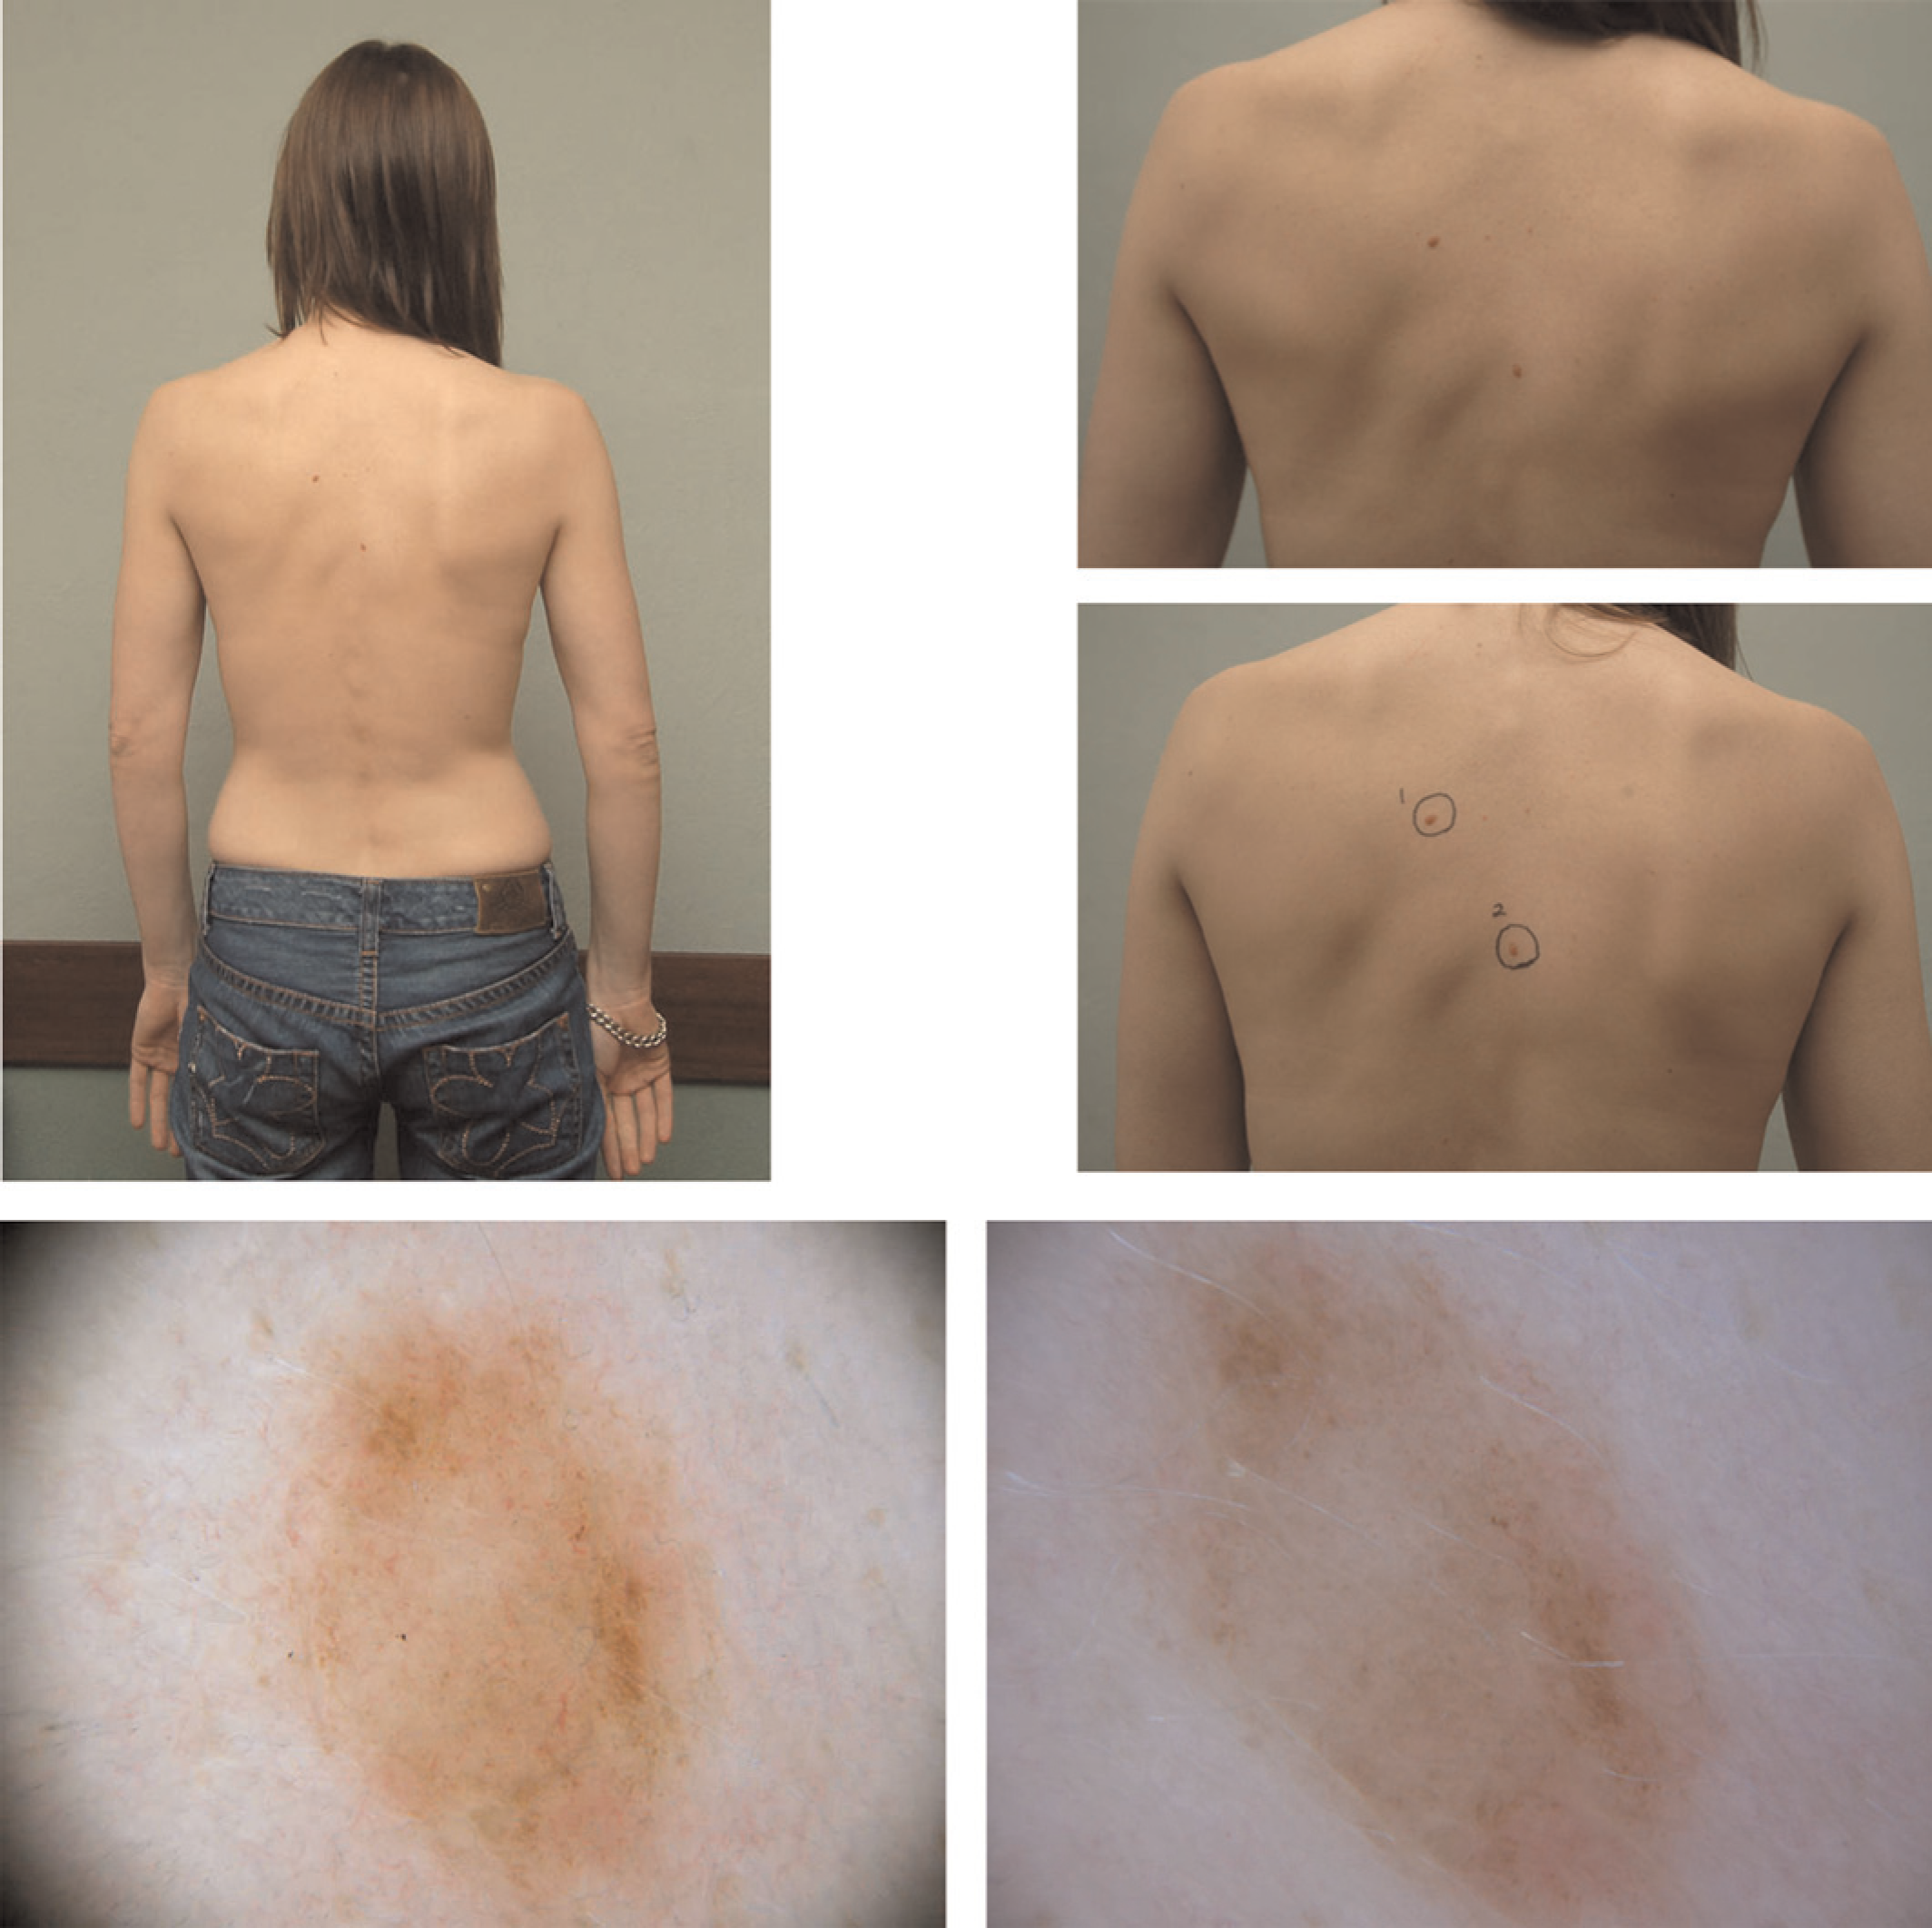
The three main steps to follow in a clinical photography series
Photographing an X-ray film
The equipment required to photograph an X-ray film includes a light box and a tripod. The steps are:
Clean the light box; Mount the camera on a tripod and align it with the centre of the image on the light box; Set the camera to Black and White. (There is no point in photographing a black-and-white object in colour – the resulting file will be three times larger than it needs to be); Turn off the lights and block any light coming in from doors and windows. It is the backlight from the light box that needs to be recorded. Any excess light spilling out from the light box should be blocked by pieces of card, Figure 11; To avoid camera shake from the long exposure which will be required, use the camera's self-timer setting. Steps in photographing an X-ray film on a light box
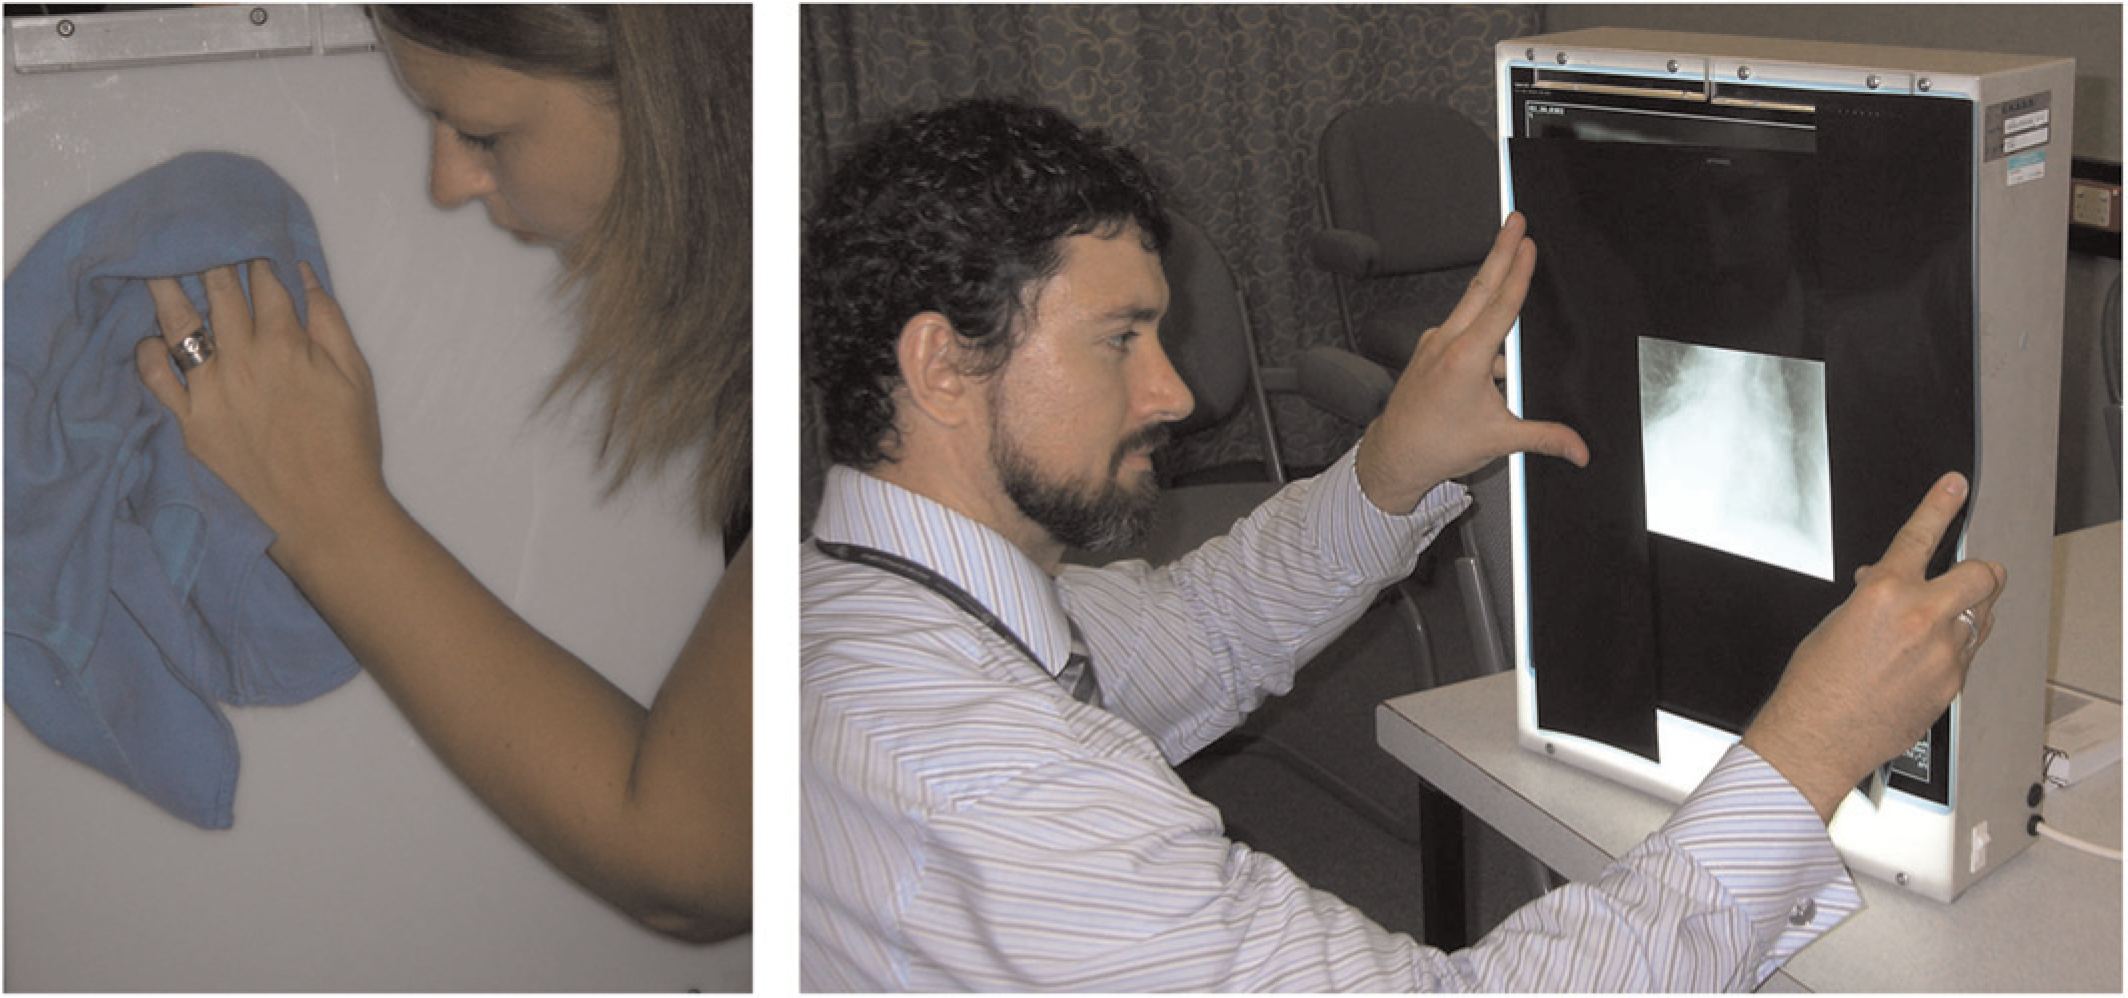
Photographing a monitor
The equipment required to photograph a computer screen (monitor) includes a tripod and a cleaning cloth. The steps are:
Clean the monitor; Mount the camera on a tripod and align it with the centre of the image on the monitor; For cathode ray tube (CRT) monitors set the camera to ‘night’ mode. This will produce a long exposure that will avoid the horizontal bands appearing across the monitor; Turn off the room lights, and block any light coming in from doors and windows, as these will cause reflections in the glass monitor; To avoid camera shake from the long exposure, use the camera's self-timer setting (Figure 12). (a) Cleaning the monitor, (b) Exposure which is too fast, (c) Flash and room lights still turned on, (d) Perfect!

Photographing a specimen
The equipment required to photograph a specimen includes a suitable background, a scale and a tripod. The steps are:
Clear a flat place on the ground (as specimens are normally photographed from above); Lay down the background cloth and the specimen. Place a scale parallel to the frame of the photograph; If the room is not sufficiently well-lit, use a tripod. Specimens are often reflective, so it is best to diffuse the flash; Photograph the patient's ID sticker, or a description of the specimen; Take the photograph.
Photography in the operating theatre
The equipment required for photography in an operating theatre includes a camera with a flash. The steps are:
Clean the area of interest; Ask for the operating lights to be switched off briefly; Take the photograph as parallel to the subject as possible. This may require getting up on a stepladder or stool.
Dental photography
The equipment required for dental photography includes retractors, dental mirrors and an external light source (or ring flash). The steps are:
Ask the patient if they consent to photography AND explain where the images will be used. This is called ‘Informed Patient Consent’ (see Appendix). Ask the patient to sign a consent form, or if they are under 18 years old, ask a parent or guardian to sign the form on their behalf; Warm the mirrors by placing them in warm water. This will stop the mirrors fogging when they are placed in the patient's mouth; Organise the external light source and change the white balance settings on your camera accordingly; Photograph the patient's ID sticker or the patient holding a colour chart with their name and date of birth underneath; Ask the patient to lick their lips before inserting retractors or mirrors; Aim to capture the image series below by photographing the reflection of the teeth on the mirrors (Figure 13). Equipment, procedures and views for dental photography
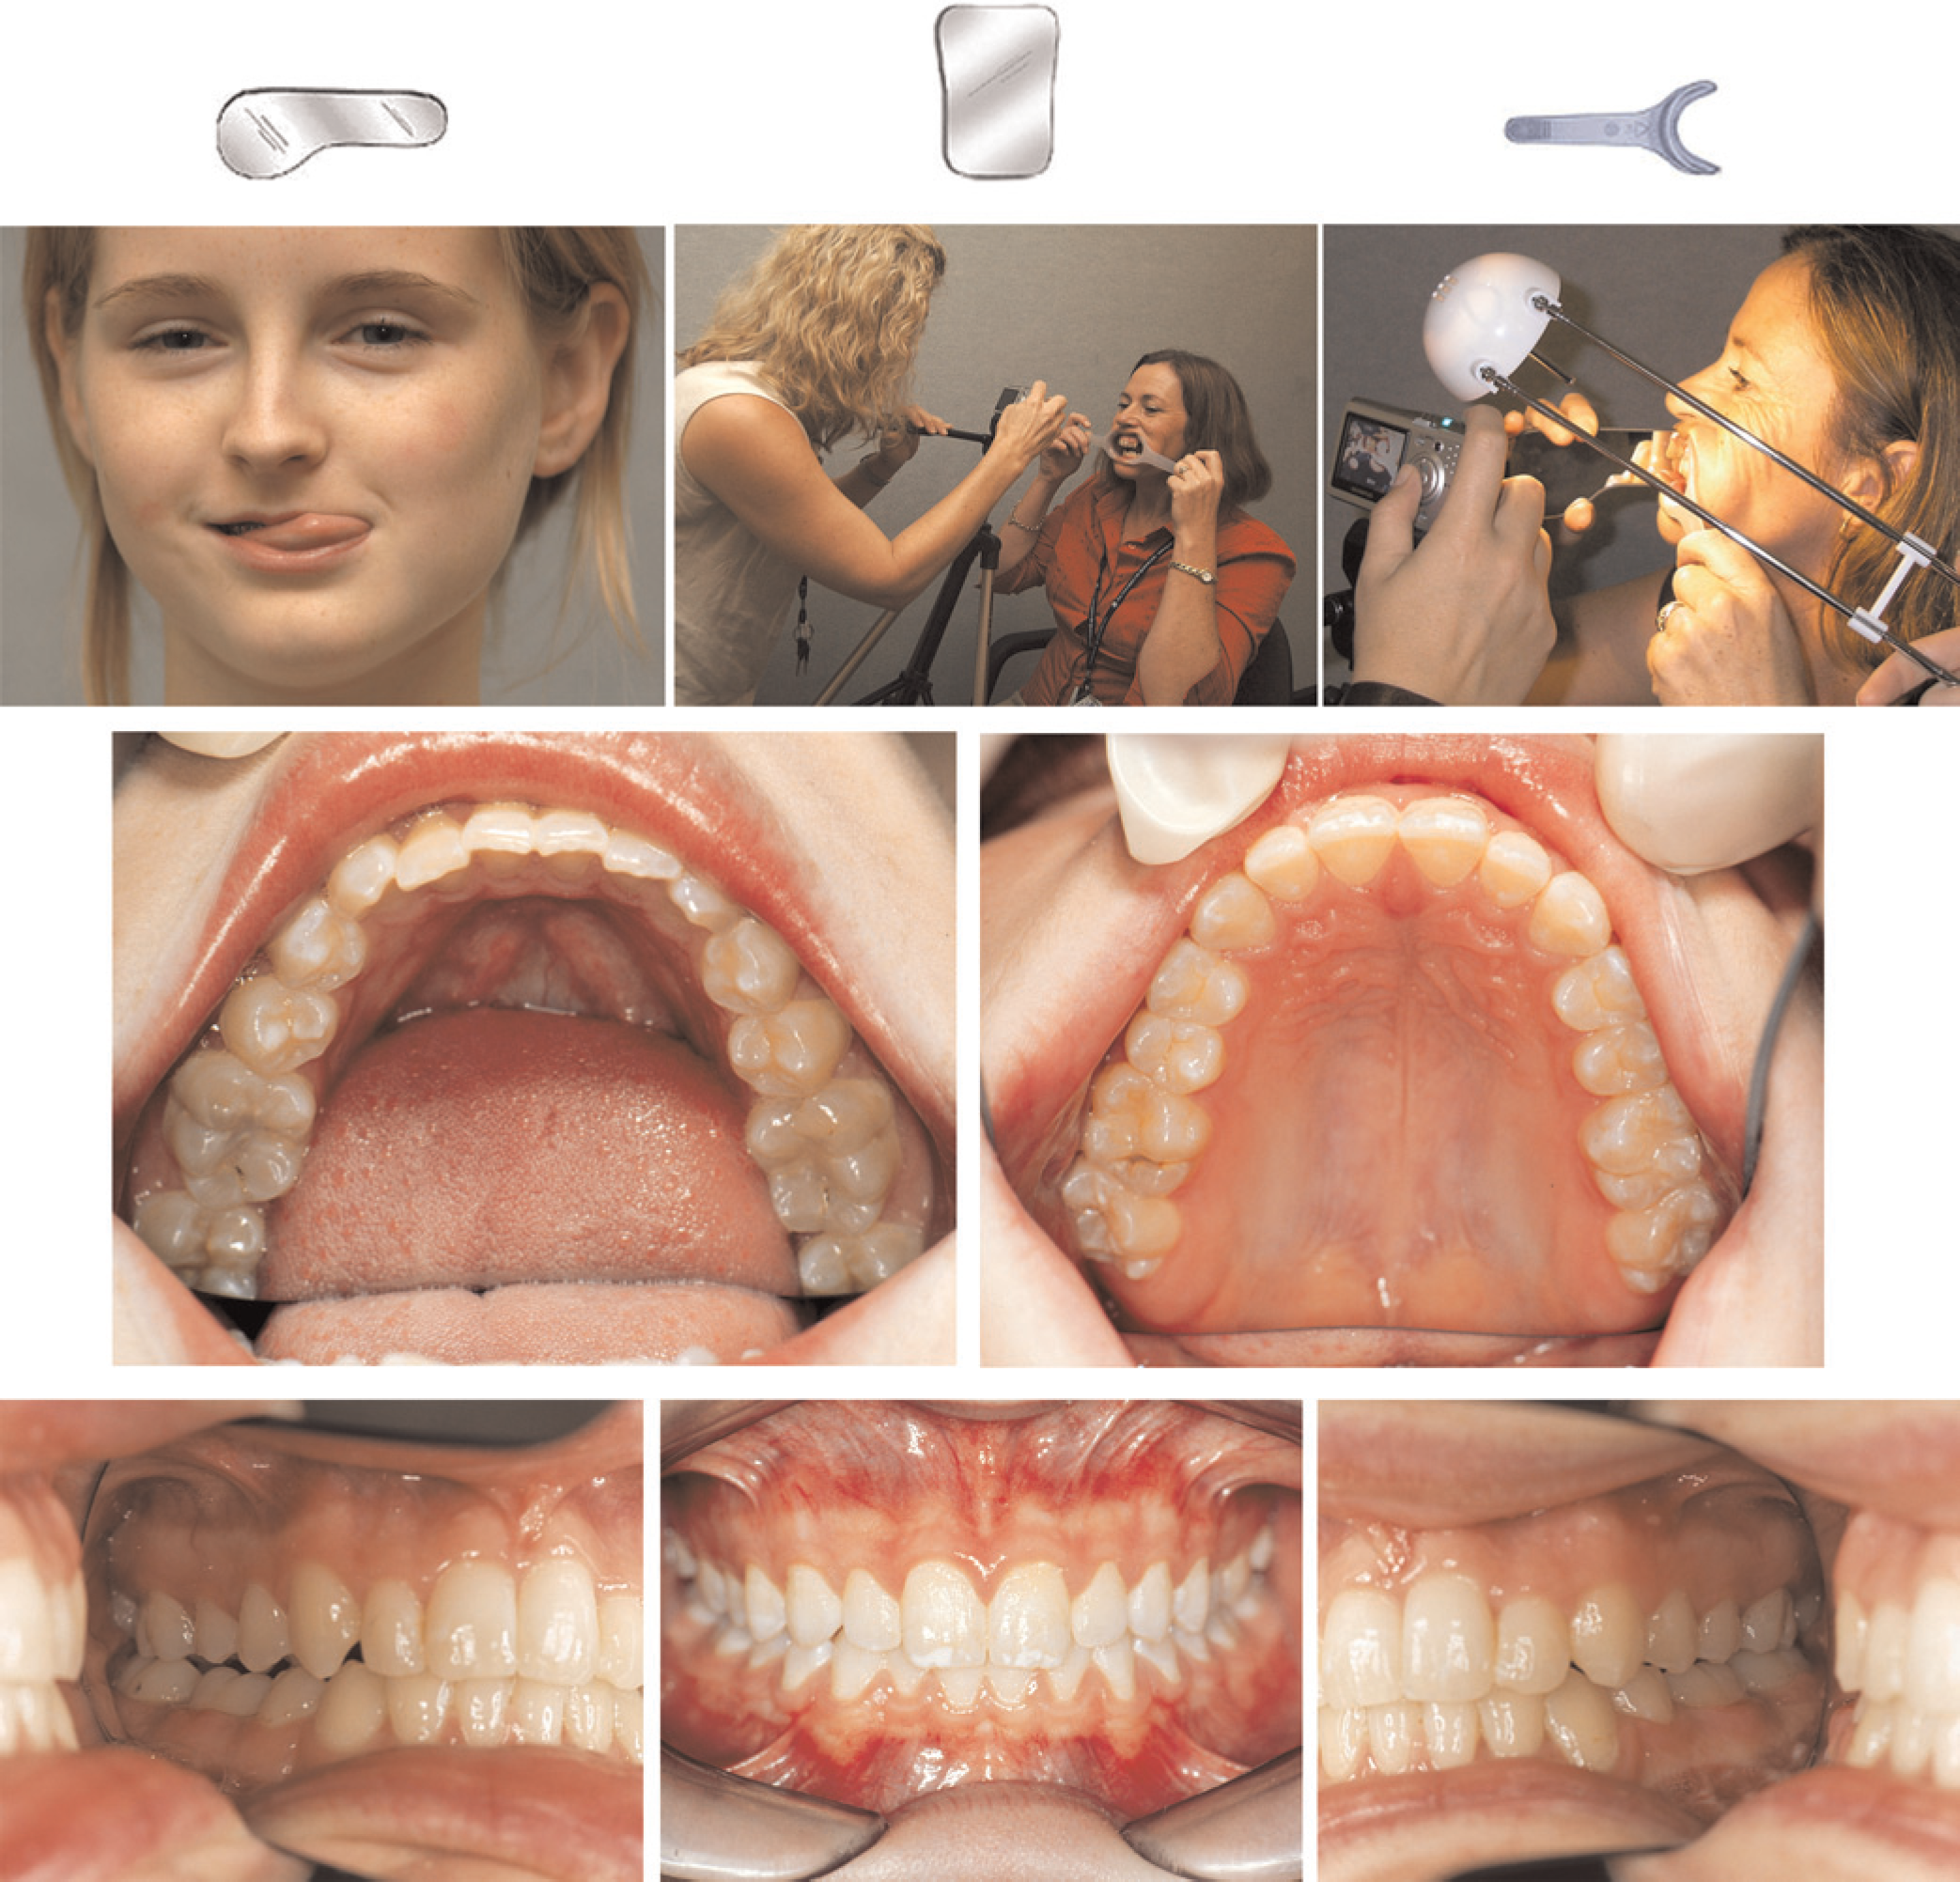
Macro photography
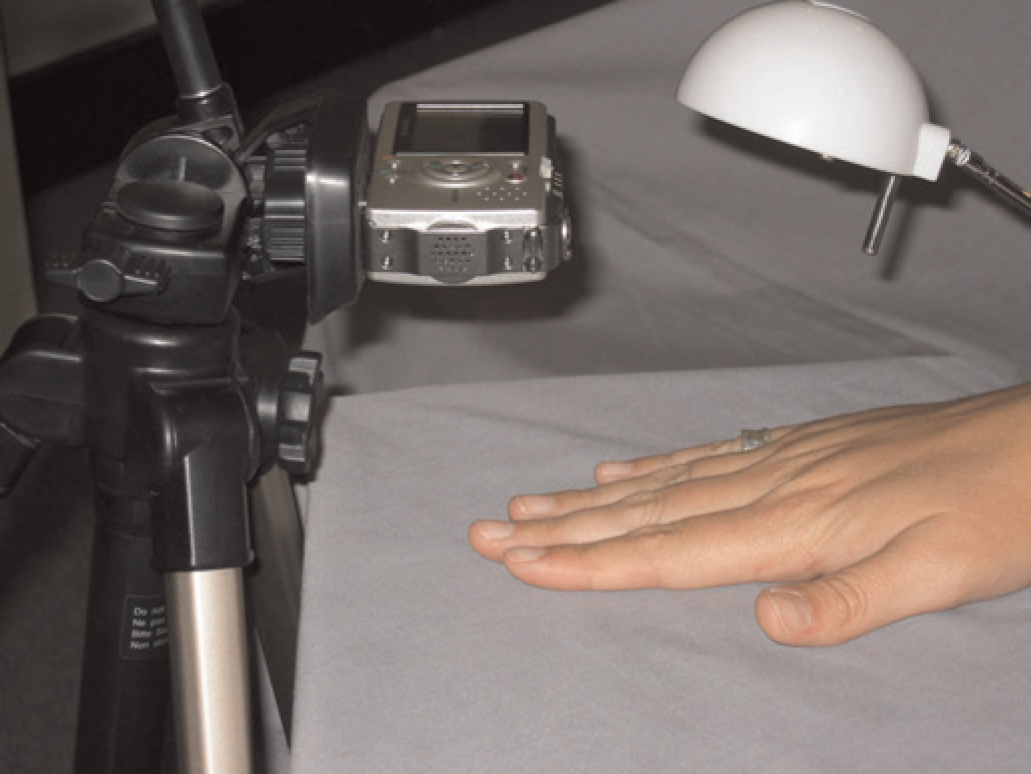
The equipment required for macro photography includes a suitable background, a scale and an appropriate light source (e.g. a built in flash, an external light source or a ring flash).
Close-up or macro photography is a useful technique to master; it can be fundamental to the recording process in disciplines such as plastic surgery and dermatology. If a diagnosis or second opinion is to be obtained by a remote specialist, the image needs to be sharp. Colour and texture must also be accurately reproduced.
Professional macro and micro photographers use lenses and flashes which are purpose-designed for photographing objects at 1:1 magnification. It is possible to achieve similar results with modern compact digital cameras, provided the macro functions are understood.
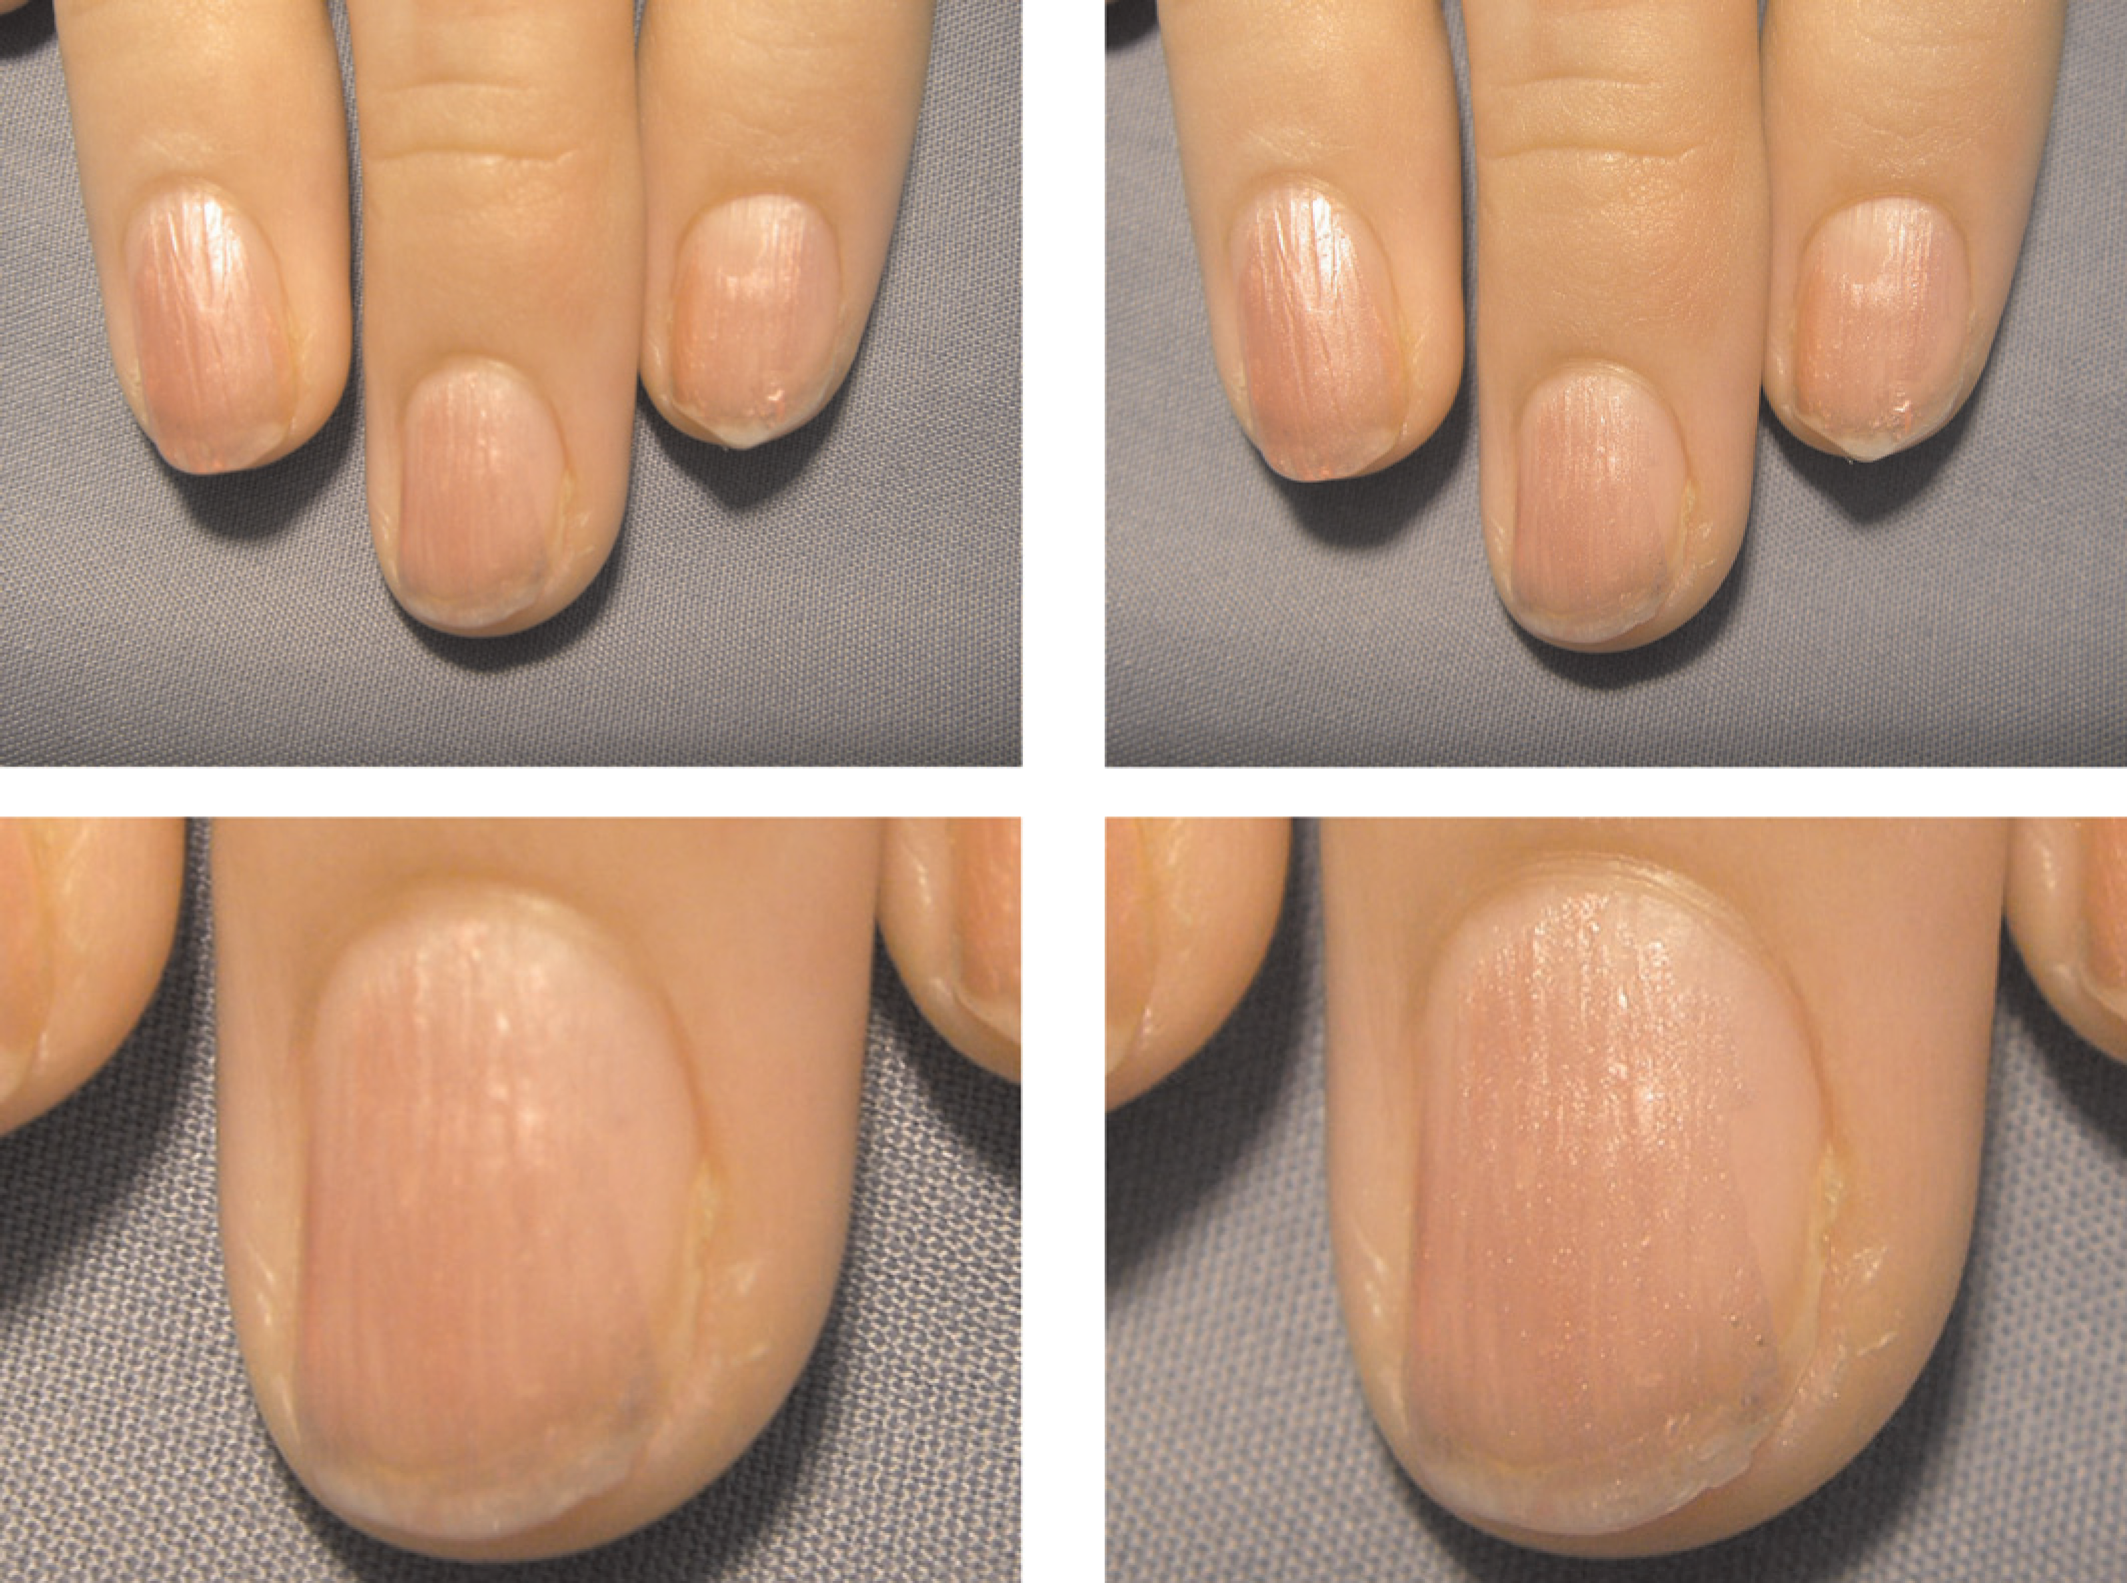
The many challenges associated with macro photography include the limited sharpness in front and behind the main point of focus. This is known as depth-of-field, which is very shallow at short working distances. It is possible to get a sharp picture of the fingernail bed, for example, but the skin in front and the nail behind are likely to be blurred. One option is to shoot from further away and to crop the photograph later. The overall subject is sharper, but the image quality may not be as good because there are fewer pixels, resulting in a lower resolution, grainier image. Successful close-up photography is likely to require a good understanding of the macro function and capabilities of your camera.
The steps are:
Ask the patient if they consent to photography AND explain where the images will be used. This is called ‘Informed Patient Consent.’ Ask the patient to sign a consent form, or if they are under 18 years old, ask a parent or guardian to sign the form on their behalf; Organise the external light source (Figure 14) and change the white balance settings on your camera accordingly; Photograph the patient's ID sticker or something that will later identify the patient; Change the camera settings to macro; Take the image, making sure that the focus and exposures are accurate (Figure 15). A desk light being used as an additional light source. Two such lights can be used at an angle of 45° to the subject Examples of poorly-focussed and well-focussed macro photographs. The close up of the fingernail on the right clearly shows the difference between the two images
Quick tips
Some useful tips for clinical photography are:
Keep a second, fully-charged battery on hand. Keep the battery charger plugged in and easily accessible. Then it will be easy to charge or switch batteries. Know where to find the camera's instruction manual. Develop your own system for image download and storage, then STICK TO IT. Make sure that there is enough room on the memory card for the expected image storage, or carry a spare card. Make sure that there is adequate space on the computer hard drive where images are stored. Make regular back-ups of the computer system. Understand your photographic limitations. For example, if there is not enough space to obtain a full-body shot, it is better to take two shots with correct perspective, than a single image from an odd angle. Ensure that everyone using a digital camera follows the same procedure.
Footnote
It is important to use a system for the storage of digital images, and that each person taking photographs understands the procedure. One suggestion is to arrange the computer folders using date names:
Then label the patients' individual folders by their hospital number and surname. 2009
2009 01 January 09
 02 February 09
 03 March 09
 04 April 09
Conclusion
Taking satisfactory images of patients requires clinical photography skills. Photographing charts, monitors, X-ray films and specimens also requires expertise. Digital cameras, when used correctly, can provide the basis for telemedicine services in both industrialized and developing countries. The increasing sophistication of digital cameras, combined with the improved speed and availability of the Internet, make them an instrument that every health care professional should be familiar with. The Swinfen Charitable Trust, and others, have shown that digital cameras and the Internet can provide a valuable, low-cost method of providing telemedicine services in developing countries.