
Abstract
Abstract
Three-dimensional (3D) food printing, or food layered manufacture (FLM), is a novel application of additive manufacturing (AM) that creates a customizable meal at maximal convenience. While conventional 3D printers use plastics and metals as their base material, a 3D food printer (3DFP) uses food. Most 3DFPs do not require heat to process food since they print confectionary treats and other materials that do not require heating before consumption. Current 3DFPs that produce meals that require cooking use traditional convective or conductive methods to process food after the printing process, which limits their ability to combine multiple materials in a single food object. Integrating an infrared lamp heating mechanism into the printer allows for more precise spatial control of the heat being delivered to printed food, the ability to create complex food patterns with more ingredient complexity, and the integration of multiple food ingredients in a single 3D object. This novel approach to onboard cooking allows users to combine different ingredients—such as chicken with dough—and cook each ingredient selectively. Chefs can experiment with new food combinations and explore novel culinary innovations. The machine's ability to selectively cook and print multi-material food objects represents a significant achievement in this particular application of AM and brings users one step closer to achieving customizable meal-based FLM.

Introduction
The ability to create multi-material food objects via three-dimensional (3D) food printing has created a need for higher resolution cooking methods. 1 Conventional cooking methods utilize principles of conduction and convection to heat an area uniformly, which works effectively for food objects of similar density and thermal heating requirements. However, due to the inability of conventional heating methods to precisely target heat for cooking, material variability on 3D food printers (3DFPs) has been limited. 2 Since 3D-printed food objects consist of many ingredients 3 and—as a result—nonuniform cooking requirements, a more targeted heating system is required 4 that an infrared (IR) lamp can provide.
IR heating allows heat to be directed and transferred without physical contact with the food, making it ideal for food layered manufacture (FLM) applications. IR heating can be used for cooking methods, such as drying, baking, roasting, and broiling. It is ideal for cooking since it offers more uniform heating than conduction, as radiation tends to target opaque objects and reduce heating time. The heating technology has already been proven commercially, and it offers the widest potential given the limitations of a 3DFP.
Companies and academic institutions are the predominant developers of FLM technologies. Barilla created a pasta-generating 3DFP that uses three identical nozzle heads to print pasta objects made from a semolina mixture. 5 Hershey's has created a printer that uses a single nozzle head to print a chocolate mixture that hardens on contact with air.6,7 NASA is exploring the use of FLM for meal creation at the space station. 8 Three-dimensional systems have been developing two commercially available systems, ChefJet and Choc Edge, both of which print various types of sugar-based materials. 9 BeeHex is working on a multi-material printer that can print custom pizzas that requires three separate nozzles for each ingredient and an oven for proper baking. 10 The Foodini, developed by Natural Machines, plans to replace closed syringe capsules used by other culinary printers with open capsules to allow the user to input materials. Finally, existing 3DFP designs have been developed to extrude edible pastes and food materials, like the Fab@Home, developed at the Cornell University, which can print frosting, chocolate mixtures, and other viscous materials to create complex edible objects. 11 While the applications of FLM are very pervasive, food designs are limited by current state-of-the-art heating methods. 12
In this article, we explore additive manufacturing (AM) technology as it applies to the extrusion and processing of food materials. The versatility and degree of customization possible with this method of food combination need to be complemented by a processing technology that can match its degree of resolution.1,11 We take a top-down approach—as opposed to a nutrient-based approach 13 —to develop extrudable materials, by creating materials from natural ingredients that are appetizing and aesthetically pleasing, similar to Hod Lipson's team at Cornell. 14 We develop a functional 3D printer able to print and process various food pastes via software. Our aim is to further the development of current food processing techniques and provide a new cooking method for 3DFPs to utilize.
Materials and Methods
Machine design
Our food printer was built from a modified X-Carve, a commercially available three-axis Cartesian milling machine and consisted of three main subsystems: (1) an extrusion mechanism, (2) an IR cooker, and (3) a software and control system.
Extrusion mechanism
We mounted a custom food extrusion mechanism to the z-axis screw table of the machine. This extruder and all axes were driven by ClearPath brushless servomotors (CPM-SDSK-2311S-RQN). This extrusion mechanism consisted of a 30-mL clear syringe barrel (PN: 7012134) with a 14-gauge flexible tapered nozzle tip (PN: 7018052). The syringe fit into a custom 3D-printed plastic syringe holder, which had four 0.25-inch-diameter neodymium magnets that are attached to the z-axis of the X-Carve. Inside the syringe was an airtight stopper that encapsulated the food material, creating an airtight seal. The extruder utilized a ClearPath servomotor coupled to a threaded rod to push and retract the rod into the syringe. A 3D-printed disk fit on the end of the rod and pushed the stopper down onto the material. The threaded rod was guided using an acrylic sheet with a slot and a 3D-printed guide, ensuring a fit with the top of the stopper every time.
Our custom machine rack (6, Fig. 1) could house up to seven different food materials for a single print job. The extruder could pick and place materials by actuating the gantry's x-, y-, and z-axes—with no additional actuation required. The tool change system employed neodymium magnets and an angled groove (Fig. 2) to facilitate the picking of a food-filled syringe.
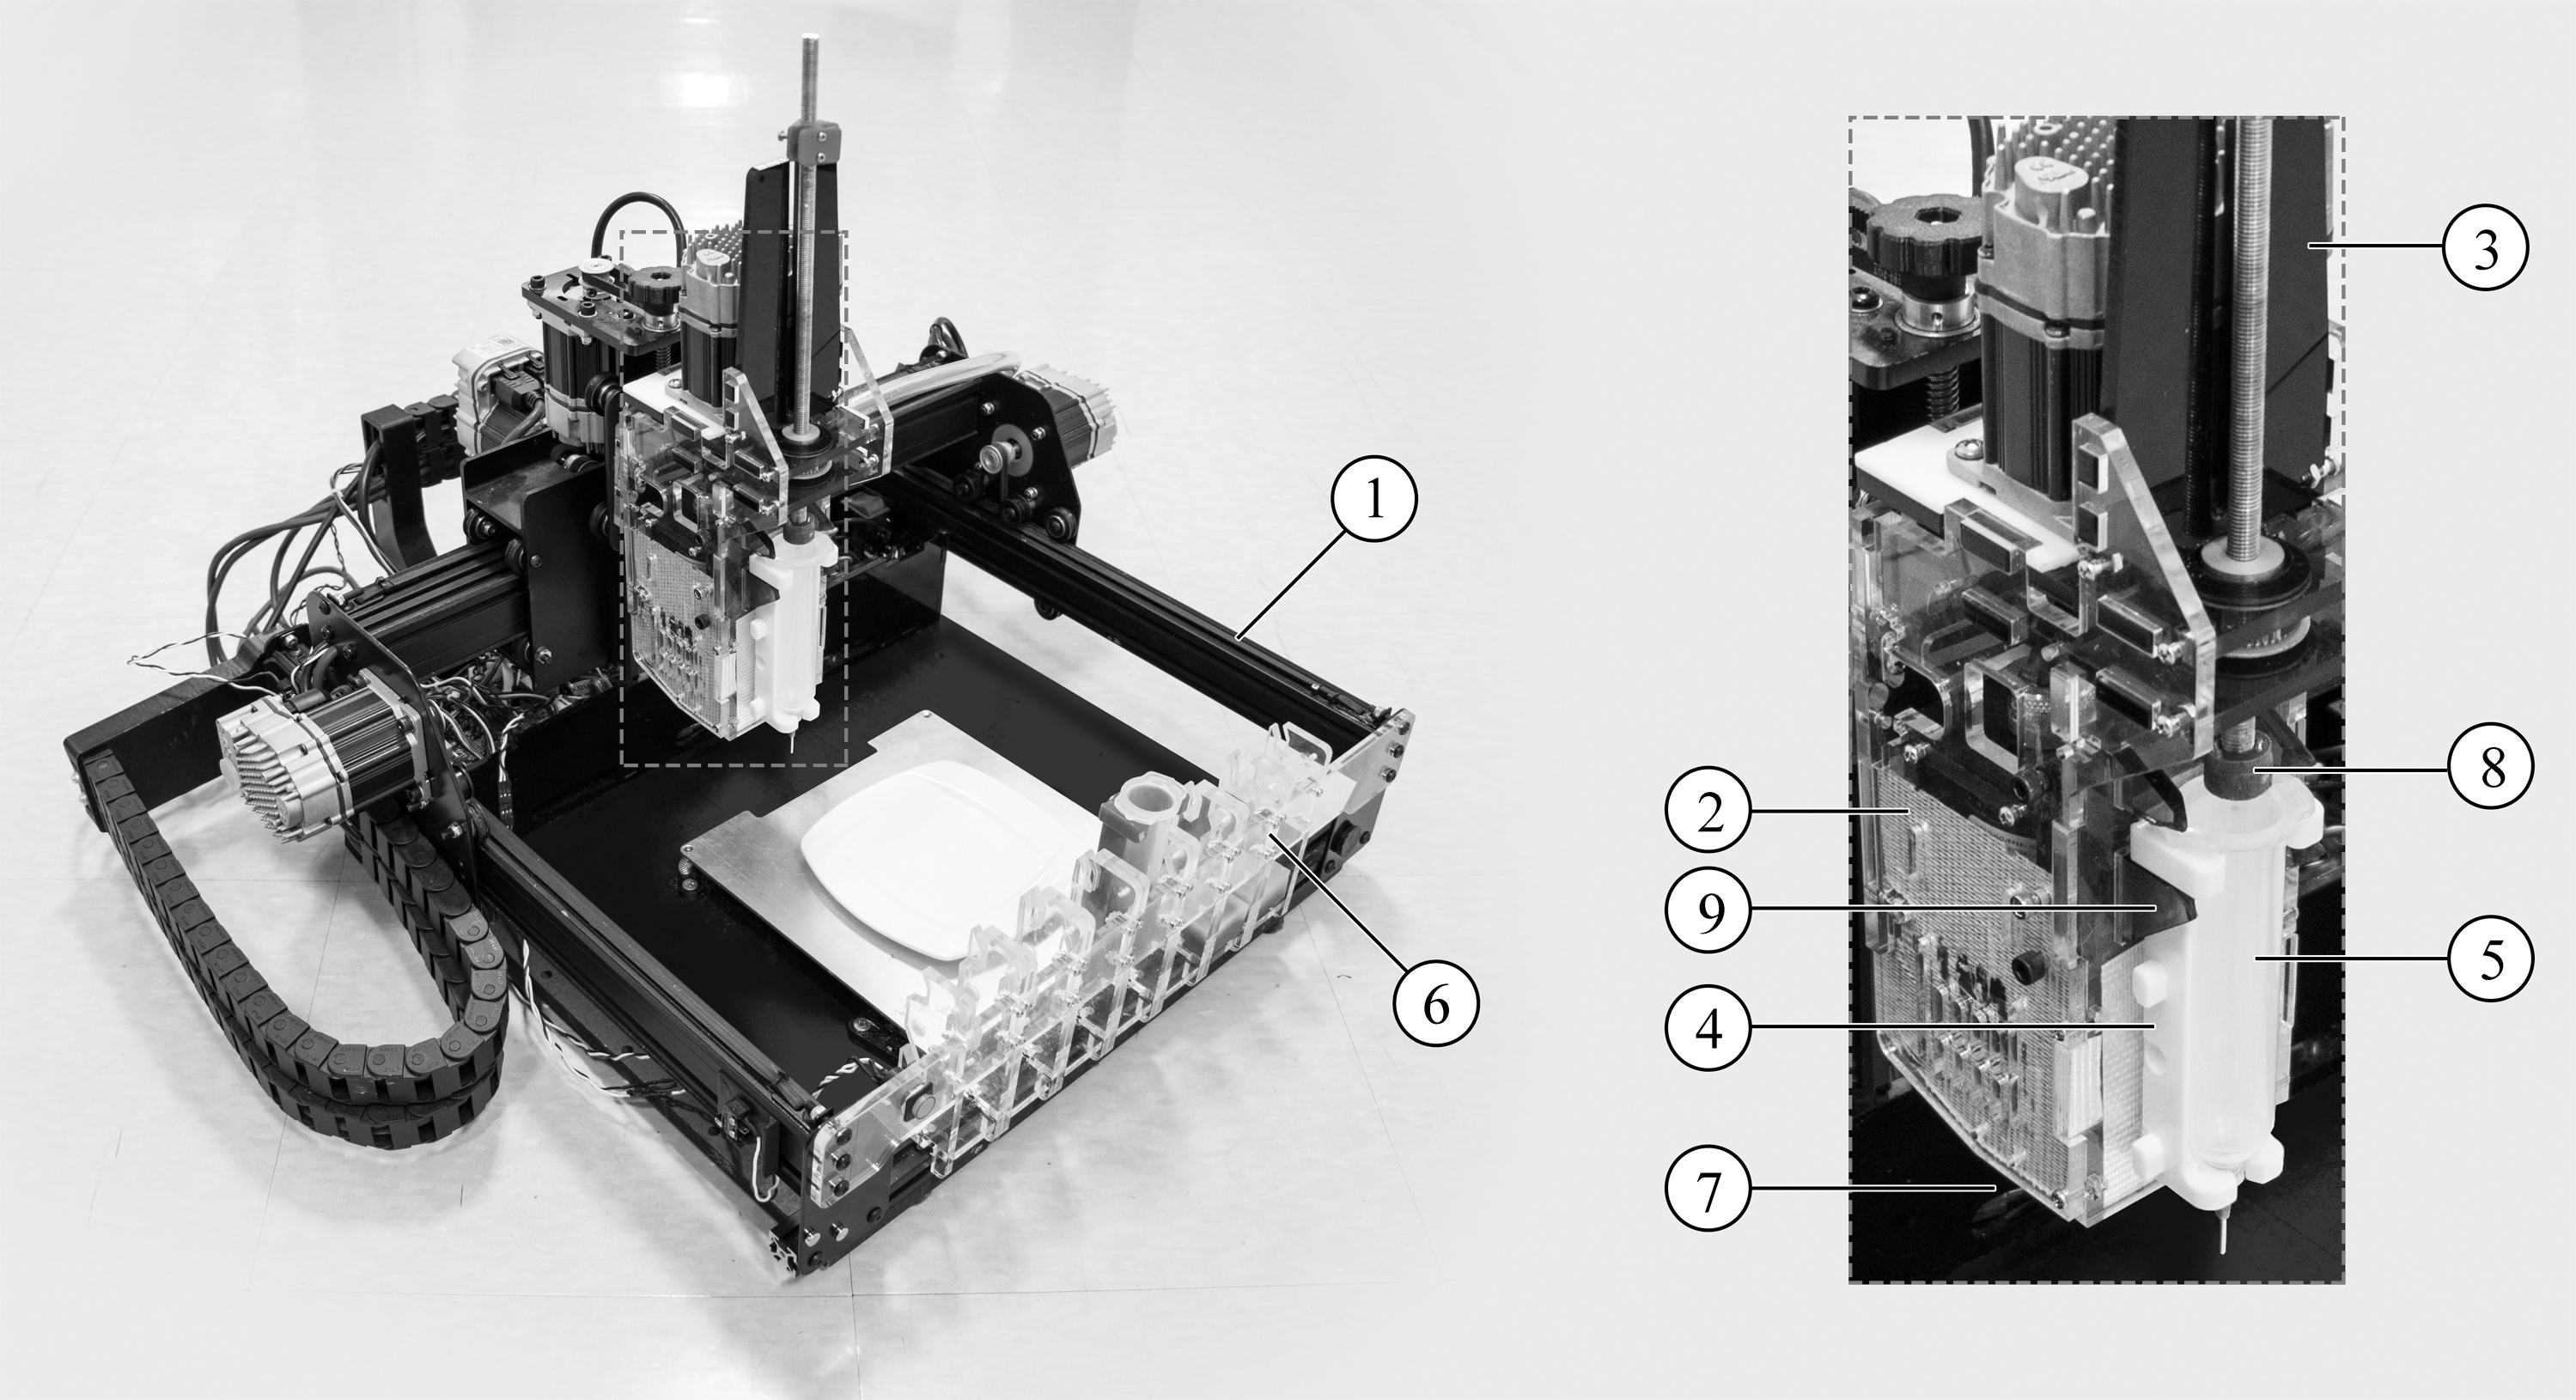
Three-dimensional food printing machine schematic. Dashed box indicates custom extrusion mechanism that was designed and built for this machine. The (1) X-Carve machine is a Cartesian gantry with three degrees of freedom. The z-axis is outfitted with a (2) custom IR housing and extruder and the base has a (6) rack for additional food materials. The custom printing mechanism has several features, including (3) a lead screw guide for stability, (5) a syringe with (4) a holder, (9) a set of syringe guide arms, (8) an extruder end for pressure distribution across the syringe stopper, and (7) an IR spotlight for cooking. IR, infrared.

Schematic showing pick and place mechanism of food syringe.
Being able to retract material and remove the drive piece from the plunger for ingredient changes was crucial for swapping syringes. The drive piece needed to be sized correctly to ensure maximum functionality: too small, it could easily be removed from the plunger but could not retract material; too large, it could retract material but could not be removed from the stopper to change ingredients. An elegant actuation-free solution to this problem lay in the material properties of our ingredients. During food extrusion, the food would slightly compress and pressure would build in the contained syringe as elastic potential energy. After extrusion, this pressure would release once the drive piece was displaced upward by a distance d and exert an opposing force F(d) on the plunger. A given drive piece would be pulled from the plunger if the opposing force exceeded some force Fpull. We observed that a larger displacement resulted in a larger opposing force. We used dretract and dchange to represent typical displacements required for material retraction and material change, respectively. By precisely tuning the size of our drive piece such that
we could ensure that the correct operation would take place.
IR cooking
We used a PCSControl SpotIR 4150 IR spot to allow for cooking while printing. This IR lamp is designed for applications that require clean noncontact heat on small targets. It is composed of a single lamp and reflector heating system that can generate temperatures up to 1800°F onto areas with diameters as small as 6.35 mm (0.25 inch). We housed the IR spot in a custom acrylic housing covered with heat-reflective and fire-resistant adhesive next to the printer's extruder system. In this setup, the IR spot could be moved in the x-, y-, and z-axes in tandem with the extruder.
We needed to characterize the resulting temperature from the IR spot as a function of the heater's power setting and distance from the printed food. To determine this relationship, we attached a thermistor on the printer bed and clamp-mounted the IR spot directly above it. Several experiments were conducted at various power settings and distances from the sensor target. Once sufficient data were accumulated, we generated a 3D plot using MATLAB (Fig. 3). This plot allowed us to determine the necessary distance from the surface and the IR spot intensity for a desired temperature in the food.

Three-dimensional plot of temperature as a function of spotlight power and distance.
We performed a polynomial regression on the data set to produce an equation that related the (T) temperature of the heat produced by the IR spot to the (H) distance from the food material and the (P) intensity of the IR spot (Equation 1).
Equation 1: Cubic expression for spotlight temperature in terms of power and distance.
Software and control
A Smoothieboard, an open-source numerical fabrication controller typically used to drive traditional 3D printers and computer numerical control (CNC) machines, controlled the actuators, IR lamp, and sensors. To convert the output of the digital sensor to an analog value for the Smoothieboard's input, we used a programmable microcontroller as an intermediary. The Smoothieboard was controlled by G-code, a numerical control language typically used to control automated machine tools. We generated custom G-code files in a Java applet user interface that captured multiple configurable parameters of the food print. Depending on the material and number of materials, different printing parameters could be assigned and changed to obtain optimal print settings, including size, shape, extrusion rate, cooking rate, and layer height.
All materials were printed into a three-sided, twisted pyramid shape for three key reasons: (1) the shape has an aesthetic appeal, (2) its geometry can be parameterized and easily adjusted, and (3) its form is not easily reproducible using traditional cooking techniques. The underlying software logic in this application ensured a hands-free print by switching between multiple materials, keeping track of the level of food in each tube, and cooking materials by repeating the pattern over the printed food layers. Logic for a two-material print of sesame paste filled with chicken paste for a single layer would be as follows: (1) pick sesame tube, (2) print triangle perimeter, (3) replace sesame tube, (4) pick chicken tube, (5) print triangle interior, (6) replace chicken tube, and (7) cook entire layer.
Because no simulative models of food printing exist, by trial-and-error we were able to determine the most optimal feed rate (20 mm/s), volumetric flow rate (51.6 mm 3 /s), and cooking speed (3.33 mm/s) for the material. Feed rate—speed of the extrusion head—determines the volumetric flow rate, which is also based on the diameter of the syringe barrel and the outlet size of the syringe tip. Our software enabled us to fine-tune a number of object parameters, including extrusion print speed, number of pyramid sides, twist of the pyramid, number of layers, layer transitions, and material infill, which helped streamline our team's iteration process.
Experimental design
Material preparation
The ideal material for extrusion on our food printer is one that has the viscoelastic properties to flow during extrusion and maintain its structure under low stresses. 15 Starch such as rice flour and egg whites were used as a thickening agent and emulsifier in many of the food ingredients to optimize extrudability and flow point.16–18 Non-Newtonian fluids exhibiting shear thinning behaviors are also ideal for extrusion on a food printer. While these factors are important, the end product has to be visually and gastronomically appetizing for consumer acceptance.
We experimented with different food pastes to assess optimal material properties. Starchy foods including cream cheese, potato puree, squash puree, and pea puree worked well since they held their shape under low stresses. Further tests were conducted with polenta, cookie dough, almond paste, pastry dough, ground meat, and shrimp as a paste. Among the most successful materials was choux dough, egg-rich and buttery dough used for pastries. Ingredients that had uniform consistency produced more favorable extrusions.
The final cooked multi-material food object consisted of a sesame paste, chicken paste, and shrimp paste. Sesame paste was prepared by mixing black sesame powder, rice flour, and warm water at a 1:1:2 ratio. Our chicken paste combined one egg white with 300 g of raw chicken. Finally, the shrimp paste included five raw shrimp (with shell and tail removed), one teaspoon of cooking wine, one finely grated slice of ginger, two teaspoons of pepper powder, half an egg white, and one teaspoon of rice flour. Each of these three recipes was combined in a food processor until thoroughly mixed. For the sesame paste and the shrimp paste, we would alter the amount of rice flour depending on the firmness of the mixture; this was performed qualitatively to achieve a texture similar to cream cheese. Once ingredients were processed, they were carefully packed into a syringe to minimize air bubbles.
Multi-material processing
As a comparative exercise, the sesame paste, chicken paste, and shrimp paste were prepared using three different methods: (1) 3D-printed without cooking, (2) 3D-printed with in situ IR heating, and (3) handmade with oven heating. The same ingredients were used for all three methods, the difference being the food combination and processing technique. Methods 1 and 2 used our custom 3D-printer to extrude the ingredients. Method 2 utilized the IR spot heater, whereas Method 1 did not (ingredients remained uncooked). For Method 3, each ingredient was placed in a separate Ziploc bag, a corner was snipped from each bag, and each material was extruded by hand (similar to using disposable decorating bags for cake frosting) to match the shape of the object produced by the food printer.
Excluding jujube jam, these food materials needed to be cooked before consumption. The sesame paste, chicken paste, and shrimp paste showed significant color and textural change after heating. This noticeable color change postheating is one of the reasons we chose to use these pastes. The dough-based materials (sweet and choux dough) became crisp and crunchy after IR heating, just as if they had been cooked using traditional methods.
Results
We were able to successfully print with six different materials derived from traditional foods: sweet dough, jujube jam, sesame paste, shrimp paste, chicken paste, and choux dough, all of which have a thickness and structural integrity to be consistently extruded while supporting layers of food heavier than their own weight (Fig. 4). We formulated these materials to have similar textural qualities to chilled cream cheese, used for initial benchmarking tests, to improve our chances of printing.
Images of successful materials printed on the machine.
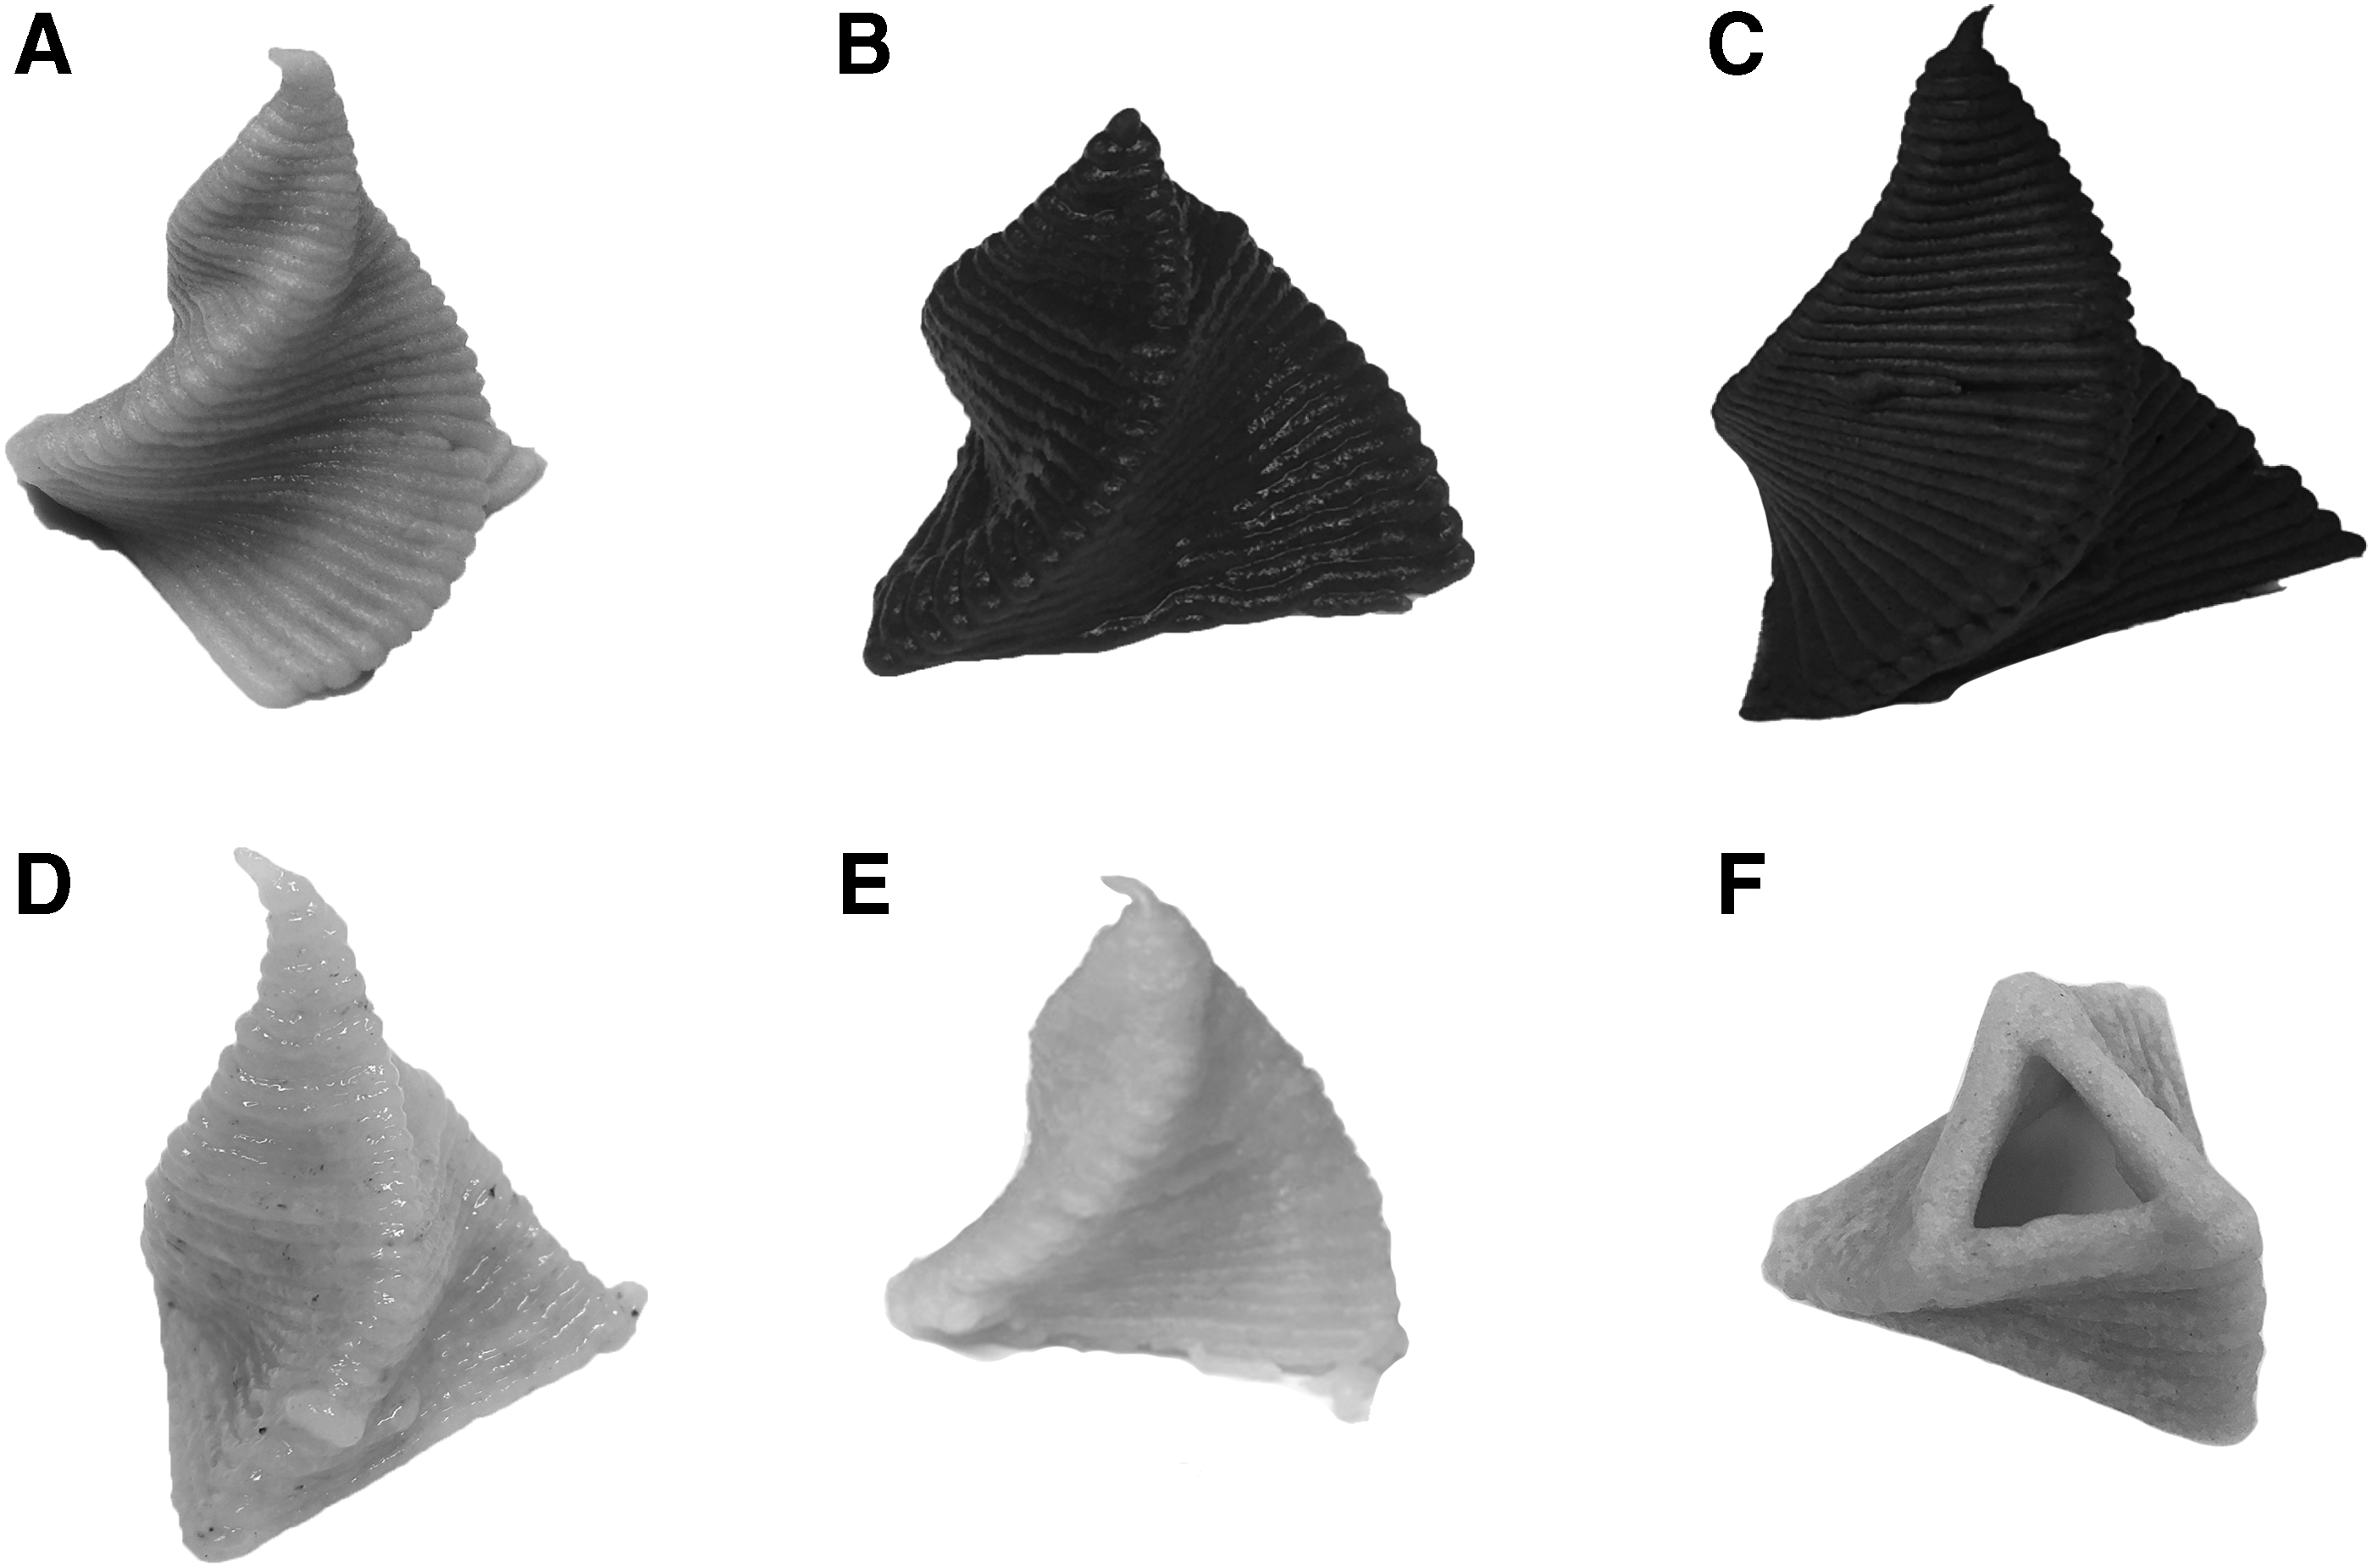
Because our materials have very similar structural rigidity, we were able to successfully make multi-material prints of a single food object. Figure 5 shows a three-sided twisted pyramid that was printed using two materials: sesame paste and chicken paste. The IR spot was used to cook printed layers (Fig. 5A) before depositing the next layer on top of the previous. Figure 5B shows the final cooked two-material product.

Comparing multi-material food preparation techniques.
During the heating process, our food materials experienced low levels of expansion. Height and width deformations were assessed visually and did not show any significant change after heating. Although size deformation and edge dulling did occur, they were negligible and were accounted for in the software model. Of the cooked materials, sesame paste deformed the least after being heated.
We were able to print and cook a twisted pyramid that consisted of three material pastes: sesame, chicken, and shrimp (Fig. 5B). Figure 5 displays this food object combining all three ingredients cohesively to create a fully cooked “pâté bite.” Determination of a cooked food was by visual inspection. Ingredients such as chicken and shrimp were strategically chosen for printing not just for their viscous material properties but also for the familiar color change that results from sufficient exposure to heat.
To justify the need for in situ IR heating during printing, we compared this method of food object creation with an uncooked printed object (Fig. 5C) and a handcrafted food object (Fig. 5D). Not cooking the ingredients during the food-printing process caused the extruded layers to droop and sag along the sides of the twisted pyramid. With the handmade food object, it was harder to maintain a steady deposition of food and a constant twist in the pyramid shape; as a result, each food layer was more mixed in the final cooked object. This food object was baked for 10 min at 350°F in the oven, and each ingredient showed significant color change; further tests would need to be conducted to determine optimal oven-baking parameters.
Discussion
Most edible materials undergo deformation in the presence of heat. We attribute the expansion of our heated food ingredients to the more concentrated heat buildup created by the IR spot. As the temperature in the food increases, the trapped air molecules inside try to escape to the surface and cause further food expansion. This effect was more readily seen in the chicken and shrimp pastes.
Applying heat to the meat and sesame pastes significantly affects the rigidity of the food object's structure. 19 Printing food without heating results in a less structurally stable food object 20 with lower printing resolution as well. Due to lower structural rigidity, these uncooked printed foods sagged causing the distance between the nozzle and the extruded layer to increase, which leads to issues of food coiling as a result of the food's colloidal structure. 21 This coiling motion of the food can be reduced by increasing the volumetric flow rate of the food, increasing the feed rate of the machine, or by adjusting the recipe of the extruded food ingredients. 22 Material property variability in the paste ingredients also made it difficult to consistently recreate materials that would extrude the same way every time. 23
The successful use of these food ingredients in an FLM application can be attributed to their non-Newtonian properties. While Newtonian fluids like water and honey have a familiar viscous response to stress, non-Newtonian fluid viscosity is dependent on shear rate. In other words, these materials can exhibit more solid behavior when certain levels of force are applied. The ingredients we formulated in our tests more closely resembled a Bingham plastic, which acts like a solid at low stress and a fluid at higher stress. When force was applied, our material could be extruded through a nozzle, exhibiting fluid-like properties. Once the material was extruded and the stress decreased, it held its shape, exhibiting solid-like properties.
Current 3DFPs are limited with their ability to combine ingredients due to the lack of high-resolution heating; they are limited to using microwaves, ovens, and other common heating appliances to process extruded food. These limitations can be overcome through the use of controlled heating with the IR spot, which provides a level of cooking resolution that allows for precise heating of different food materials in a single food object.
Delivering heat via IR spot makes it possible to selectively heat internal and superficial food ingredients evenly by cooking the food as it is built layer by layer. Ovens can also provide even heat distribution, but cooking time tends to take longer due to the slow conduction of heat through the food sample. While an oven does take longer to heat an area uniformly by convection of dry air, the food sample is warmer after processing, which is not the case for the IR spot-heated sample since each layer is cooked sequentially. Finally, more of the heat generated by the IR spot goes directly toward heating the food, unlike an oven where a much larger area needs to be heated, as such the IR spot is more energy efficient in terms of heat delivery.
Being able to control heat layer by layer, also gives a food designer the opportunity to be creative with texture, flavor, and color, which are all indicators of food quality. 24 Since food quality is greatly affected by heating, having the ability to tune the degree of heat exposed to the extruded food with the software-controlled IR spot heater allows for a higher degree of control to achieve desired food quality metrics. Variables such as cooking speed, z-offset (to control heat flux), and repeat exposure are all factors which can be tuned to produce different heating outcomes and—as a result—food textural qualities. 4
Conclusion
We have demonstrated the ability of our 3DFP to extrude and cook food products simultaneously with great precision. Our 3DFP can print multi-material 3D food objects of varying textural and material properties. It can also simultaneously print and cook food via the use of an IR lamp. The high resolution of our IR spot allows for the combination of food ingredients at a much closer level, giving rise to new flavor profiles and inventive food recipes that would be more challenging to achieve using conventional cooking methods.
We were able to successfully retrofit an existing CNC machine with an extrusion and heating mechanism that allows chefs and designers to reimagine the way food is assembled and prepared in the modern kitchen. While this printer was designed purely for functional purposes, future models will embody form as well as function to more seamlessly integrate into users' lives.
Footnotes
Acknowledgment
This work was supported in part by the Columbia University's SEAS Interdisciplinary Research Seed (SIRS) Funding program and Seed Funds from University of Chicago, Agreement #FP053369-D for “Explorations in Food Printing.”
Author Disclosure Statement
Every author discloses that he or she does not have any conflicting interests with this project, financial, social, or otherwise.