
Abstract
The generation of vascularized mineralized tissues of complex geometry without the use of extrinsic growth factors or exogenous cells requires a large animal model to recapitulate the challenges seen in the clinic. The proposed versatile ovine model can be utilized to investigate the use of a customized bioreactor to generate mineralized tissue, matching the size and shape of a defect before transfer to and integration within another site. The protocol results in bioreactors that can be harvested for investigation of the effects of different biomaterials for the generation of bone or to generate tissues appropriate for repair of bony defects; this protocol focuses on reconstruction of the mandible but could be modified for orthopedic applications. The bioreactor packing material can be altered, allowing for the study of various commercially available or novel graft materials. The surgical procedure requires ∼1.5 h to implant four bioreactors adjacent to rib periosteum. After 9 weeks, the harvest of the bioreactor tissue takes approximately 1 h. If creating a craniofacial defect, an additional 2 h should be taken for mandibular defect creation and 2 to 3 h for the reconstruction. Sheep that have undergone reconstruction are typically euthanized after 12 weeks to allow for evaluation of transferred tissues. In this protocol, we discuss the necessary steps to ensure the reproducibility and analytical techniques to assess bone regeneration such as microcomputed tomography, mechanical analysis, and histology.
Impact statement
Bone grafting is a frequent procedure in the fields of orthopedics, otolaryngology, and oral and maxillofacial surgery. Generating customized, vascularized, and mechanically robust bony tissues while eliminating common complications such as donor site morbidity with autograft harvest or lack of suitable mechanical properties with commercially available synthetic graft would greatly improve the lives of patients. A large animal model is necessary to generate tissues of clinically relevant geometries. In this article, a reproducible ovine model of in vivo bioreactor technology toward customized bone generation is presented with broad application to tissue engineering and regenerative medicine.
Introduction
Each year, 2.2 million bone grafting procedures are performed globally, with the majority of the surgeries involving the utilization of autograft or allograft. 1 For craniofacial reconstruction, the most commonly utilized vascularized autograft is the fibular flap. 2 While the fibular flap can be successful for many patients, 3 the geometry of the fibula is often a poor match for the defect site, and the patient can experience nerve damage and pain as a result of the harvest.4,5 Allograft from living donors has a rejection rate as high as 50%, while allograft from cadavers—although available in a variety of geometries—still poses a risk of disease transmission, and processing can lead to a lack of suitable mechanical and biological properties. 6 Synthetic grafts, most often available in granules or cements, lack appropriate cortical mechanical properties and are not osteoinductive by themselves 6 ; however, the addition of growth factors to optimize bone forming capacity remains controversial in patients with malignant disease. 7
The ability to generate tissues of desired geometries within a patient utilizing customized in vivo bioreactors could eliminate the concerns of poor geometrical match, rejection, and inappropriate mechanical properties, ultimately reducing complications and improving the outcomes for the patients. We propose a clinical strategy in which (1) a large bony defect in a patient is imaged using computed tomography; (2) the defect is filled with a space maintainer created within a three-dimensional (3D)-printed mold constructed from the imaging data; (3) customized in vivo bioreactors are 3D printed and implanted adjacent to a periosteal surface and filled with a scaffold material that has been optimized for mechanical properties; and (4) after an optimized time for the selected scaffold material, definitive reconstructive surgery is performed in which the space maintainer is removed and the tissue from the bioreactor is transferred. To test this regenerative strategy, we have developed a protocol for the generation of mineralized tissue in a bioreactor implanted adjacent to the rib periosteum in a large animal model without the need for exogenous growth factors or exogenous stem cells utilizing the osteogenic potential of the periosteum, as several other animal models have done.8,9 After several weeks, this tissue can be removed for analysis or transferred for reconstruction of a craniofacial defect in the ovine mandible to further investigate the integration of the generated bony tissue.
This model can be modified to address the need:
For a variety of defect geometries from rectangular
10
to complex
11
to personalized utilizing a 3D printer12,13; for investigation into the effects of scaffold materials within the bioreactor such as biodegradable polymers,
14
autograft,
10
synthetic ceramics,
15
or xenograft cancellous bone chips
13
; for transfer of the formed tissue as a graft or vascularized flap to a variety of defect locations within the craniofacial region such as the angle of the mandible
16
and the hemimandible
12
to investigate the long-term efficacy of the generated tissue; as part of a two-stage approach in which a space maintenance device is implanted in a mandibular defect and tissue generated within a bioreactor is used in the reconstruction to replace the space maintainer in a second surgery
12
; and for osseous regeneration within bioreactors in the presence of a remote mandibular infection to investigate the effects of local infection on distal bone formation.
13
The following protocol allows for the evaluation of bone generation of varying geometries, with different graft types, in response to different systemic factors, and as part of an independent investigation into periosteal bone generation or a two-stage craniofacial repair strategy.
Overview of the procedure
A schematic overview of this procedure is provided in Figure 1 with important time points and design considerations. For the implantation surgery, sheep are anesthetized, and two skin incisions are made before blunt dissection to expose the ribs. The periosteum is elevated, and a portion of 4 alternating ribs is removed. A bioreactor filled with a scaffold material is implanted adjacent to the rib periosteum at each site. During this surgery, a mandibular defect can be created if delayed reconstruction 12 or investigations into the effects of a localized infection on remote bone growth 13 are proposed. After some time (optimized for autograft at 9 weeks 11 ), the animals are euthanized for tissue harvest or a second surgery is performed for the transfer of the bioreactor tissue. The tissue can be transferred to the defect site as a vascularized flap or an avascular graft. After additional 12 weeks, the sheep can be euthanized, and the reconstructed tissue can be analyzed. Analysis has previously involved microcomputed tomography, histology, quantitative polymerase chain reaction, and mechanical testing.

Overview of the procedure.
Experimental design
Bioreactor size, geometry, and material considerations
In vivo bioreactors consist of a chamber with an open face to allow for cell infiltration and a cuff to suture the bioreactor in place. We have previously utilized poly(methyl methacrylate) (PMMA) for the chamber as it is biocompatible, 17 nonbiodegradable, 18 and can be utilized to create a variety of nonporous shapes; however, it should be possible for other polymers of similar properties to be utilized. The cuff has been formed from an elastomeric polymer such as expanded poly(tetrafluoroethylene), 10 polyurethane, 14 polyethylene, 11 or ethylene-vinyl acetate.12,13,15,16 Bioreactors can be molded by adding the polymerizing PMMA mixture to a preformed mold or 3D printed by heat extrusion of a prepolymerized PMMA filament. Simple geometries that have resulted in successful bony tissue generation are rectangular with lengths from 2 to 4 cm and heights of 0.5 to 1 cm.10,12–16 More complex geometries have mimicked the human mandible. 11 After polymerization of the PMMA, bioreactors can be immersed in 100°C water to remove unreacted monomer and volatile compounds.11,19 If ethylene-vinyl acetate is utilized to form the cuff, it can be heat molded around the bioreactor.12,13,20 Other cuffs can be secured around the perimeter with silicone glue.10,11,14 Completed bioreactors are sterilized using ethylene oxide gas before surgery. For the bioreactor tissues that will be harvested for analysis, it is important to produce sufficient tissue for completing the desired destructive analyses. For the bioreactor tissue that will be transferred, it is important to ensure that there is adequate tissue to fill the defect without excess, as trimming the tissue could potentially disrupt blood flow. The area of the periosteum, as well as the volume of scaffold material needed to fill the bioreactors, should also be considered when determining chamber geometry.
Scaffold considerations
A variety of scaffold materials can be tested within these bioreactors. As a portion of the rib is to be removed, autograft can be created from freshly harvested morselized rib. A variety of biodegradable polymers 14 and synthetic ceramics have also been evaluated. Commercially available graft materials, such as MasterGraft® (Medtronic, Minneapolis, MN)12,15,16 or Bio-Oss® (Geistlich Pharma, Switzerland), 13 have also successfully been utilized within these bioreactors to generate tissues. Negative control empty bioreactors have been shown not to generate any bone. 10 As the bioreactor utilizes the innate osteogenic capacity of the adjacent periosteum, as well as osteoconductive characteristics of different graft systems, the scaffold material does not require the use of extrinsic growth factors, although it would be possible to test scaffold materials augmented with bioactive agents within this system if desired.
Implantation time considerations
Previous optimization of implantation time for an autograft-filled bioreactor that was 1 cm in height has been shown to be ∼9 weeks. Up until 9 weeks, tissue volume in the chamber was constant; however, it had significantly decreased at 12 and 24 weeks. 11 It is possible that different scaffold types promote different rates of bone generation and scaffold resorption.
Craniofacial defect considerations (if applicable)
While the bioreactor portion of this model is useful alone for the evaluation of various graft materials, a mandibular defect can also be created to evaluate the ability of the tissues to be transferred, integrated, and further remodeled at the mandibular site. Transfer to orthopedic sites should also be possible, but noncraniofacial applications have not yet been tested. The angle of the mandible allows for the removal of large bony areas (4 × 1 × 1 cm) and has close proximity to neck vasculature for anastomosis; however, it is an anatomic defect, that is, relatively shielded from mechanical forces and less clinically relevant than areas more directly adjacent to the oral cavity. The sheep have an edentulous region between the incisors and premolars that allows for the creation of a partial segmental defect immediately adjacent to the oral mucosa. If the anterior limit of the resected bone is placed mesial to the mental foramen, sensory innervation to the lip and anterior teeth and gingiva will be preserved. While further from the large vessels in the neck than the angular defect, it is still possible to transfer the bioreactor tissue as a flap and anastomose with branches of the facial artery and vein. 12 These defects can be created immediately before the transfer (during the second surgery) or at the time of the bioreactor implantation (during the first surgery). In the event that they are created during the first surgery, a space maintainer can be utilized to protect the space from fibrovascular infiltration. PMMA space maintainers can be cut or molded using 3D-printed molds before the first surgery for plating within the craniofacial defect. Previously, porous space maintainers with and without antibiotic have been utilized successfully to maintain the space.12,13
Systemic effect considerations (if applicable)
A variety of systemic factors can also be investigated using this bioreactor system. Previous studies have shown higher degree of success of bony tissue growth within bioreactors in younger animals compared to older animals. We have also shown that a localized mandibular infection affects both the maturity and quantity of bone formed within these bioreactors using a bioluminescent strain of Staphylococcus aureus (Xen36) at 106 colony forming units within the defect. 13 Given the ease of surgical placement, the large volume of graft that can be used, and the ability to place four bioreactors per animal, this model can act as a platform to elucidate the effects of a variety of factors on the effect of bony growth in a large animal model.
Materials Required
Animal species
Female Dorper Sheep were utilized for these studies; however, current literature in sheep suggests that both genders can be used, randomly distributed between study groups. Although bone density has been shown to vary for age, sex, and even strain of sheep, 21 male and female sheep have been shown to reach skeletal maturity at similar ages,22,23 suggesting that bone generation before skeletal maturity is similar. Early studies utilized skeletally mature sheep (4 years old 16 ); however, bone growth within these bioreactors was suboptimal. More recent studies have utilized skeletally immature sheep (6–12 months) with weight ∼30–35 kg. The younger sheep have been shown to generate more robust tissues, mirroring young soldiers with trauma-induced facial trauma, our intended clinical application. Different demographics may call for older sheep to test group-relevant hypotheses. Within each published study, we have utilized only female sheep of the same strain and age (n = 4–6 animals), but other investigators should conduct a power analysis to calculate the correct number for the proposed study. All surgical procedures followed protocols approved by the Institutional Animal Care and Use Committee and, if necessary, the respective funding agencies.
Personnel and expertise
The implantation of the bioreactors could be performed by two graduate students (or other team members of similar or higher education) familiar with sheep anatomy and basic surgical technique. The mandibular defect creation and space maintainer implantation could also be performed by another team of two. These teams could work in parallel to decrease time the sheep is under anesthesia or the same team could conduct both surgeries in series. The bioreactor transfer, especially if being performed with the anastomosis of vasculature, would require the assistance of a surgeon familiar with microvascular anastomosis techniques, such as an oral and maxillofacial surgeon or otolaryngologist. Furthermore, a veterinary technician should be available to monitor the sheep throughout the surgery. It is also beneficial to have an additional person (nonsterile) to assist with equipment, sample collection, and documentation.
Equipment
Large Animal Anesthesia Equipment (Ohmeda Modulus II Plus Anesthesia System w/7810 ventilator and Isotec 4 vaporizer)
Electric Clippers (Oster)
Vital Signs Monitor (SurgiVet, model no. V9204)
Warming System (Blanket, Gaymar T/Pump, Model TP 700 and/or HotDog Warmer, Augustine Temperature Management, WC52-VET)
Inflatable ring (Graham-Field Health, cat. no. 1819)
Electrocautery system (ValleyLab Force FXc generator, with ValleyLab RockerSwitch pencil, E2515H, and REM polyhesive grounding pad, E7507)
Bone mill (KLS Martin, cat. no. 04-060-00)
Suction equipment (Ohmeda vacuum regulator, CVR Model 6-1225)
Diamond Saw (South Bay Technology, cat. no. 650)
MicroCT (SkyScan 1172 or SkyScan 1272)
Mechanical testing system (MTS Systems Corporation Mini Bionix 858 or Instron 5565)
Sterile gown, gloves, mask, and head cover (Patterson Veterinary)
Optional: Craniofacial defect
Dental drill (NSK Surgic XT Plus, cat. no. Y141246 or Bien Air, cat. no. 1700463-001)
Straight handpiece (NSK Ti-Max, cat. no. SG65L or Bien Air, cat. no. 1600436-001)
Surgical microscope (Leica Microsystems, cat. no. 695)
Reagents and surgical materials
Bioreactors, sterilized
Bioreactor packing material, sterilized
Ethylene Oxide (Andersen Products, cat. no. AN73)
Buprenorphine (Patterson Veterinary, cat. no. 07-891-9756)
Isoflurane (Covetrus North America, cat. no. 029405)
Oxygen USP grade (AirGas)
Bupivacaine (Patterson Veterinary, cat. no. 07-890-4881)
Fentanyl Patch (Covetrus North America, cat. no. 070359)
Naxcel (Patterson Veterinary, cat. no. 07-839-3210)
Excede (Patterson Veterinary, cat. no. 07-869-5483)
Sterile Normal Saline (Covetrus North America, cat. no. 059382)
Lactated Ringer's Solution (Covetrus North America, cat. no. 059380)
Puralube (Covetrus North America, cat. no. 008897)
20G Needles (Patterson Veterinary, cat. no. 07-834-1363)
22G Needles (Patterson Veterinary, cat. no. 07-834-1405)
Chlorhexidine scrub (Patterson Veterinary, cat. no. 07-892-4241 and 07-892-4243)
Towels (Patterson Veterinary, cat. no. 07-808-4970)
Drapes (Patterson Veterinary, cat. no. 59100-246)
Towel Clamps (Patterson Veterinary, cat. no. 07-800-3291 and 07-800-3309)
Surgical skin pen (Patterson Veterinary, cat. no. 07-849-0214)
Stomach tube [Patterson Veterinary, cat. no. 07-802-3091 (3/8″ ID) or 07-810-3170 (1/2″ ID)]
Yankauer suction tip (McKesson cat. no. 161365)
Stainless Steel Ruler (Integra, cat. no. 360-260)
Scalpel blades, no. 10 (Miltex, cat. no. 4-310)
Scalpel blades, no. 15 (Miltex, cat. no. 4-115)
Scalpel handles (KLS Martin, cat. no. 10-130-03)
Periosteal elevators (KLS Martin, cat. no. 23-453-18-07)
Freer (KLS Martin, cat. no. 37-546-18-07)
Spatula (VWR, cat. no. 82027-530)
Forceps (Patterson Veterinary, cat. no. 07-800-4051, 07-800-4044, 07-809-8920)
Scissors (Patterson Veterinary, cat. no. 07-800-4879, 07-800-4887, 07-800-4861, 07-800-4853, 07-803-4488)
Hemostat (Patterson Veterinary, cat. no. 07-800-4150, 07-800-3119)
Needle drivers (Patterson Veterinary, cat. no. 07-800-3317)
Army-Navy retractor (Integra cat. no. 3714018)
Gauze [Patterson Veterinary, cat. no. 07-847-3547 (4″ × 4″) and 07-847-3505 (2″ × 2″)]
Sponge bowl (Patterson Veterinary, cat. no. 07-858-3746)
Right angle forceps (Patterson Veterinary, cat. no. 07-890-9575)
Bone cutters (KLS Martin, cat. no. 23-935-17-07)
Rib Shears (Mopec, cat. no. AF004)
3-0 Vicryl Suture (Patterson Veterinary, cat. no. 07-807-0393)
3-0 Nylon Suture (Patterson Veterinary, cat. no. 07-807-1443)
10% Neutral Buffered Formalin (Sigma-Aldrich, cat. no. HT501128)
RNAlater (Sigma-Aldrich, cat. no. R0901)
Optional: Craniofacial defect (in addition to some listed above)
Space maintainer, sterilized
Burr 1 and 0.6 mm (Henry Schein, cat. no. 7010345)
Frazier suction tip (Patterson Veterinary, cat. no. 07-891-8579)
Titanium fixation plate (KLS Martin, cat. no. 25-316-00-91)
Plate benders (KLS Martin, cat. no. 50-502-10-07)
Plate cutters (KLS Martin, cat. no. 50-502-11-07)
Titanium screws (KLS Martin, cat. no. 25-878-05-09)
Screwdriver (KLS Martin, cat. no. 25-402-99-07 and 25-489-97-07)
9-0 Ethilon Suture (Ethilon, cat. no. 2809G)
Microvascular Kit (Synovis MCA, S&T Microsurgical Kit, cat. no. 00771)
Microvascular clamps (Synovis MCA, TKS-1, TKM-1, TKSV-1, TKMV-1)
Osteotome (KLS Martin, cat. no. 37-626-05-07)
Mallet (KLS Martin, cat. no. 01-002-86-07)
Senn retractor (Patterson Veterinary, cat. no. 07-800-4721)
Lidocaine (Patterson Veterinary, cat. no. 07-891-4324)
Optional: Craniofacial infection
Collagen sponge (Medline, cat. no. A6021)
Pipette (Eppendorf, cat. no. 3121000083)
Bacterial inoculum (Xen36, PerkinElmer, cat. no. 119243)
Protocol
Preoperative preparation
Upon protocol approval by the IACUC (and funding agencies, if applicable), an equal number of male and female sheep are ordered from a vendor who ensures that both sexes have negative Coxiella burnetii tests and the female sheep have negative pregnancy tests before shipment to the animal facility. After receipt, the animals are allowed to acclimatize for at least a week before surgical manipulation.
Surgical instruments are sterilized using autoclave and allowed to cool to room temperature. Biomaterials are sterilized using ethylene oxide (or gamma radiation, if available) and allowed to off-gas for at least 24 h before surgery.
Surgical induction and animal preparation
Remove food from the sheep ∼18 h before surgery.
Administer telazol (4–8 mg/kg IV) with a 20G needle an hour before surgery. Weigh sedated sheep.
Start isoflurane (3–5% for induction, 2 L/O2) on mask while shaving, placing IV catheter, applying Puralube, and administration of Naxcel (if not creating an infection, 3 mg/kg) and buprenorphine (0.01 mg/kg subcutaneously [SC]). Shave the area over the right ribcage for the bioreactor surgery and the area over the right mandible if creating a mandibular defect. Insert a 20G IV in the lateral saphenous for fluid replacement. After verifying absent pedal reflex, intubate the sheep and begin isoflurane (1.5–3%) for maintenance.
Position the sheep in left lateral recumbency on the operating room table, with the rear of the animal located adjacent to the anesthesia site to allow for easy access to the mandibular defect site. Insert stomach tube of 1/2″ or 3/8″ internal diameter. Secure legs to the table with rope—front legs displaced caudally to displace scapula for rib access. If performing mandibular surgery, position head on inflatable ring and ensure the tubes exit on the left side of the mouth so as not to apply pressure to the mucosa overlying the defect site. Attach rectal thermometer, pulse oximetry monitor, blood pressure cuff, and grounding pad and cover rear of sheep with a warming water blanket. Start IV with lactated ringers at a rate of 10 mL/kg/h for the first 2 h and 5 mL/kg/h for the remainder of the procedure.
Sterilize the surgical site(s) with alcohol and chlorhexidine. Prepare surgical field(s). Scrub and don sterile gown and gloves and drape the sheep.
Monitor the animal for heart rate, tissue oxygenation, blood pressure, temperature, exhaled CO2, and presence of spontaneous respirations every 5 min throughout the procedure.
Bioreactor implantation
Palpate the ribs, locate ribs 3, 5, 7, and 9, and mark locations with the marking pen (Fig. 2A).

Images of the bioreactor implantation procedure.
Note: We have previously also utilized ribs 2, 4, 6, and 8; however, it is difficult to reach rib 2 with the location of the scapula. It is important that alternating ribs are selected to minimize occurrence of flail chest.
Create a skin incision (up to 15 cm) between rib 3 and 5 with a 10 scalpel blade. Utilize the Bovie pen to cauterize bleeding vessels.
Perform blunt dissection through muscle layers anteriorly to reach rib 3 (or posteriorly to reach rib 5 as both can be reached through a single skin incision). Use army-navy retractors to assist with visualization.
Caution: Increase care of dissection as the rib is approached. The vasculature for anastomosis runs immediately inferior to the rib and can be disturbed during blunt dissection.
Upon removing muscle from the rib, use the Bovie pen to incise a line in the periosteum on the external side of the rib, that is, 1 cm longer than the bioreactor to be implanted.
Utilize a periosteal elevator to elevate the periosteum from the rib, taking care not to damage the periosteum or disturb the small vessels running inferior to the rib (Fig. 2B). Elevate the periosteum from the entire external surface of the rib and one tool's width from the pleural side.
Caution: Pleural tears can occur if the sharp edge of the periosteal elevator is used on the pleural side of the rib. Smaller holes can be closed with a couple of sutures.
Use a right-angle hemostat to reach between the pleural side of the rib and the pleural periosteum and grab a piece of unfolded gauze. Carefully pull it back through so a portion is visible on both the inferior and superior edge of the rib, between the rib and the periosteum.
Slide the gauze along the length of the rib to be removed, elevating the periosteum from the entire pleural side of the rib.
Measure again the length of the rib to be removed. Mark the edges with a Bovie pen or dental drill.
Utilize bone cutters to remove the section of the rib, careful again to avoid pleural tears with the sharp edges of the bone snips (Fig. 2C). Bone removed should be ∼0.5 cm larger than the bioreactor to be implanted (Fig. 2D).
Optional: If planning on having an autograft group within the study, the removed rib can be ground using a manual or automatic sterilized bone mill (Fig. 2E). The morselized autologous bone can then be packed into bioreactors at the desired packing density. We have previously utilized 0.55 g/L packing density. 15
The bioreactors can be filled with the desired material for testing. We have previously packed bioreactors with autograft, calcium phosphate ceramics (MasterGraft®), xenograft bone matrix (Bio-Oss®), or a combination of autograft and one of the commercially available graft materials.
Using a ruler (or other flat surgical instrument) to hold the graft in the bioreactor, the bioreactor is inserted into the location from where the rib was just removed, with the cuff under the rib on either side. The ruler is carefully removed, and the bioreactor is gently pressed onto the cambium layer of the periosteum (Fig. 2F).
Suture the cuff to the periosteum with nonresorbable suture (4-0 Prolene) to hold the bioreactor in place.
Close the deep muscle layers in an interrupted manner with resorbable suture (3-0 Vicryl) to further secure the bioreactor in place.
Uncover the other rib that can be accessed through the same skin incision and repeat steps 9–20 above to implant the second bioreactor.
Close the subcutaneous fascia and muscle layers with interrupted resorbable (3-0 Vicryl) suture.
Close the skin with running subcuticular suture using resorbable (3-0 Vicryl). Bury the knots as these can be a source of infection for the animals.
Use the scalpel to create the second skin incision to access ribs 7 and 9 for bioreactor implantation. Repeat steps 9–23 above to implant two more bioreactors.
Optional mandibular defect creation
Note: Can be performed simultaneously with additional personnel and tools. We do not recommend utilizing the same set of tools as this increases the risk of infection.
Caution: It is recommended to wear N-95 respirators if mandibular defect creation is being performed. The protocol calls for the use of a dental drill, which can aerosolize particles. Although these sheep have tested negative several times for Q-fever, an N-95 still offers optimal protection.
Use the marking pen to mark out the length of the incision. If a defect in the angle of the mandible is desired, an 8 cm curved incision should be created along the inferior border of the posterior mandible with extension along the ramus. If a superior marginal defect is required, a 6 cm incision should be created along the inferior border of the central mandible, centered in the edentulous region. Use a 15 blade to create the desired incision.
Bluntly dissect down to the bone, retracting with the rake-sim retractor, while avoiding vasculature that could be used in future anastomoses.
After incising a small hole in the periosteum, utilize a periosteal elevator to raise the periosteum from the mandible on the buccal and lingual sides.
Caution: When elevating the periosteum within the edentulous region for the creation of a superior marginal defect, the mucosa can be damaged.
Use a dental drill with 1 mm burr to outline the borders of the desired defect (Fig. 3). The angle of the mandible defect (Fig. 3A) we have utilized is 4 cm long by 1 cm high and full thickness.15,16 The superior marginal defect (Fig. 3B) spans from the anterior edge of the molar to the canal of the mental nerve (up to 2 cm) with the height down to the nerve canal (∼0.5 cm) and full thickness. Continue deepening the grooves with irrigation and suction.
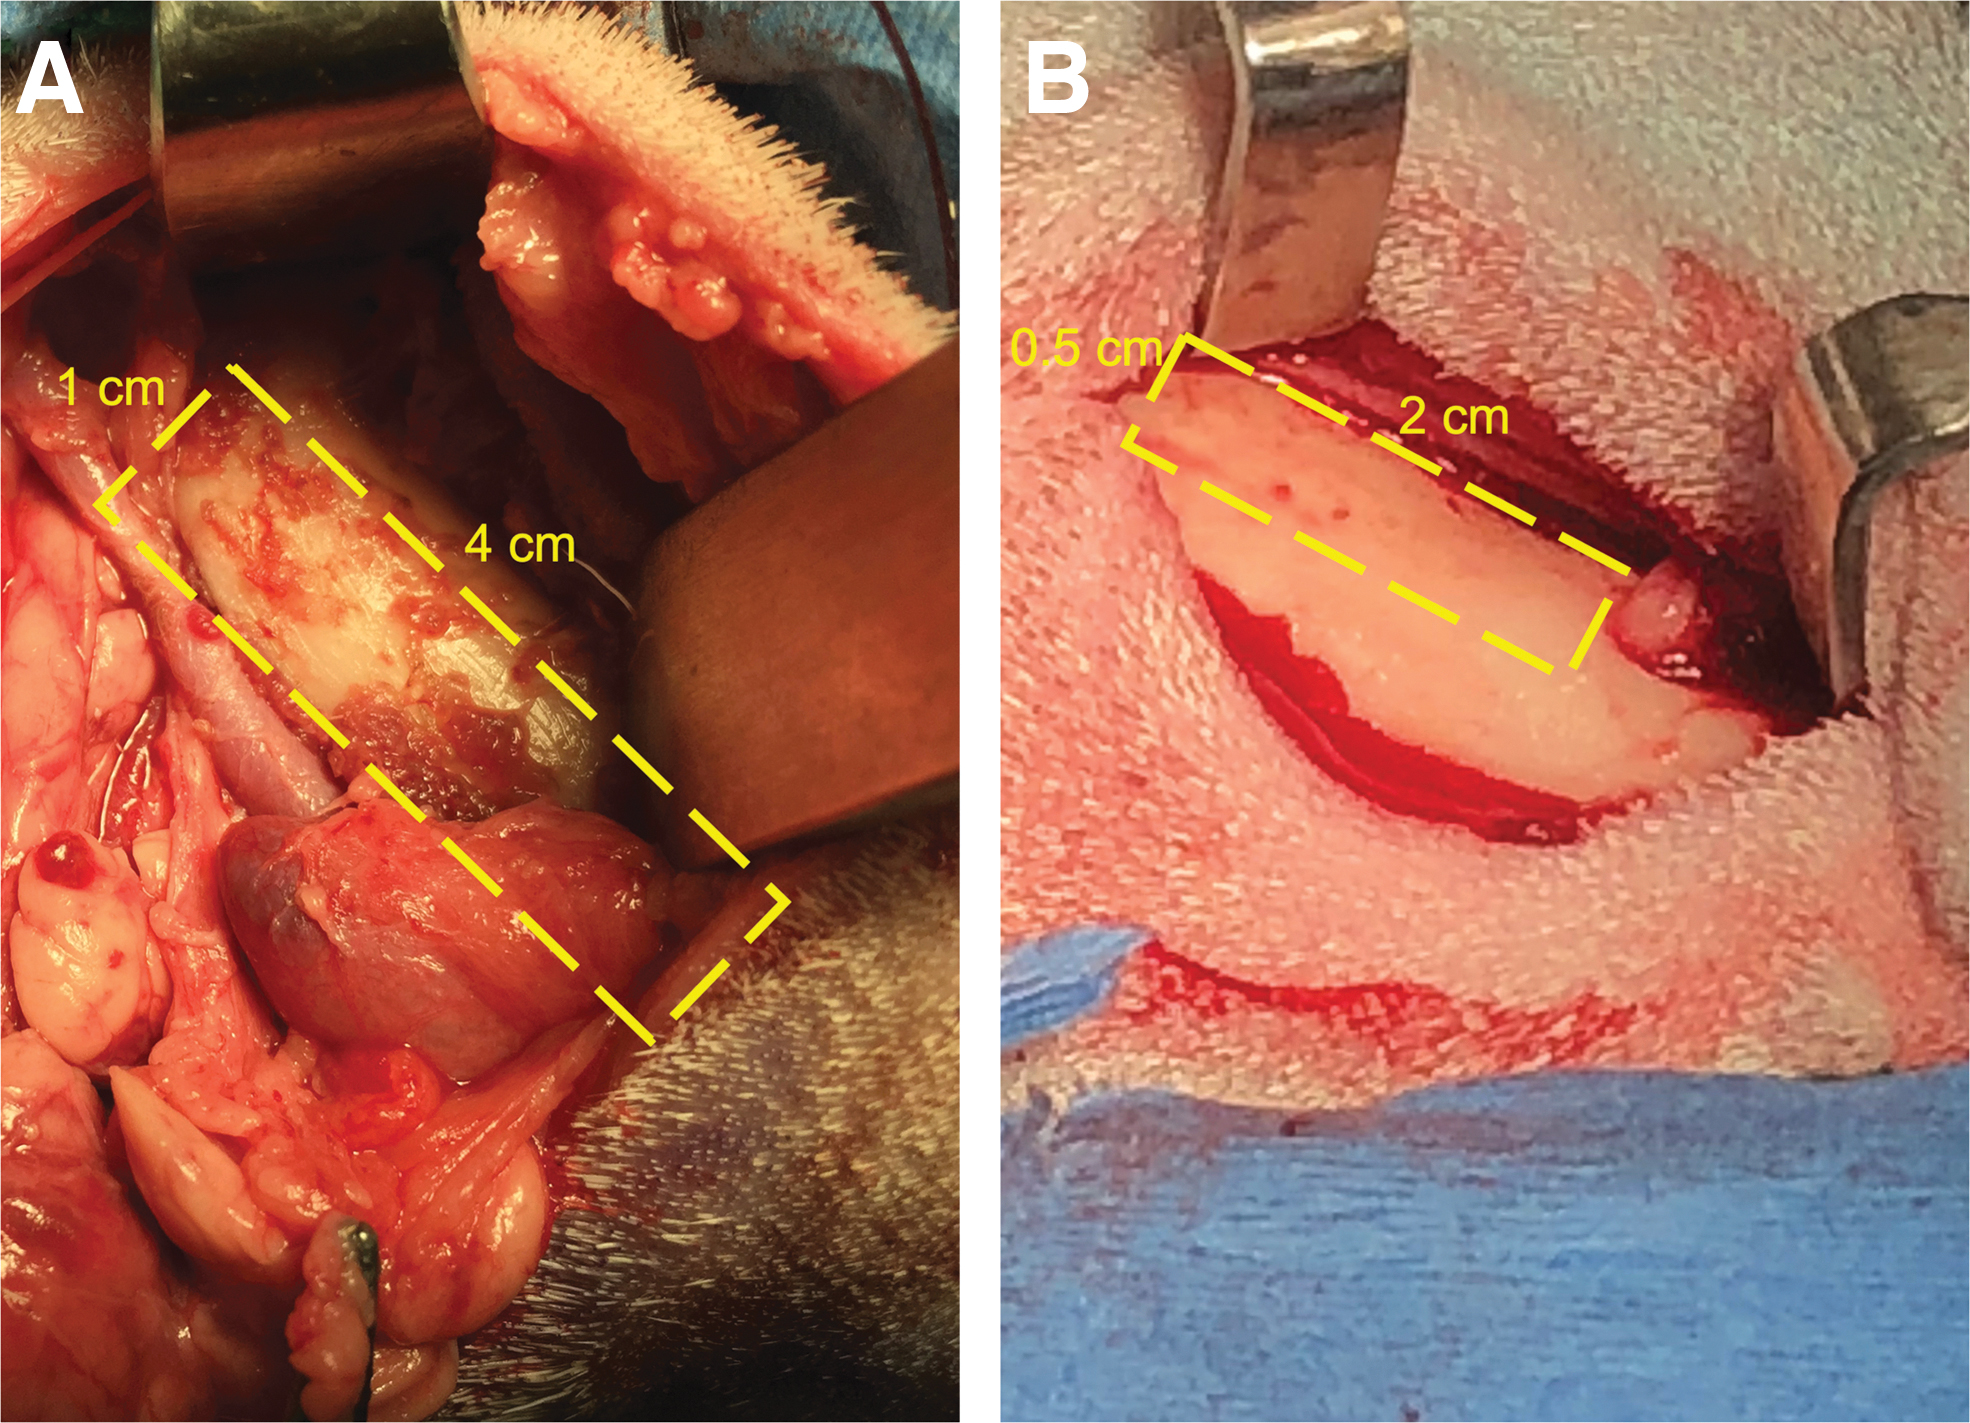
The defects created in the mandible for eventual transfer of bioreactor tissue.
Caution: For the superior segmental defect, the drill is in close proximity to the oral mucosa, so a retractor can be used to protect the soft tissue from the bur.
Caution: The nerve delivers sensation to the lower lip, so the sheep may experience problems with picking up food and eating if it is damaged. Use caution around the neurovascular bundle.
Utilize an osteotome and hammer with gentle tapping to further loosen the bone. Switch between the drill and osteotome as necessary to loosen the bone. After the bone is free, remove it.
Use the burr to smooth the edges of the bone to ensure rough edges are not likely to cause dehiscence of the oral mucosa. Irrigate the area well to remove bone dust and fragments.
Optional: Mandibular Infection
If a mandibular infection is to be created to test the release of antibiotics from the space maintainer or the effects of a localized bacterial infection on remote bone growth, place a sterile collagen sponge into the defect (1 cm in diameter).
Pipette bacterial strain of desired concentration into the defect site. We utilized 200 μL of S. aureus (bioluminescent Xen36) such that 106 colony forming units were pipetted onto the sponge.
Wait 15 min before implanting space maintainer.
Note: Do not irrigate further during the protocol or risk spreading infection or losing inoculum.
Use the dental drill or other tool to shape the space maintainer to fit snugly within the defect site. If using the larger angle of the mandible defect, a 4 L × 1 H × 1 W cm space maintainer should not need much adjusting. If using the superior segmental defect, a 2 L × 0.5 H × 1 W cm space maintainer may require a little trimming to fit within the defect as molar-canal distance varies slightly animal to animal. Porous space maintainers should be trimmed under irrigation to ensure melting acrylic does not clog pores.
After ensuring a snug fit with the space maintainer and that there are no sharp edges to damage surrounding structures, place the space maintainer within the defect. Bend the fixation plate appropriately.
Use the self-tapping screws to secure the space maintainer in place. Utilize two screws posterior, two within the spacer, and two anteriorly.
Close the deep tissues with interrupted resorbable suture (3-0 Vicryl).
Close the skin with running subcuticular resorbable sutures (3-0 Vicryl or polydioxanone) and bury the knots.
Postoperative care
Wipe the incision sites with saline.
Administer bupivacaine 0.25% at <1 mL/kg to both incision sites. Administer buprenorphine (SC at 0.01 mg/kg), ketoprofen (intramuscularly at 2 mg/kg), and Excede (6.6 mg/kg, if not creating an infection) and place a fentanyl patch (75–100 μg/45.5 kg) onto the back of the sheep.
Note: Ketoprofen is a nonsteroidal anti-inflammatory drug (NSAID). While several studies have shown that both selective and nonselective NSAID use poorly impacts bone growth, 24 other studies indicate that this effect is duration and dose dependent. 25 We use it for up to a week postoperatively, if needed for pain relief, but recommend other methods, such as the Fentanyl patch for long-term pain relief.
Stop isoflurane, remove the stomach tube, and extubate the sheep. After extubation and maintaining vitals and near normal body temperature, transport the animal back to the pen. Continue to monitor vitals every 15 min while animal recovers from surgery. Once able to stand, introduce the animal back with the fellow sheep. Allow regular diet (including probiotics for 3 days) and water.
Continue monitoring animals for signs of distress and intakes/outputs. Administer ketoprofen (2 mg/kg) and clean the incision with dilute chlorhexidine solution daily for 3 days. Any exposed surgical knots should be promptly trimmed.
Optional: bioreactor transfer
If study objective is to test the performance of the transferred tissue to the mandibular site, a second surgery should be performed. The preoperative course should be the same as above, with steps 1–6 performed to prepare the animals for surgery.
Palpate the ribs to locate the bioreactors. The previous skin incisions should be well-healed but visible after shaving. Use a 10 blade to open along the previous incision.
Carefully dissect through the muscle to reach the bioreactor that will be transferred to the mandibular defect site.
Note: We recommend that the chamber, that is, to be transferred is located and properly removed first in case there are issues (poor bone generation, surgeon error in harvesting vasculature, etc.) that may lead to the need to transfer a different bioreactor.
Cut the suture and remove the cuff from the bioreactor. Remove the PMMA portion of the bioreactor, leaving the generated tissue exposed (Fig. 4A).
Begin searching for the small intracostal arteries and veins that supply the generated tissue. They should be largest inferior and posterior to the bioreactor implantation site.
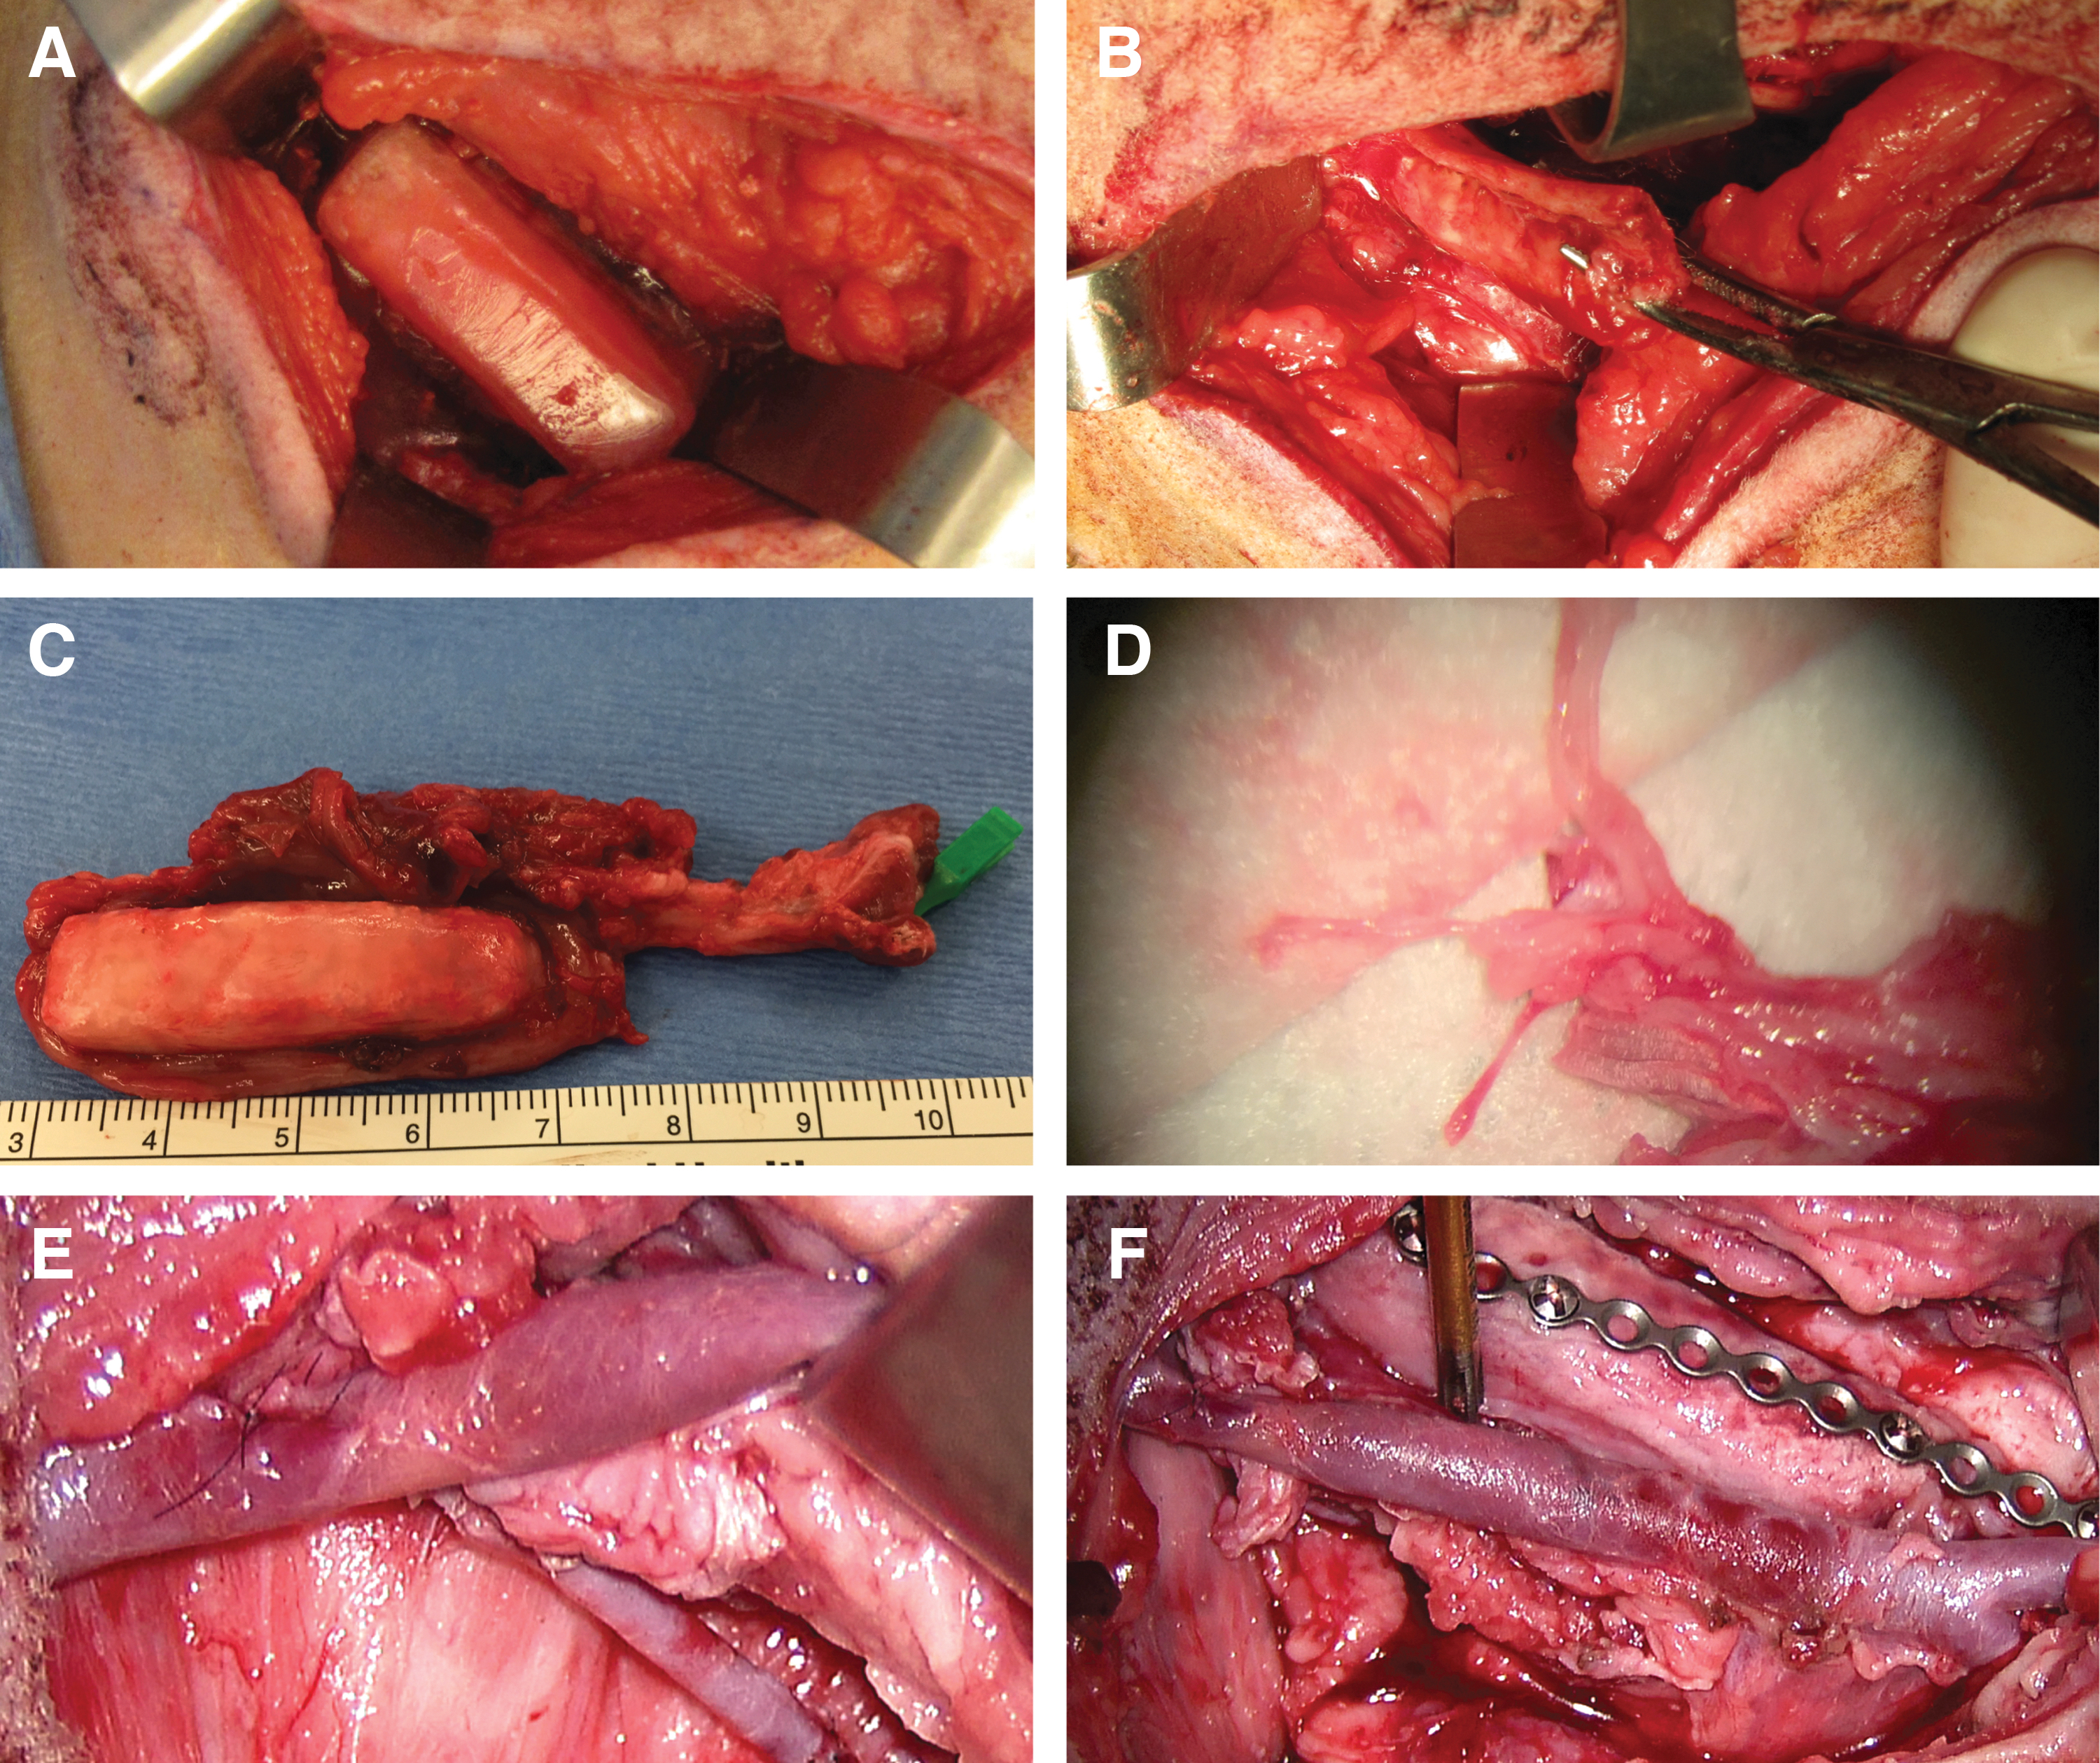
The bioreactor transfer surgery.
Note: Depending on the success of the bioreactor implantation surgery, there may be some scar tissue around the bioreactor that makes the location of vessels difficult.
Trace the vasculature as far posterior as possible to allow for long vasculature to give flexibility in anastomosis location.
Use a periosteal elevator to carefully remove the pleura from the pleural side of the generated tissue. If the bony tissue is continuous with the ribs, utilize the bone cutters to cut along the edge of the generated tissue to free it from the rib (Fig. 4B).
Caution: Due to some scar formation and the desire to preserve the generated tissue and vasculature, it is not uncommon to create a small pleural tear at this step. Suture it closed with some 3-0 Vicryl if small. Larger tears may need a chest tube, but we have never experienced this complication.
After the bioreactor tissue that will be transferred has been freed, the vasculature can be clamped with bulldogs and the vessels cut (Fig. 4C). Transfer the bioreactor tissue to the surgical table and cover with some gauze that has been soaked in sterile saline. If the vessels are particularly small, some lidocaine-soaked gauze can be placed over the vessels to encourage their dilation.
Remove the remaining bioreactors and generated mineralized tissue with or without vasculature. If qPCR is to be performed, biopsy punch the appropriate sides of the bioreactor and place these samples in RNAlater. Place the tissues in 10% neutral buffered formalin for fixing. Close the incisions with deep, intermediate, and skin sutures as previous.
Use a 15 blade to open the previous mandibular incision and bluntly dissect down to the bone. If a defect was not created during the first surgery, follow steps 25–30 above to create the mandibular defect now. If two surgical teams and two sets of tools exist, the following mandibular steps can be performed in parallel with the harvesting of the tissue for transfer at the rib site.
If a space maintainer was implanted during the first surgery, uncover the plate and screws. Unscrew the screws that anchor the plate to the mandible (two anterior and two posterior) and remove the space maintainer and plate as one piece.
Note: The previous surgery will create some fibrous tissue in the area. It is important that blunt careful dissection is used so the vessels for the anastomosis are not compromised.
Locate the vessels for anastomosis. If the defect at the angle of the mandible is being investigated, the vessels can be found in the neck as branches of the external carotid and accompanying vein. If the superior segmental defect is being investigated, a branch of facial artery and vein several centimeters posterior to the defect should be used.
Anastomose the vessels with the surgical microscope using 9-0 Ethilon suture (Fig. 4D, E). Use six interrupted sutures each in the artery and the vein. Verify patency with pulsations of the artery.
Utilize the same plate that held the space maintainer in place (Fig. 4F). Secure the generated anastomosed tissue with two screws posterior, two anterior, and two within the tissue.
Close mandible in deep and skin layers as done previously, with care not to suture through the newly formed anastomoses.
Perform postoperative monitoring and recovery as steps 37–40 above.
Euthanasia and specimen retrieval
Sedate the sheep with telazol (6–8 mg/kg). Weigh the animal and transport it to the necropsy suite. Inject pentobarbital/phenytoin (0.22 mg/kg) in the internal jugular or cephalic vein. Monitor the animal for cessation of heartbeat and respirations.
If the optional second surgery to transfer the bioreactor tissue was not performed, recover the tissue by opening the rib incisions, dissecting down to the rib, and carefully removing the bioreactor tissues. Remove any samples for qPCR.
If the optional second surgery to transfer the bioreactor tissue was performed, the mandible should be removed. Incise the buccinator muscles from the edges of the mouth posterior to the condyle. Dissect the skin from the oral mucosa on the buccal side of the mandible and continue to dissect along this plane inferiorly to the inferior border of the mandible and anteriorly and posteriorly until the skin is removed from the exterior of the mandible. On the lingual side, make an incision of the mucosa under the tongue from the anterior to posterior edge of the lingual side of the mandible. After incising the mucosa (this prevents mucosal tears over the defect site), dissect more inferiorly through the tongue muscles to reach the inferior edge of the mandible. At this point, the skin and tongue can be removed from the mandible, and the focus can shift to the posterior muscles (such as the masseter and pterygoid). The temporomandibular joint can be disarticulated by cutting through the muscle, and the mandible can be removed.
Take some images of the mucosa overlying the defect and contralateral side and make some gross observations of the mandible before fixing.
Use a diamond saw to isolate the region of interest of the mandible. This allows for better penetration of the fixative, as well as allows the sample to fit within the microCT. Under irrigation, use the diamond blade to incise ∼1 cm anterior and posterior to the reconstructed defect and make the same cuts on the contralateral control side.
Place the cut mandible in 10% neutral buffered formalin at room temperature.
After 1 week, transfer the fixed bioreactor tissues and mandible to 70% ethanol for longer term storage.
Analysis
Perform qPCR for selected primers on the biopsy punches of bioreactor tissues stored in RNAlater.
Perform microCT of both the bioreactor-generated mineralized tissues and cut mandibles.
Using a diamond blade saw, cut the bioreactor specimens into smaller sections, depending on what additional analysis is to be done. Larger bioreactors (4 cm in length) can be used to perform three tests (i.e., histology, compressive mechanical testing, screw pullout testing), while smaller bioreactors (2 cm in length) should be used for two tests (i.e., histology and compressive mechanical testing).
Embed and stain the samples for histology. Score the histological sections using the previously published scoring matrices.12,13,15
Perform mechanical testing of the remaining portions of the bioreactor tissues. For compressive mechanical testing, ensure that the sample does not exceed an aspect ratio of 2:1 in any direction. 12 For screw pullout testing, utilize a dental drill with 1.8 mm diameter bit and 5 mm stop to predrill screw holes. Screw in 2.0 mm screws to a depth of 5 mm.
Anticipated Results
The protocol described in this article has been validated with several projects that have investigated the effect of different variables on the regeneration of bony tissues. These studies have studied the influence of bioreactor geometries, scaffold materials, and sites for tissue transfer, and these previous results have been published with in-depth discussions in other peer reviewed journals.10–13,15,16 Utilizing this model, we can reliably generate bone of geometries approximating the implanted bioreactor and compare the performance of various graft materials. Furthermore, we can transplant these tissues to a defect site created at the time of the bioreactor implantation and filled with a space maintainer or created at the time of the bioreactor harvest. Transferred tissues can be transplanted as a vascularized flap or as an avascular graft. Finally, this model can also be utilized to determine the interplay between a localized infection and remote bone growth.
Using the presented methods with the appropriately trained personnel, no significant intraoperative complications have occurred, with the animals expected to undergo two surgeries doing well after each. The analgesia and antibiotics within this protocol have been sufficient for the bioreactor implantation with minor complications (small seroma, small mucosal dehiscence) being observed infrequently with mandibular defect creation; however, none of these complications resulted in animals being removed before the study end points. The primary methods for the evaluation of the tissues formed within the bioreactors harvested after 9 weeks are microcomputed tomography, histomorphometry, and mechanical testing, while those that are harvested after transfer to the mandible are evaluated through microCT and histology. We have also investigated qPCR to determine the gene expression within different regions of the generated tissues; however, it has not been a major metric in determining the quality of the formed bone.
MicroCT
MicroCT analysis is nondestructive and allows for the specimens to be utilized for further testing. It can be utilized to visualize bony structures without disturbing the soft tissue, and it can generate quantitative values for an area of interest, assuming that scanning parameters are similar across samples (Fig. 5). Scanning parameters should be chosen to balance desired resolution and scanning time. 26 As samples are fixed and stored in 70% ethanol before scanning, it is important that samples remain moist for the duration of the scanning.
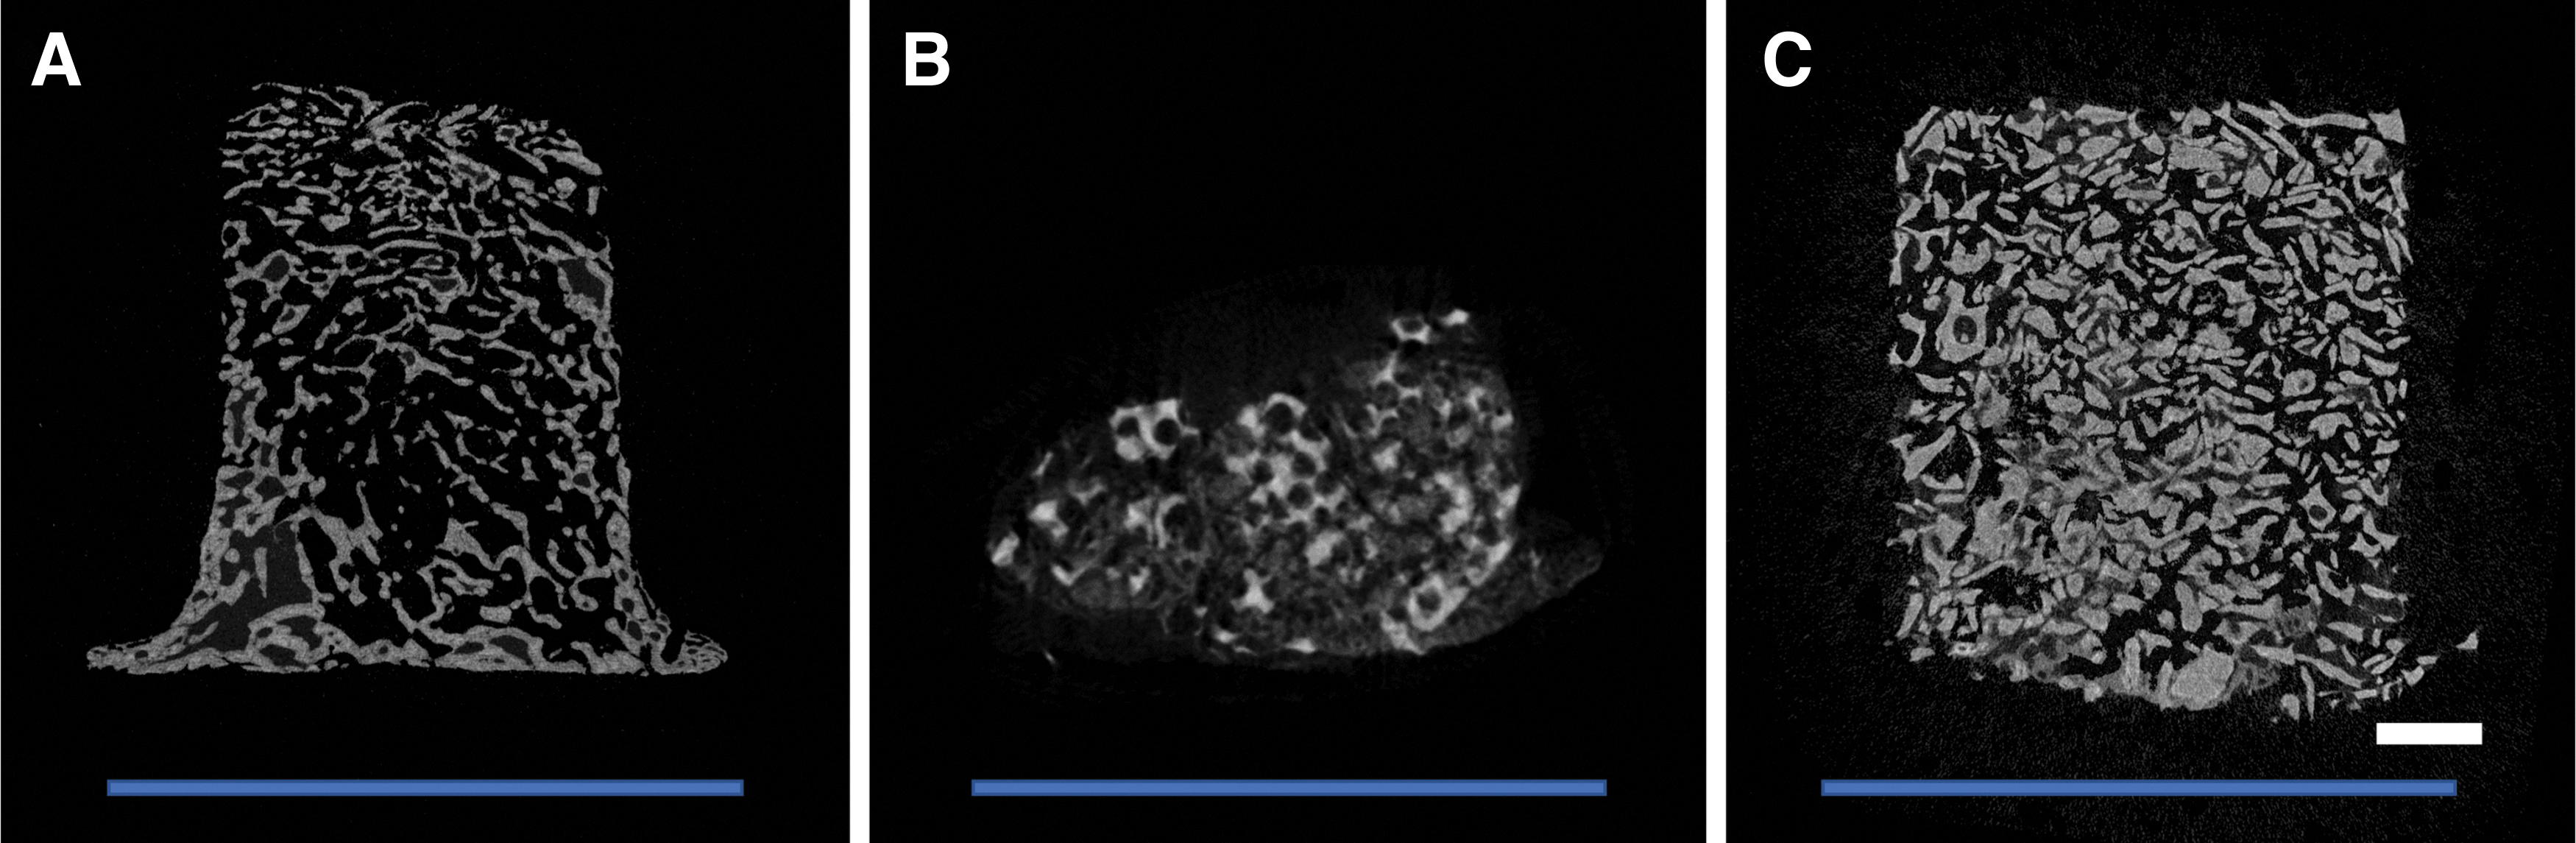
MicroCT images from previous studies.
Radiographic analysis has been utilized to determine the bone volume/total volume (BV/TV), the trabecular spacing (Tb.Sp.), trabecular number (Tb.N.), and trabecular thickness (
Histology and histomorphometry
Histological sectioning is a destructive process. Samples can be decalcified before paraffin embedding or embedded in methacrylate without need for decalcification. 27 We have utilized primarily methacrylate embedding for this model as the space maintainers, fixation plates, and screws require diamond blade saws for sectioning. Methylene blue and basic fuchsin can then be utilized to stain bone red, nuclei blue, and collagen and fibrous tissue purple (Fig. 6). After digitization of images, histological scoring can be performed using blinded scorers using previously established scoring systems.12,13,16 The height of viable bone within the bioreactor and the area of bone within the bioreactors can also be quantified by histology. 12
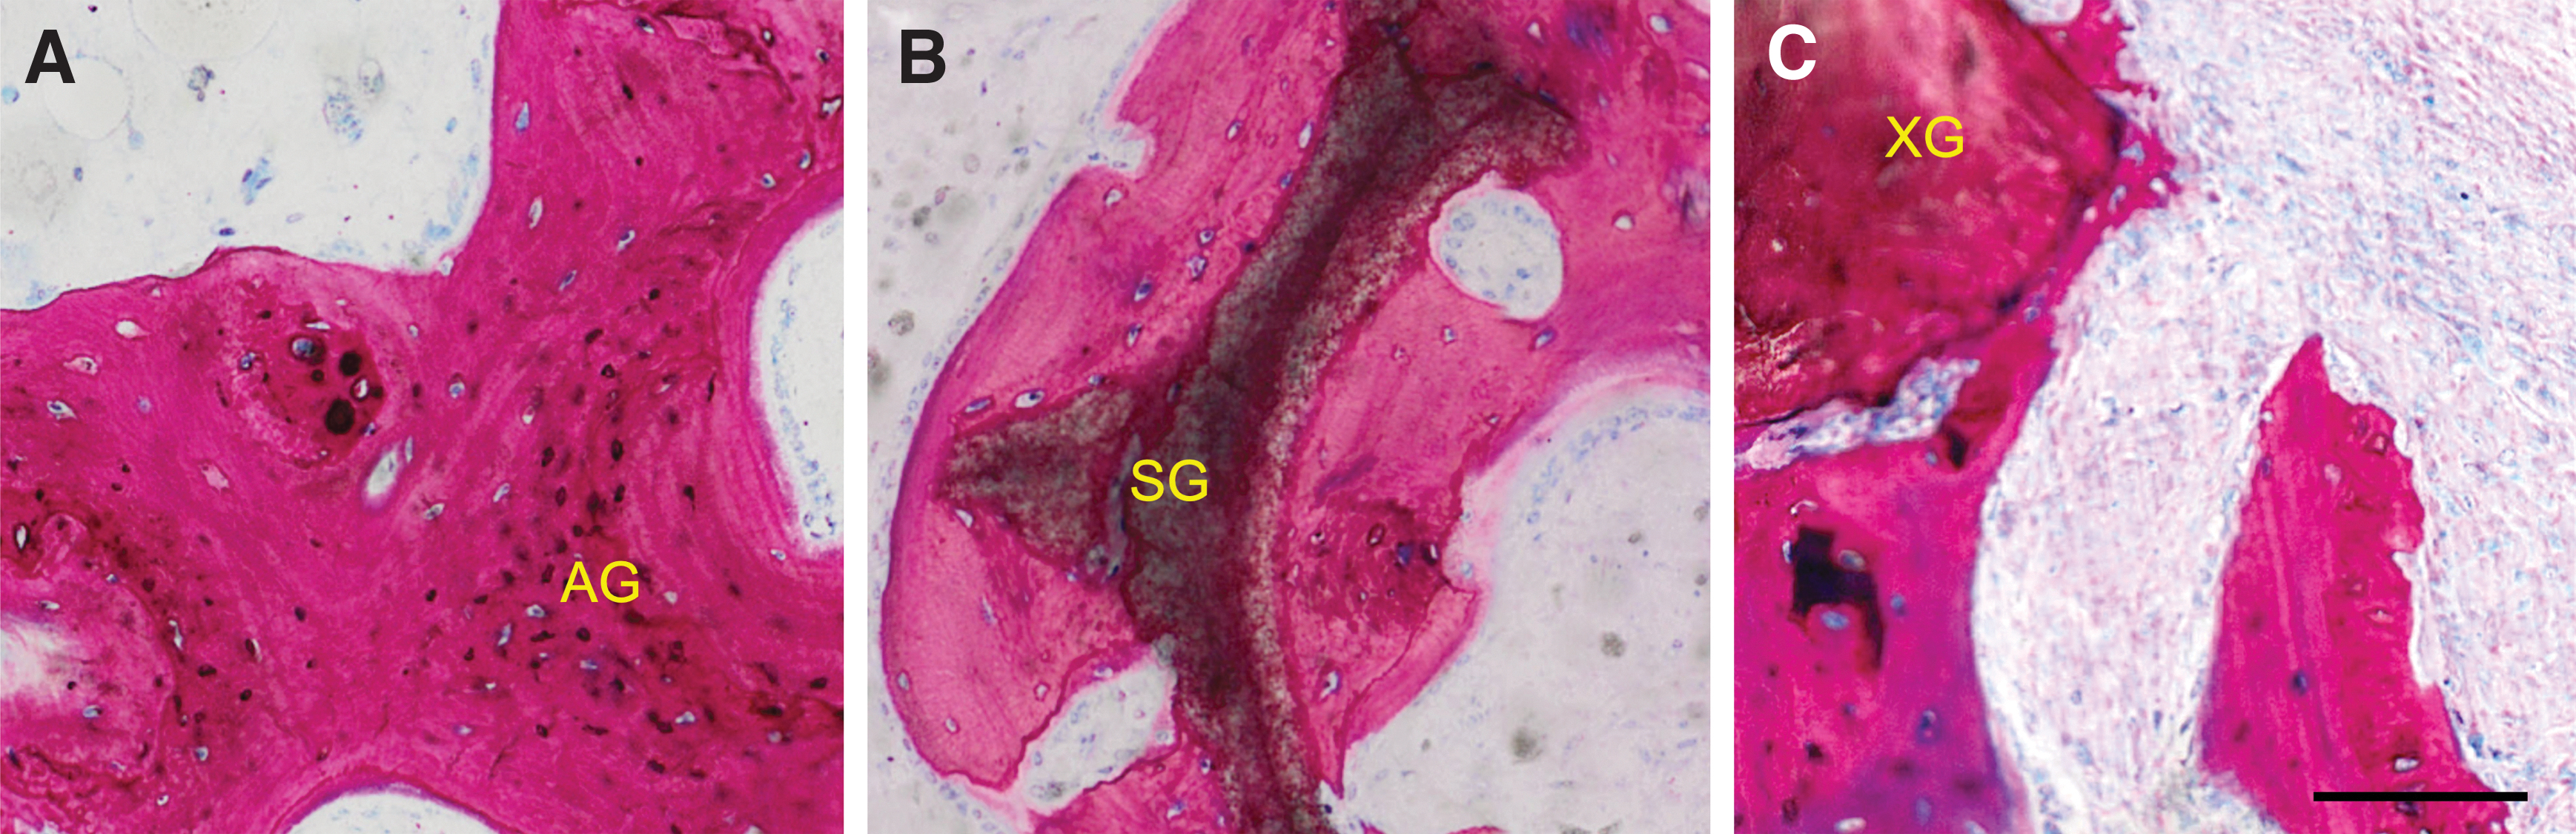
High magnification images acquired from bioreactor tissue sections embedded in methacrylate and stained with methylene blue and basic fuchsin.
Bioreactor tissues have previously been scored for tissue type, tissue maturity, substrate score, and presence of osteoclasts. We have previously demonstrated that there was no significant difference in tissue type or tissue maturity between autograft containing bioreactors and ceramic calcium phosphate synthetic graft 16 ; however, the autograft-containing bioreactors had significantly higher substrate scores than the synthetic graft-filled bioreactors, implying better coverage of the autograft with newly formed bone. 12 We have also demonstrated that autograft-containing bioreactors had higher scaffold coverage than cancellous bone chip-filled bioreactors. 13 In addition to histological scoring, histomorphometry such as fractional depth and ratios of chamber contents (if able to threshold between graft and newly formed bone) can be computed. Tissue transferred to the mandible can also be scored histologically for bony bridging and screw integration within the scaffold. 12 Image analysis can also be utilized to measure the dimensions of the adjacent native mandible.
Mechanical testing
Mechanical testing is a destructive test that should be designed for the intended application of the graft tissue. Compressive mechanical testing is commonly used for tissue that may be needed for load bearing applications, 28 while screw pullout testing should be used for tissue that will be expected to hold screws. 29
The compressive modulus and compressive strength have been successfully measured. Tissue specimens of roughly cubic geometry (no aspect ratio was >2) underwent unconfined mechanical testing (Fig. 7A). Results showed that the synthetic graft-containing bioreactors generated tissues with a significantly lower compressive modulus than native rib, but that autograft was not significantly different from either. 12 Compressive modulus for specimens generated within autograft-containing bioreactors has also been shown to be significantly higher than xenograft-containing bioreactors within the same treatment group. 13 Screw pullout testing was performed using screws of same diameter and penetration depth as those utilized to fix the mandible in place (Fig. 7B, C). We demonstrated that bony tissues generated in autograft-filled bioreactors had higher maximum pullout forces than those from xenograft-filled bioreactors. 13

Mechanical testing of bioreactor tissues.
Conclusion
This protocol describes a versatile large animal model of in vivo bioreactors that allows for the investigation of different bioreactor geometries, manufacturing strategies, time of implantation, and graft materials, and for the transfer of the generated tissues to a mandibular defect. The model utilizes the periosteum to generate the bone without the need for extrinsic growth factors, allowing for true comparisons of scaffold material properties. To date, we have experienced no clinically significant complications that have required withdrawal of animals from the study. The generated tissues can be evaluated using polymerase chain reaction, microCT, histology, and mechanical testing. This large animal protocol allows for the optimized generation of bony tissues of clinically relevant sizes and customized geometries from a variety of different graft types and can serve as an important model system for studying bony tissue generation and subsequent reconstruction of defects using different physiologic and anatomic variables.
Footnotes
Acknowledgments
E.W. and A.M.T. thank the Baylor College of Medicine Medical Scientist Training Program. The authors acknowledge the help and support from Sarah Fraizer for her assistance in the description of the preoperative and postoperative monitoring handled by veterinary staff at the University of Texas Health Science Center. We acknowledge Sarita R. Shah and Mollie M. Smoak for their assistance with photography. The authors thank Casey Rehfeld and Zeke Riser of KLS Martin for surgical instrument support.
Disclosure Statement
No competing financial interests exist.
Funding Information
This work was supported by the Army, Navy, NIH, Air Force, VA, and Health Affairs to support the AFIRM II effort (Award No. W81XWH-14-2-0004); the Osteo Science Foundation; and the NIH (Grant P41 EB023833). E.W. is supported by the National Institute of Dental and Craniofacial Research (Grant F31 DE027586). Opinions, interpretations, conclusions, and recommendations are those of the authors and are not necessarily endorsed by the Department of Defense.