
Abstract

Introduction
When setting up cellists, each teacher has a collection of phrases and illustrations for establishing correct playing position. While most string teachers feel comfortable setting up groups of beginning cellists using their preferred methods, a truly ergonomic cello posture is body specific. Unlike most general guidelines that serve to approximate cello setup, ergonomic setup requires an understanding of the underlying principles of a balanced and free-moving cello position. In this article, I describe the feel of an ergonomic cello posture along with simple, repeatable motions that instill a sense of balance in cello players. This information is applicable for teachers who are cellists and non-cellists alike and for teachers working in one-on-one or group settings. With more experienced students, understanding the principles of ergonomic posture enables us to remediate poor habits that cause discomfort and tension or otherwise inhibit progress.
Underlying Principles
In my examination of cello pedagogy—especially setup—I found that expert cello teachers do not strictly adhere to a specific set of rules (Flippin 2017). The various games, diagrams, and checklists in our method books are often negotiable as they deal with different people and body proportions. 1 The underlying principles of a good cello setup include the cellist’s ability to move freely and a sense of constant balance between the body, cello, and bow.
The following sections describe cello setup with a focus on these principles.
The Sitting Stance
Standing First
I term the ideal posture of a seated cellist as “The Sitting Stance.” Common directives such as “sit up straight” or “feet flat on the floor” are intended to elicit a proper posture but often cause unnecessary tension or strain. While the imagery of sitting up “straight” may improve a slouched posture momentarily, the effort to straighten the spine may have unintended consequences.
Finding the sitting stance begins by standing tall. Use the imagery of a puppet with a string attached to the crown of your head. 2 Imagine a puppeteer lifting the string upward and feel yourself become “tall” while keeping your feet flat on the ground.
A helpful approach for those exhibiting tension and lack of free movement is to bend forward at the waist allowing your arms to dangle and swing freely (I tell classes to “reach your fingertips toward your toes” while demonstrating the motion). Then, slowly bring yourself upright, imagining that you are stacking your vertebrae on top of one another one at a time. 3
Bringing the Stance to the Chair
From this tall stance, set your feet approximately shoulder-width apart and slowly lower yourself by bending your knees. Feel how the engaged leg muscles control this descent. To raise yourself back to an upright stance, exert force from your legs, through your feet, into the ground. The key to the sitting stance is that your body, from the waist up, is the same in your seated position as your tall stance. Once you understand the feeling of raising and lowering yourself with your knees, stand in front of your chair and lower yourself until your sit bones rest on the chair. 4 While seated, the sitting stance allows you to stand without excessive motion such as having to rock forward or pull one’s feet inward before standing.
Balance of the Sitting Stance
A simple rocking exercise will establish the cellist’s sense of balance. By rocking back and forth while maintaining the tall, seated stance, you can sense certain muscle groups engaging. Leaning forward, the back muscles engage. Conversely, the abdominal muscles engage while leaning backward. There is a balance point where both muscle groups are at rest. Without the cello, this balance point is where the shoulders are directly above the hips. You can recognize this point by feeling balanced on your sit bones. With a cello, cellists will achieve this balance by leaning forward a few degrees which will counter the weight of the cello.
The Knee-Hip Alignment
Sitting with feet flat on the floor assumes the cellist has a chair of an appropriate height relative to their leg length. Optimally, the cellist’s knees are slightly lower than their hips. The slant of the upper leg creates a slight forward lean that maintains the balance described previously. This alignment depends on the chair’s height in relation to the cellist’s height. However, most classrooms contain chairs with uniform height even though the students’ heights vary. One solution may be to furnish height-adjustable chairs for all cellists, but this is impractical. Fortunately, cellists do not need chairs to be of a precise height because they can adjust their knee height by changing the position of their feet.
In the seated position, practice tracing the letter “V” on the floor with your feet. With your feet flat, they are at the upper ends of the “V,” and by drawing them inward, your heels will meet directly underneath you at the vertex of the “V.” By moving the feet closer together (toward the vertex), you can lower the height of your knees (See Figures 1 and 2).
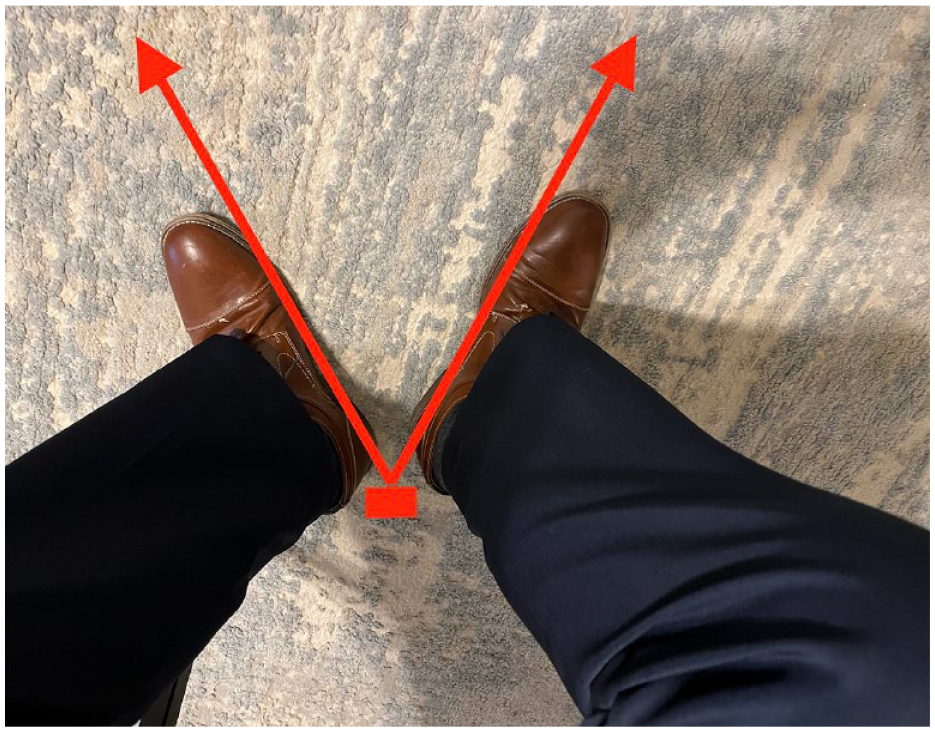
Cellists can lower their knee height by pulling their heels together along the imaginary “V.”

Cellist’s feet are commonly placed at the ends of the imaginary “V.”
The hip-knee alignment is particularly important for taller cellists. If they sit with their knees higher than their hips, they strain muscles to maintain a proper seated posture. They will either give in to gravity by slouching back in the chair or experience discomfort from compensating for lack of balance. It is possible for young cellists to achieve a comfortable posture from the instructions “feet flat on the floor” but later become uncomfortable as they grow. The knee-to-hip alignment should be revisited in older cellists who have experienced significant growth since their beginner years. When playing in different chairs (such as at a performance venue where the provided chairs are not designed for musicians), awareness of this alignment enables musicians to adapt to differing chair heights.
The ultimate sign of an ergonomic sitting stance is that the cellist’s posture from the waist up is the same—freedom of movement in their arms, shoulders, and neck—as when they stand fully upright.
Bringing the Cello to the Cellist
When setting up the cellist for the first time, forgo all “tricks” about estimating endpin length. Instead, align the instrument with the cellist’s unique body. Once aligned, secure the cello in place by dropping the endpin to the floor.
Start from the sitting stance and stand facing the student. 5 Hold the cello with your left hand on the neck and right hand under the upper edge of the C-bout, with the back of the cello facing the student. Ask the cellist to place their hands palms down on their knees and maintain this balanced posture until the cello is in place. Gently lean the cello against the cellist. Align the neck of the cello with the neck of the cellist. The necks should be parallel; they should not form a “V” angle. The necks of cello and cellist should be close, with the cello hovering above, but never touching, the cellist’s left clavicle. The ideal amount of tilt is achieved when the cello makes contact with the inside of the cellist’s left knee (typically, but not always just below the C-bout) as well as with the cellist’s chest to the side of the sternum under the breast. 6 When the cello is leaning into the cellist, the student secures the cello by placing their hands in the upper edge of the C-bout. Next, drop the endpin to the floor and adjust the rock stop or strap to keep the cello in place. The student then releases their hands and feels the cello leaning into their body.
The cello is supported on the left side of their body. Even if the legs appear symmetrical, moving the right leg away from the cello does not move the cello, but moving the left leg away will cause the cello to rotate outward on the endpin. The alignment of the fingerboard and angle of the cello are both non-negotiable variables. Other checkpoints, such as the C-peg touching the head and the knee contacting below the bout, are negotiable in service of comfortable left hand and bow placement. If the cello sits too high, the left hand will overreach to hang on the fingerboard. If the cello sits too low, the bow arm may collide with the knees. If the cello is so large that fixing one of these problems causes the other, the cellist needs a smaller-size instrument.
Checkpoints
Teachers should revisit and reinforce all aspects of cello setup as players grow and advance. A previously balanced setup requires resetting after a growth spurt. Most importantly, introducing new skills may reveal previously invisible problems with setup (e.g., being unable to properly bow the A-string in the upper half of the bow). The following checkpoints are useful indicators of ideal balance of the instrument to the student’s body.
“The ultimate sign of an ergonomic sitting stance is that the cellist’s posture from the waist up is the same—freedom of movement in their arms, shoulders, and neck—as when they stand fully upright.”
Weight-Bearing Contact Points
The weight of the leaning cello is supported against the left side of the cellist’s body. Cellists can move their right knee away from the cello and the instrument will not move, but if they move their left knee, the cello will twist along the endpin’s axis. Similarly, the upper bout of the cello rests against the chest, not the shoulders or the stomach. We can visually confirm that the chest is supporting the weight of the cello by having students raise both hands in the air (Phyllis Young might have her students say, “Look, Ma! No hands!”). 7 While raising and lowering the arms, the cello should remain balanced against the cellist’s chest.
Space and Alignment of the Neck
A cello’s neck floats above the player’s collar bone with a small space between the cello’s scroll/neck and the cellist’s shoulder. The ultimate proof of this placement is the cellist’s left arm bringing the fingers to rest comfortably in the first position on the fingerboard.
The neck of the cello and cellist should align. For cellists with longer arms, the necks of the cello and cellist might touch, but there should never be pressure. More important than having contact or slight separation, however, is avoiding the “V” angle between cellist and cello necks (see Figure 2). If moving the cello’s neck toward or away from the cellist, make the same adjustment to the endpin placement to maintain the parallelism of the fingerboard and cellist. This alignment supports the ideal angle of a balanced bow arm motion and the left arm’s ability to maintain intonation while carrying the fingers across strings.
Common Problems and Successful Solutions
Twisted Shoulders
Cellists should sit with their shoulders directly above their hips, with a slight forward lean that balances the weight of the cello. Often, cellists will twist their upper bodies, so the left shoulder is further back than the right. This may be caused by discomfort in the left arm, or their body compensating for the weight of the cello. In either case, revisit the steps of setting the cello to the cellist, maintaining the sitting stance each step of the way. If the problem persists, try lowering the height of the cello or using a steeper angle so that the left arm positions the left hand more in front of than on top of the shoulder.
Diverging Necks
When standing in front of a cellist, the cellist’s neck and the cello’s fingerboard should appear parallel. When cellists sit with the cello’s neck angling away from their bodies, the left hand cannot comfortably rest on the fingerboard, and they cannot easily bow parallel to the bridge (See Figures 3 and 4). This misalignment may happen for a few reasons. Often, the inexperienced cellist is reacting in discomfort to the C-peg touching their head, or they turn their body to look at the left hand and do not return to their proper alignment (teachers, beware the common directive “check your tapes” when correcting intonation errors. It will prompt students to look sideways at their left hand and cause misalignment). If the student is uncomfortable with the peg contact, you can try raising the endpin to put the peg a bit further back, or rotating the cello slightly along the endpin axis, raising the A-string. You could also shift the entire cello to the left of the cellist a few inches. When making this adjustment, stand in front of the cellist. Move the endpin to your right (cellist’s left), while ensuring that the entire instrument, from endpin to scroll, moves together. This way, you increase the distance between the cellist’s neck and the cello’s fingerboard without changing the angle of the cello alignment. If the problem persists, you may inquire about “posture pegs.” These modified tuning pegs require a special tool to adjust but do not protrude from the peg box.
Example of a properly aligned cello.
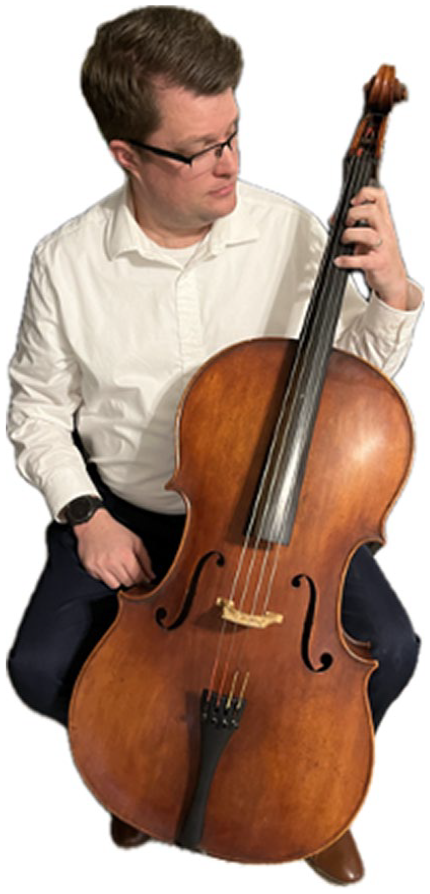
A common misalignment.
Cello Too Slanted or Upright
The default angle of the cello is determined by the distance from the cellist’s hip to their knee. When seated, the cello position should resemble the hypotenuse of a right triangle when compared to the cellist’s thigh and torso (see Figure 3). The angle of the cello along its horizontal axis allows gravity to channel the bow arm’s weight into the cello, resulting in resonant sound that does not require excessive exertion of the bow arm (Figure 5). 8
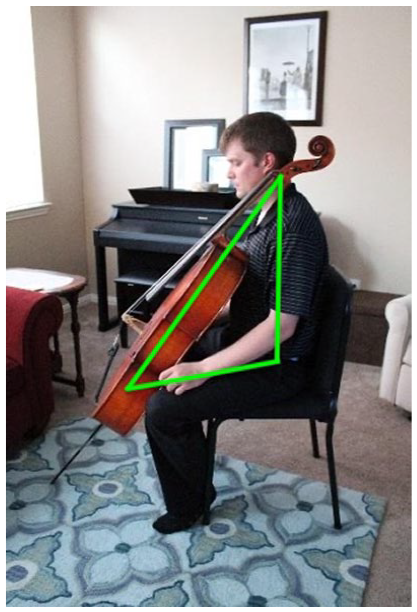
The cello forms the longest side of a triangle that includes the cellist’s leg and torso.
A cello that is too upright results in a tense bow hand and arm since the cellist must “grip” the bow in the air instead of allowing it to rest on the strings. The overly-upright cello also moves the fingerboard away from the cellist’s left shoulder, forcing the left hand to reach out and “grab” the fingerboard and impeding the left hand’s access to the length of the fingerboard. 9 A vertical cello can be a sign that the cello has come too far inside the cellist’s leg, and the bow will likely hit their legs on the A and C strings. If the cello is too vertical, lengthen the endpin and move it further away. If the hip-knee alignment is correct, redo the steps of leaning the cello into the cellist, carefully aligning the cello with the cellist’s inner left knee and chest.
A cello that is tilted too far along the horizontal axis causes different problems. Overtilting moves the bow’s contact point further from the cellist’s body. It can also bring the cello out from the cellist’s left knee, and it can bring the fingerboard above and behind the cellist’s left collarbone. The following observable problems may indicate that a cello is too tilted, and the cellist needs help re-aligning their cello:
The cellist is resting the cello on their knee instead of beside or within their knee.
The cellist is overextending their bow arm to play in the upper half of the bow on the A-string.
The cellist is reaching their hand behind their face to play in first position.
The cellist is slouching or straining to maintain a sitting stance under the weight of the cello.
In cases of excessive tilt, a taller cellist may need a taller seat so that their hip-knee alignment creates a proper angle.
Video Demonstrations
Because cello playing is motion-based, video examples can more effectively convey the feel of cello playing than photos. Below is a sampling of video resources I found helpful for establishing posture and basic technique.
An Organized Method of String Playing by Starker and Bekefi (2010) is a widely used set of exercises still in publication and available from most music retailers. Less known and more difficult to find is a video of the same title. In the video, approximately one hour in length, Starker presents the basic facets of his cello method to a live audience, demonstrating and explaining cello setup, left-hand technique, and basic bow strokes. 10
A Lesson with Leonard Rose (Rose 1978) is another video resource found online. The footage shows Leonard Rose, a twentieth-century cellist, explaining and demonstrating cello technique. This video is easily accessible thanks to the work of Rose biographer, Steven Honinberg. The entire film can be seen on Honinberg’s YouTube channel and is featured on CelloBello. 11
CelloBello (Katz 2017) is a contemporary online resource and a project of cellist and professor Paul Katz. The mission of CelloBello is to “[n]urture and strengthen the individual cellist and a global cello community through free online instruction and advice from renowned cellists and teachers.” 12 The site includes numerous video segments of lessons between Katz and students from his studio. Other resources include interviews, blog posts, and articles by renowned cellists and artist teachers
Summary
An ergonomic posture is essential to cellists’ ease and longevity of playing. A good setup varies from cellist to cellist due to unique body proportions, and individual setup is bound to change as young players grow. Cellists and teachers of cellists can achieve this balanced setup at all phases of development by prioritizing the ability to move freely and the constant sense of balance between body, cello, and bow.
Footnotes
Notes
Sam H. Flippin (